
Withdrawal
1. Disconnect the negative cable from the battery.
2. Chock the rear wheels and apply the parking brake.
3. Release nuts of fastening of the left forward wheel and lift before the car. Put the car on the safety stands.
4. Remove the left front wheel for easier access to the crankshaft casing in front of it.
5. Using a jack, provide additional support to the engine. At the same time, place a piece of wood between the oil pan and the jack to prevent damage to the pan.
6. Remove the left engine support (section 17 of this Chapter).
7. Remove spark plugs and drive belt (see chapter 1).
8. Put the piston of the first cylinder at TDC (see Section 3).
9. Remove the upper drive belt guard so that the cover gasket remains on the block: it cannot be removed or replaced without damage.
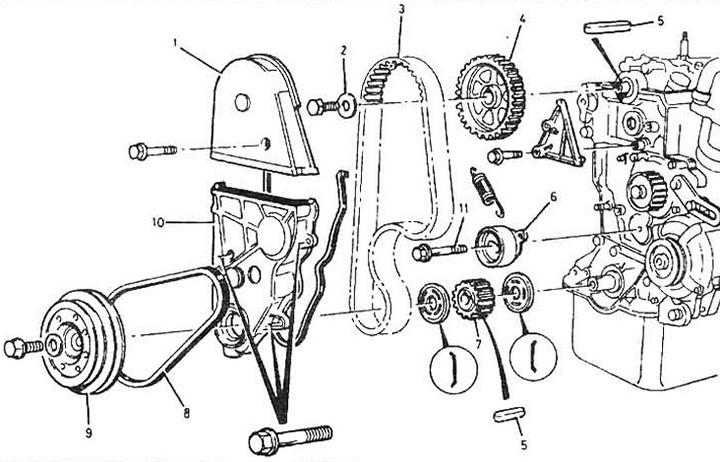
Pic. 7.9 Camshaft drive belt
1 - top cover; 2 - washer; 3 - belt; 4 - camshaft gear; 5 - key; 6 - belt tensioner; 7 - crankshaft gear; 8 - generator drive belt; 9 - crankshaft pulley; 10 - bottom cover; 11 - tensioner adjusting bolt.
10. Remove the generator and its bracket (see chapter 5).
11. Disconnect the power steering pump (power steering) without removing the oil hose and take it aside (see chapter 10).
12. If there is an air conditioner: disconnect the wires and remove the air conditioner compressor without dismantling the refrigerant hoses (see chapter 3).
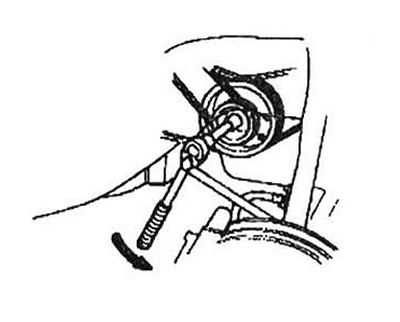
13. Using a large screwdriver inserted into the teeth of the flywheel, block the rotation of the crankshaft.
Loosen the bolt securing the pulley to the crankshaft. Remove the pulley from the shaft
14. Remove the water pump drive pulley.
15. Remove the lower part of the drive belt guard.
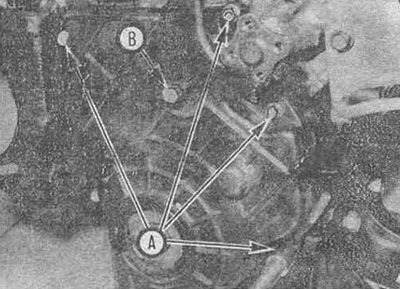
Pic. 7.15 To remove the bottom cover of the drive belt, unscrew bolts A. Bolt B is used only to adjust the belt tension
16. If you intend to reuse the belt, mark the relative position of the belt and the drive gear pulley, indicating the direction of rotation.
17. Loosen the belt tensioner bolt, remove the outer belt guide from the crankshaft sprocket and remove the belt. Note the installation position of the outer belt guide. If you want to replace the front crankshaft oil seal, remove the crankshaft sprocket and inner belt guide.
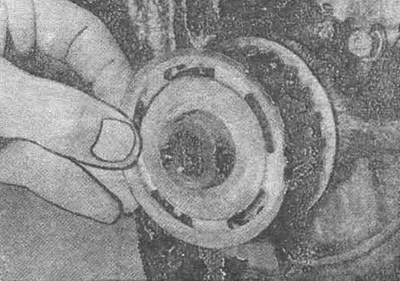
Pic. 7.17 Remove the outer belt guide: note that the bent part of the guide points away from the belt (belt removed)
18. If you want to replace the camshaft or its oil seal, secure the camshaft from turning with a large screwdriver by inserting it through the drive gear pulley. Loosen the bolt and lubricate the toothed pulley. Don't forget to pull out the toothed pulley key.
Inspection
19. Turn the belt tensioner by hand and rock it from side to side. Replace the idler if axial play or uneven rotation is found.
20. Check the belt for wear (especially the bearing side of the teeth), cracks, cuts, abrasions or oiling. If at least one of the specified defects takes place, replace a belt.
Note: Replace the belt each time it is removed, regardless of the vehicle's low mileage since the previous replacement and the belt's good appearance. Never install an old belt if there is the slightest doubt about its suitability.
Installation
21. If you removed the toothed pulleys, install them. do not forget to install the camshaft sprocket and crankshaft sprocket inner belt guide. Tighten the toothed pulley bolts to specification.
22. Before installing the belt, make sure that the small hole or markings "UP" on the camshaft sprocket are at the top and the two marks on the outside of the sprocket are in line with the surface of the cylinder head.
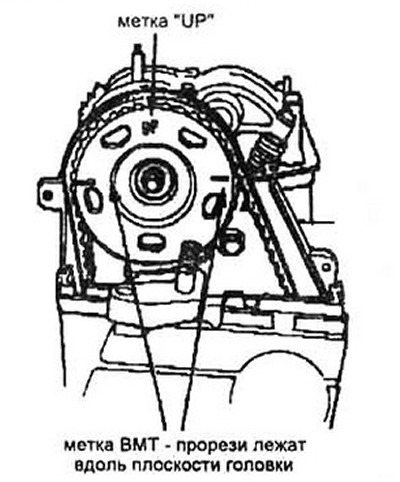
Pic. 7.22 When mounting the gear, make sure that the small hole (top arrow) or marking "UP" was at the top
Note: On early engine models, these marks are on the inside of the toothed pulley.
23. Temporarily install the crankshaft pulley and rotate (if necessary) until the marks on the pulley and the cover match (see Section 3).
24. Install a belt with a low tension between the toothed pulleys (from the side of the radiator).
Pic. 7.24 Direction of rotation
With the tensioner bolt loose, slowly rotate the crankshaft counterclockwise to an angle approximately equal to three teeth on the camshaft sprocket. Thus, the tension of the belt is ensured.
25. Tighten the tensioner bolt.
26. Carefully turn the crankshaft two turns clockwise and check that all marks match. If the crankshaft suddenly stops rotating, do not force it to turn, as one of the valves and the piston meet due to incorrect camshaft angle. In this case, remove the belt and repeat the entire procedure from step 22.
27. Remove the crankshaft pulley bolt.
28. On models of release from 1984 to 1990. install the removed components and parts in the reverse order of disassembly. Tighten the pulley bolt to specification.
29. On models of release since 1991 establish the removed knots and details in the return dismantling order. If a new crankshaft pulley bolt is installed, tighten it to 200 Nm. then fully loosen and retorque to specification.
When using an old bolt: Tighten it immediately to specification.
30. Start the engine and check for correct operation.