
HondaBook.ru
Auto companies Volkswagen Auto companies Ford Auto companies Lada Auto companies Skoda Auto companies BMW Auto companies Mazda Auto companies Peugeot
English Русский
Български
Беларускі
Український
Српски
Hrvatski
Română
Polski
Slovenský
Magyar
Bookmark Contacts Sitemap   


Accord Civic Fit / Jazz CR-V HR-V Others Articles
Civic 3 and 4 (1983-1991) Civic 5 and 6 (1991-2000) Civic 6 (1995-2000) Civic 7 (2000-2005) Civic 8 (2005-2011)

Top dead center (TDC) of the first cylinder (Honda Civic 3)

  • Main
  • Honda Civic
  • 3 (1983-1991)
  • Power unit
  • Engine in a car
  • Top dead center (TDC) of the first cylinder
0
Note: the sequence of operations is described assuming that the ignition distributor is installed correctly. If you want to determine the TDC for installing the distributor, set the piston of the first cylinder to TDC, then set the ignition marks according to item 8.


1. The piston reaches TDC at the end of the compression and exhaust strokes, but here we will always talk only about compression TDC.

2. The exact position of the piston at TDC is extremely important when performing many jobs, for example, when removing the camshaft, rocker arm, drive belt and camshaft gear, ignition distributor.

3. Before starting work on installing TDC, make sure that the gearshift lever is in neutral, in addition, it is necessary to ensure that the car is braked by any means. Disconnect the ignition system by removing the central wire from the distributor cap and grounding it to ground with a wire. Remove the spark plugs (see Chapter 1).

4. To set any of the pistons to TDC, rotate the crankshaft using one of the methods described below. The correct rotation of the engine shaft is clockwise (view of the camshaft drive belt), so:
a) the most preferred method is to rotate the crankshaft through one of the drive wheels, which must be jacked up.

b) to save some time, you can use a remote starter (see the corresponding instructions) to bring the piston to TDC, the precise setting of TDC is carried out by turning the crankshaft through the wheel.

5. Find the marking of the spark plug breaker of the first cylinder on the distributor cap. If it is not marked, find it by the spark plug wire.


6. Make a mark on the distributor housing opposite the breaker terminal.
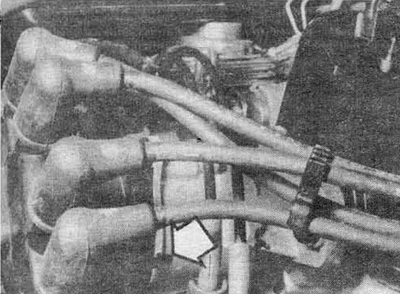
Fig. 3.6 Make a mark (arrow) on the distributor…

Fig. 3.6 Make a mark (arrow) on the distributor housing opposite the high-voltage wire socket of the first cylinder spark plug


7. Remove the distributor cap (see Chapter 1) and take it aside.

8. Turn the crankshaft so that the TDC mark on the timing belt pulley is opposite the mark on the engine cover. On most engines, the TDC mark is highlighted in white paint and is always separate from the degree marks for setting the ignition timing.

9. The rotor (runner*) of the distributor should be located exactly opposite the mark on the housing that you made. If so, then go to step 12.
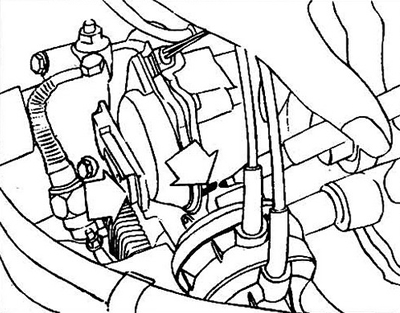
Fig. 3.9 Together with the coincidence of the…

Fig. 3.9 Together with the coincidence of the degree marks, the distributor slider should point to the mark that you made on the distributor housing (arrow)


10. If the rotor is located at 180°, then the piston of the first cylinder is at TDC of the exhaust stroke.


11. To set the TDC of the compression stroke, rotate the engine crankshaft 360° counterclockwise. The rotor should reach the position opposite the mark.

12. The TDC of the remaining cylinders is determined according to the operating order and is set by rotating the engine clockwise. Lock the position of the high-voltage wire terminals on the cover relative to the housing. When the engine rotates, the rotor, located according to the mark on the housing, will show that the corresponding piston is at TDC of the compression stroke.

Original published on this resource www.hondabook.ru
This article is available at: russian, bulgarian, belarusian, ukrainian, serbian, croatian, romanian, polish, slovak, hungarian
This information has been verified: Yaroslav Shiryaev
Share with friends:
◀ Previous
Civic 3 and 4: Engine in a car
Next ▶

Repair work on the engine without removing it from the car
General information about car engine repair
Engine specifications
Cylinder Head Cover — Removal and Installation
Intake manifold — removal and installation
Exhaust manifold — removal and installation
Drive belt and camshaft sprocket — removal, inspection and installation
Crankshaft oil seal — replacement
See also other articles from Honda manuals:
Bringing the piston of the first cylinder to the top dead center… Honda Accord 6 (1997-2002)
Removal the cylinder head Honda Fit 1 (2001-2008)
Brake master cylinder Honda CR-V 1 (1995-2001, petrol)
Cylinder head — design description Honda HR-V 1 (1998-2006, petrol)
Cylinder head component arrangement Honda Avancier 1 (1999-2003, petrol)
Link in different formats to this article
Comments and feedback from visitors
No comments yet


How much will 23 + 37 ?


Civic 8 (2005-2011) 
  • General information
  • Technical data
  • Governing bodies
  • Driving and maintenance
  • Power unit
  • Gasoline engines (L13A)
  • Gasoline engines (R18A)
  • Diesel engines (N22A)
  • Cooling and lubrication (L13A)
  • Cooling and lubrication (R18A)
  • Cooling and lubrication (N22A)
  • Injection system (gasoline)
  • Injection system (diesel)
  • Toxicity reduction system
  • Troubleshooting
  • Transmission
  • Clutch and drive shafts
  • Mechanical gearbox
  • Chassis and running gear
  • Suspension and wheels
  • Steering
  • Brake system
  • Body and interior
  • Exterior (external elements)
  • Doors, locks and windows
  • Electrical equipment
  • Equipment and devices
  • Headlights and lighting
  • Power devices
  • Electrical circuits
Civic 7 (2000-2005) 
  • General information
  • User manual
  • Maintenance
  • Power unit
  • Engines D15B and D17A
  • K20A Engines
  • Overhaul engine
  • Cooling system
  • Lubrication system
  • Fuel injection system
  • Toxicity reduction system
  • Engine electrical equipment
  • Transmission
  • Clutch
  • Manual gearbox
  • Automatic gearbox
  • Variator (CVT)
  • Drive shafts
  • Chassis and running gear
  • Car suspension
  • Steering
  • Brake system
  • Body and interior
  • Exterior (external elements)
  • Interior (internal elements)
  • Doors, locks and windows
  • Heater and air conditioner
  • Manual air conditioner
  • Automatic air conditioner
  • Security system
  • Electrical equipment
  • Equipment and devices
  • Headlights and lighting
  • Windscreen wipers
  • Audio system
  • Electrical diagrams
Civic 6 (1995-2000) 
  • General information
  • Introduction to guide
  • User manual
  • Maintenance
  • Power unit
  • Engine in car (Civic)
  • Engine in car (Integra)
  • Engine overhaul
  • Cooling and heating
  • Power and exhaust systems
  • Engine electrical equipment
  • Engine management systems
  • Transmission
  • Manual gearbox
  • Automatic transmission (AT/CVT)
  • Clutch and drive shafts
  • Chassis and running gear
  • Brake system
  • Car suspension
  • Steering
  • Body and interior
  • Exterior (external elements)
  • Interior (internal elements)
  • Doors, locks and windows
  • Electrical equipment
  • Equipment and devices
  • Electrical circuits
Civic 5 and 6 (1991-2000) 
  • Power unit
  • SOHC engines
  • DOHC engines
  • Engine overhaul
  • Cooling and lubrication system
  • Intake and exhaust system
  • Fuel injection system (SOHC)
  • Fuel injection system (DOHC)
  • Carburetor
  • Transmission
  • Clutch
  • Manual gearbox S4C
  • Manual gearbox S40
  • Automatic gearbox
  • Drive shafts
  • Chassis and running gear
  • Car suspension
  • Steering
  • Brake system
  • Body and interior
  • Body elements
  • Heater and air conditioner
  • Electrical equipment
  • Power devices
  • Equipment and instruments
  • Electrical circuits
Civic 3 and 4 (1983-1991) 
  • General information
  • Maintenance
  • Power unit
  • Engine in a car
  • Engine overhaul
  • Cooling system
  • Power and exhaust system
  • Engine electrical equipment
  • Emission control system
  • Transmission
  • Mechanical gearbox
  • Automatic gearbox
  • Clutch and drive shafts
  • Four-wheel drive
  • Chassis and running gear
  • Brake system
  • Car suspension
  • Steering
  • Body and interior
  • Body elements
  • Electrical equipment
  • Equipment and devices
  • Electrical circuits
HondaBook.ru © 2018–2026 • Mobile version • Sitemap: EN BG BY UA RS HR RO PL SK HU • Feedback • Driver Information • Search system • Bookmark
Accord 3 (1985-1989) • Accord 6 (1997-2002) • Civic 3 and 4 (1983-1991) • Civic 5 and 6 (1991-2000) • Civic 6 (1995-2000) • Civic 7 (2000-2005) • Civic 8 (2005-2011) • Fit 1 (2001-2008) • CR-V 1 (1995-2001) • CR-V 2 (2002-2006) • HR-V 1 (1998-2006) • Avancier 1 (1999-2003) •
 
This website uses cookies to ensure proper functioning. By clicking "OK," you agree.