


Car doors, locks and windows Honda Civic 7
.
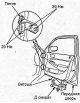
Front door
Adjustment 1. Adjust the position of the front door if necessary. a) To adjust the vertical and horizontal position of the door, loosen the door hinge mounting bolts as shown in the figure. Place a jack under the open...
Adjustment 1. Adjust the position of the front door if necessary. a) To adjust the vertical and horizontal position of the door, loosen the door hinge mounting bolts as shown in the figure. Place a jack under the open...
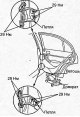
Rear side door
Adjustment 1. Adjust the position of the rear side door if necessary. a) To adjust the vertical and horizontal position of the door, loosen the door hinge mounting bolts as shown in the figure. Note: Place a jack under...
Adjustment 1. Adjust the position of the rear side door if necessary. a) To adjust the vertical and horizontal position of the door, loosen the door hinge mounting bolts as shown in the figure. Note: Place a jack under...

Trunk lid
Adjustment 1. Adjust the position of the trunk lid if necessary. a) To adjust the position of the trunk lid, loosen the hinge mounting bolts as shown in the figure "Adjusting the trunk lid". b) Tighten the bolts after...
Adjustment 1. Adjust the position of the trunk lid if necessary. a) To adjust the position of the trunk lid, loosen the hinge mounting bolts as shown in the figure "Adjusting the trunk lid". b) Tighten the bolts after...

Back door
Adjustment 1. Adjust the position of the rear door if necessary. a) To adjust the vertical and horizontal position of the door, loosen the door hinge mounting bolts as shown in the figure "Adjusting the rear door". b)...
Adjustment 1. Adjust the position of the rear door if necessary. a) To adjust the vertical and horizontal position of the door, loosen the door hinge mounting bolts as shown in the figure "Adjusting the rear door". b)...
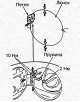
Fuel filler neck hatch
Adjustment Hatchback Adjust the position of the fuel filler flap if necessary. a) Unscrew the nut and remove the spring. Tightening torque - 2 Nm b) To adjust, loosen the hatch mounting bolts as shown in the figure and...
Adjustment Hatchback Adjust the position of the fuel filler flap if necessary. a) Unscrew the nut and remove the spring. Tightening torque - 2 Nm b) To adjust, loosen the hatch mounting bolts as shown in the figure and...

Side rear view mirror
Removal and installation 1. Disconnect the cable from the negative terminal of the battery. 2. Lower the front door window completely. 3. (Hatchback) Carefully remove the side rearview mirror inner trim. 4. (Hatchback)...
Removal and installation 1. Disconnect the cable from the negative terminal of the battery. 2. Lower the front door window completely. 3. (Hatchback) Carefully remove the side rearview mirror inner trim. 4. (Hatchback)...

Windshield
Note: When removing and installing the windshield, refer to the assembly drawing "Windshield". Removal 1. Remove the interior rearview mirror. 2. Remove the windshield wipers. 3. Pull up the side outer windshield trim,...
Note: When removing and installing the windshield, refer to the assembly drawing "Windshield". Removal 1. Remove the interior rearview mirror. 2. Remove the windshield wipers. 3. Pull up the side outer windshield trim,...

Rear window (sedan)
Removal Note: When removing the rear door glass, refer to the assembly drawing "Rear glass". 1. Remove the rear shelf (see section " Interior trim "). 2. Remove the rear window wiper motor (see chapter " Body electrical...
Removal Note: When removing the rear door glass, refer to the assembly drawing "Rear glass". 1. Remove the rear shelf (see section " Interior trim "). 2. Remove the rear window wiper motor (see chapter " Body electrical...

Rear door glass
Removal Note: When removing the rear door glass, refer to the assembly drawing "Rear Door Glass". 1. Remove the rear door interior trim (see section " Interior trim "). 2. Remove the spoiler. 3. Remove the additional...
Removal Note: When removing the rear door glass, refer to the assembly drawing "Rear Door Glass". 1. Remove the rear door interior trim (see section " Interior trim "). 2. Remove the spoiler. 3. Remove the additional...

Rear fixed side glass
Removal 1. Remove the rear pillar trim (see section " Interior trim "). 2. Remove the cover and disconnect the antenna connector. 3. Remove the seal as shown in the figure. Note: To avoid damaging painted surfaces,...
Removal 1. Remove the rear pillar trim (see section " Interior trim "). 2. Remove the cover and disconnect the antenna connector. 3. Remove the seal as shown in the figure. Note: To avoid damaging painted surfaces,...

Hatch — adjustment, disassembly and assembly
Adjustment 1. Close the hatch completely. 2. Measure the gap between the hatch panel and the seal and compare the obtained values with those given below. Gap "a" - 1.0 -2.5 mm 3. Adjust the position of the hatch if...
Adjustment 1. Close the hatch completely. 2. Measure the gap between the hatch panel and the seal and compare the obtained values with those given below. Gap "a" - 1.0 -2.5 mm 3. Adjust the position of the hatch if...

Hatch — Removing and installing hatch glass
1. Close the sunroof glass completely. 2. Open the sunroof curtain. 3. Loosen the screws, then remove the decorative covers. Loosen the nuts and remove the gaskets. Tightening torque - 9 Nm 4. Lift the glass up and...
1. Close the sunroof glass completely. 2. Open the sunroof curtain. 3. Loosen the screws, then remove the decorative covers. Loosen the nuts and remove the gaskets. Tightening torque - 9 Nm 4. Lift the glass up and...

Hatch — Removing and installing the hatch deflector
1. Open the sunroof glass completely. 2. Loosen the screws, disconnect the clamps and remove the sunroof deflector. 3. Installation is performed in the reverse order of removal. After installation, make sure that the...
1. Open the sunroof glass completely. 2. Loosen the screws, disconnect the clamps and remove the sunroof deflector. 3. Installation is performed in the reverse order of removal. After installation, make sure that the...

Hatch — Removing and installing the drain gutter
1. Remove the sunroof glass. 2. Using a special tool, move the glass brackets, then unscrew the screws. 3. Disconnect the drain gutter from the clamps, slide the gutter and lift it up. 4. Remove the drain gutter. 5....
1. Remove the sunroof glass. 2. Using a special tool, move the glass brackets, then unscrew the screws. 3. Disconnect the drain gutter from the clamps, slide the gutter and lift it up. 4. Remove the drain gutter. 5....

Sunroof — Removing and installing the sunroof curtain
1. Remove the drain gutter. 2. Move the sunroof curtain so that the spacers become visible. 3. Loosen the screws and remove the spacers. 4. Then pull the sunroof blind out until the clips are visible. Loosen the screws...
1. Remove the drain gutter. 2. Move the sunroof curtain so that the spacers become visible. 3. Loosen the screws and remove the spacers. 4. Then pull the sunroof blind out until the clips are visible. Loosen the screws...

Hatch — Removal and installation of the electric hatch drive
1. Disconnect the cable from the negative terminal of the battery. 2. Remove the roof trim (see section " Roof finishing "). 3. Disconnect the connector, unscrew the bolts, then remove the sunroof electric drive....
1. Disconnect the cable from the negative terminal of the battery. 2. Remove the roof trim (see section " Roof finishing "). 3. Disconnect the connector, unscrew the bolts, then remove the sunroof electric drive....

Hatch — Removing and installing the hatch subframe and drain hoses
Note: when removing and installing the sunroof subframe and drain hoses, follow the assembly drawing "Removing and installing the sunroof subframe". Carry out removal in the sequence shown in the drawing. 1. Remove the...
Note: when removing and installing the sunroof subframe and drain hoses, follow the assembly drawing "Removing and installing the sunroof subframe". Carry out removal in the sequence shown in the drawing. 1. Remove the...
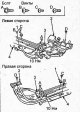
Hatch — Removing and installing the drain gutter guide and hatch drive cable
1. Remove the sunroof subframe. 2. Remove the sunroof curtain and sunroof electric drive. 3. Remove the screws, then remove the stoppers and rear brackets. Remove the bolts from the side brackets and remove the screws...
1. Remove the sunroof subframe. 2. Remove the sunroof curtain and sunroof electric drive. 3. Remove the screws, then remove the stoppers and rear brackets. Remove the bolts from the side brackets and remove the screws...
This section is available on: russian, bulgarian, belarusian, ukrainian, serbian, croatian, romanian, polish, slovak, hungarian
Link in different formats to this section
TEXTHTMLBB Code
- General information
- Technical data
- Governing bodies
- Driving and maintenance
- Power unit
- Gasoline engines (L13A)
- Gasoline engines (R18A)
- Diesel engines (N22A)
- Cooling and lubrication (L13A)
- Cooling and lubrication (R18A)
- Cooling and lubrication (N22A)
- Injection system (gasoline)
- Injection system (diesel)
- Toxicity reduction system
- Troubleshooting
- Transmission
- Clutch and drive shafts
- Mechanical gearbox
- Chassis and running gear
- Suspension and wheels
- Steering
- Brake system
- Body and interior
- Exterior (external elements)
- Doors, locks and windows
- Electrical equipment
- Equipment and devices
- Headlights and lighting
- Power devices
- Electrical circuits
- General information
- User manual
- Maintenance
- Power unit
- Engines D15B and D17A
- K20A Engines
- Overhaul engine
- Cooling system
- Lubrication system
- Fuel injection system
- Toxicity reduction system
- Engine electrical equipment
- Transmission
- Clutch
- Manual gearbox
- Automatic gearbox
- Variator (CVT)
- Drive shafts
- Chassis and running gear
- Car suspension
- Steering
- Brake system
- Body and interior
- Exterior (external elements)
- Interior (internal elements)
- Doors, locks and windows
- Heater and air conditioner
- Manual air conditioner
- Automatic air conditioner
- Security system
- Electrical equipment
- Equipment and devices
- Headlights and lighting
- Windscreen wipers
- Audio system
- Electrical diagrams
- General information
- Introduction to guide
- User manual
- Maintenance
- Power unit
- Engine in car (Civic)
- Engine in car (Integra)
- Engine overhaul
- Cooling and heating
- Power and exhaust systems
- Engine electrical equipment
- Engine management systems
- Transmission
- Manual gearbox
- Automatic transmission (AT/CVT)
- Clutch and drive shafts
- Chassis and running gear
- Brake system
- Car suspension
- Steering
- Body and interior
- Exterior (external elements)
- Interior (internal elements)
- Doors, locks and windows
- Electrical equipment
- Equipment and devices
- Electrical circuits
- Power unit
- SOHC engines
- DOHC engines
- Engine overhaul
- Cooling and lubrication system
- Intake and exhaust system
- Fuel injection system (SOHC)
- Fuel injection system (DOHC)
- Carburetor
- Transmission
- Clutch
- Manual gearbox S4C
- Manual gearbox S40
- Automatic gearbox
- Drive shafts
- Chassis and running gear
- Car suspension
- Steering
- Brake system
- Body and interior
- Body elements
- Heater and air conditioner
- Electrical equipment
- Power devices
- Equipment and instruments
- Electrical circuits
- General information
- Maintenance
- Power unit
- Engine in a car
- Engine overhaul
- Cooling system
- Power and exhaust system
- Engine electrical equipment
- Emission control system
- Transmission
- Mechanical gearbox
- Automatic gearbox
- Clutch and drive shafts
- Four-wheel drive
- Chassis and running gear
- Brake system
- Car suspension
- Steering
- Body and interior
- Body elements
- Electrical equipment
- Equipment and devices
- Electrical circuits