
Car engine overhaul Honda Civic 3 and 4

General information about engine repair
This Section of Chapter 2 includes general repair techniques for the cylinder head and other engine components. The information concerns the sequence of preparation for repair and acquisition of replacement parts, a...
This Section of Chapter 2 includes general repair techniques for the cylinder head and other engine components. The information concerns the sequence of preparation for repair and acquisition of replacement parts, a...
Engine Components Specifications
General information Working volume - see Part A Number of cylinders - see Part A Work order: 1 - 3 - 4 - 2 Engine Identification (the first 3 or 5 positions in the serial number) EW1 - 1500 carburetor EV1 - 1300...
General information Working volume - see Part A Number of cylinders - see Part A Work order: 1 - 3 - 4 - 2 Engine Identification (the first 3 or 5 positions in the serial number) EW1 - 1500 carburetor EV1 - 1300...

Engine Repair — General Information
It is not always easy to determine what and where in the engine requires repair: too many factors need to be taken into account. High engine mileage is not always a prerequisite for repairs and vice versa - low mileage...
It is not always easy to determine what and where in the engine requires repair: too many factors need to be taken into account. High engine mileage is not always a prerequisite for repairs and vice versa - low mileage...
Compression pressure monitoring («compression»)
1. Compression will tell you about the condition of the pistons, rings, valves and head gasket: large leaks indicate wear or damage to these parts. Note: When measuring compression, the engine must be fully warmed up...
1. Compression will tell you about the condition of the pistons, rings, valves and head gasket: large leaks indicate wear or damage to these parts. Note: When measuring compression, the engine must be fully warmed up...
Engine Removal — Methods and Safety
If you decide to remove the engine for repair, some preparations must be made. The choice of the place where the work will be carried out is extremely important to ensure space for servicing and storing spare parts. It...
If you decide to remove the engine for repair, some preparations must be made. The choice of the place where the work will be carried out is extremely important to ensure space for servicing and storing spare parts. It...

Engine — removal and installation
Note: Read the entire section first. The engine and gearbox are removed as an assembly. The gearbox is removed outside the vehicle. Removal 1. On fuel injected models, relieve the fuel pressure in the system ( see...
Note: Read the entire section first. The engine and gearbox are removed as an assembly. The gearbox is removed outside the vehicle. Removal 1. On fuel injected models, relieve the fuel pressure in the system ( see...
Alternative Engine Rebuilding
During the repair process, you may make quite a number of alternative decisions. The decision to replace the block, piston/connecting rod assembly, crankshaft depends on many factors, the first of which is the condition...
During the repair process, you may make quite a number of alternative decisions. The decision to replace the block, piston/connecting rod assembly, crankshaft depends on many factors, the first of which is the condition...

Engine Repair — Disassembly Sequence
1. Installing the engine on a stand significantly simplifies the assembly and disassembly processes. Before installing the engine on the stand, remove the flywheel and rear oil seal. 2. If there is no stand, disassembly...
1. Installing the engine on a stand significantly simplifies the assembly and disassembly processes. Before installing the engine on the stand, remove the flywheel and rear oil seal. 2. If there is no stand, disassembly...

Cylinder head — disassembly
1. Disassembly of the head begins with the removal of the intake and exhaust valves and the corresponding parts. To do this, remove the additional valves (if installed), rocker arm axle assembly and camshaft. For more...
1. Disassembly of the head begins with the removal of the intake and exhaust valves and the corresponding parts. To do this, remove the additional valves (if installed), rocker arm axle assembly and camshaft. For more...

Cylinder head — cleaning and inspection
When cleaning the cylinder head and valve train parts, carefully inspect them to decide on the scope of service work. Note: If the engine has been overheated, there is a high probability of warping the head (see step...
When cleaning the cylinder head and valve train parts, carefully inspect them to decide on the scope of service work. Note: If the engine has been overheated, there is a high probability of warping the head (see step...
Valves — Maintenance
Since for the production of this type of work (repair of valves, seats and guides) a set of skills and special tools are required - it is better to contact professionals.
Since for the production of this type of work (repair of valves, seats and guides) a set of skills and special tools are required - it is better to contact professionals.

Cylinder head — assembly
1. Make sure all parts needed for assembly are present and clean. 2. If the valves are already installed, skip to step 8. 3. Install the spring seats on the guide, install new seals on each valve guide. Keep in mind...
1. Make sure all parts needed for assembly are present and clean. 2. If the valves are already installed, skip to step 8. 3. Install the spring seats on the guide, install new seals on each valve guide. Keep in mind...

Piston/Connecting Rod — Removal
Note: Before removing the piston/connecting rod assembly, remove the cylinder head and oil pan. Refer to Part A of Chapter 2 for the necessary information. 1. Use your finger to check for a protrusion in the stop zone...
Note: Before removing the piston/connecting rod assembly, remove the cylinder head and oil pan. Refer to Part A of Chapter 2 for the necessary information. 1. Use your finger to check for a protrusion in the stop zone...
Crankshaft — dismantling
Note: The crankshaft can only be removed from the engine outside the vehicle. The flywheel, rear oil seal housing, crankshaft pulley, drive belt and gear, pipe, piston group must also be removed. 1. Before removing the...
Note: The crankshaft can only be removed from the engine outside the vehicle. The flywheel, rear oil seal housing, crankshaft pulley, drive belt and gear, pipe, piston group must also be removed. 1. Before removing the...

Engine Block — Cleaning
Attention: if the block plugs fall into the cooling jacket, it will be almost impossible to remove them. 1. Remove all protruding parts from the block. 2. Drill small holes in the center of the plug and use an inertia...
Attention: if the block plugs fall into the cooling jacket, it will be almost impossible to remove them. 1. Remove all protruding parts from the block. 2. Drill small holes in the center of the plug and use an inertia...
Engine Block — Inspection
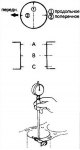
1. Before starting the inspection, perform the work in paragraph 14. 2. Determine the presence of cracks, corrosion, deposits. Inspect the condition of the threads. If the detected defects cannot be repaired. Replace...
1. Before starting the inspection, perform the work in paragraph 14. 2. Determine the presence of cracks, corrosion, deposits. Inspect the condition of the threads. If the detected defects cannot be repaired. Replace...
Cylinder wall honing
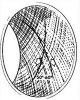
1. Honing of the walls creates good conditions for the operation of piston rings, therefore we recommend this type of treatment. 2. Install the main bearing caps and tighten them to specification. 3. The most common...
1. Honing of the walls creates good conditions for the operation of piston rings, therefore we recommend this type of treatment. 2. Install the main bearing caps and tighten them to specification. 3. The most common...

Piston/Connecting Rod — Inspection
1. Before inspection, wash the parts and remove the piston rings. Note: Use new rings for assembly. 2. When removing the rings, try not to damage the piston surfaces. 3. Remove any carbon deposits from the piston head....
1. Before inspection, wash the parts and remove the piston rings. Note: Use new rings for assembly. 2. When removing the rings, try not to damage the piston surfaces. 3. Remove any carbon deposits from the piston head....

Crankshaft — inspection
1. Wash and dry the crankshaft. Clean the oil passage holes with a stiff brush and wash them with solvent. Fig. 18.1 Clean the oil passages with a wire brush and rinse them 2. Check the main and connecting rod journals...
1. Wash and dry the crankshaft. Clean the oil passage holes with a stiff brush and wash them with solvent. Fig. 18.1 Clean the oil passages with a wire brush and rinse them 2. Check the main and connecting rod journals...

Main and connecting rod bearings — inspection and rejection
1. Even if you decide to replace the bearings with new ones, the old bearings should be subjected to serious analysis, as they can provide a lot of information about the condition of the engine. Fig. 19.1 Typical...
1. Even if you decide to replace the bearings with new ones, the old bearings should be subjected to serious analysis, as they can provide a lot of information about the condition of the engine. Fig. 19.1 Typical...
Engine Repair — Assembly Sequence
1. Before you begin assembling the engine, make sure you have all the necessary parts, gaskets, seals and the following tools. set of universal keys 12.7mm square drive ratchet ring mandrel ring puller vibration damper...
1. Before you begin assembling the engine, make sure you have all the necessary parts, gaskets, seals and the following tools. set of universal keys 12.7mm square drive ratchet ring mandrel ring puller vibration damper...
Piston rings — installation
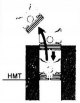
1. Before installing the rings, check the lateral clearances in the ring/piston groove pair (see item 17) 2. The method for measuring the gaps in the ring lock is described below. 3. Insert the ring into the cylinder...
1. Before installing the rings, check the lateral clearances in the ring/piston groove pair (see item 17) 2. The method for measuring the gaps in the ring lock is described below. 3. Insert the ring into the cylinder...

Crankshaft — installation and checking of bearing clearance
1. Installing the shaft is the first step in assembling the engine. Make sure the block and shaft are clean. 2. Place the block with the crankshaft bed facing up. 3. Remove the main bearing caps and place them side by...
1. Installing the shaft is the first step in assembling the engine. Make sure the block and shaft are clean. 2. Place the block with the crankshaft bed facing up. 3. Remove the main bearing caps and place them side by...
Installing the rear oil seal
1. Before installing the rear oil seal, make sure that the crankshaft installation operations are completed. 2. Check the contact surface of the shaft journal again for scratches and burrs that could damage the sealing...
1. Before installing the rear oil seal, make sure that the crankshaft installation operations are completed. 2. Check the contact surface of the shaft journal again for scratches and burrs that could damage the sealing...

Piston/Connecting Rod — Installing and Checking the Clearance in the Connecting Rod Bearing
1. Before installing the piston group, thoroughly clean the cylinder walls, make sure there is a lead-in chamfer at the top of the cylinder. In engines with individual main bearing caps with an oil bridge, first install...
1. Before installing the piston group, thoroughly clean the cylinder walls, make sure there is a lead-in chamfer at the top of the cylinder. In engines with individual main bearing caps with an oil bridge, first install...
First engine start after repair
1. After installing the engine on the vehicle, fill it with oil and coolant. 2. With the ignition system turned off and the spark plugs removed ( see section 3 ) crank the engine until oil pressure appears in the...
1. After installing the engine on the vehicle, fill it with oil and coolant. 2. With the ignition system turned off and the spark plugs removed ( see section 3 ) crank the engine until oil pressure appears in the...
This section is available on: russian, bulgarian, belarusian, ukrainian, serbian, croatian, romanian, polish, slovak, hungarian
Link in different formats to this section
TEXTHTMLBB Code
- General information
- Technical data
- Governing bodies
- Driving and maintenance
- Power unit
- Gasoline engines (L13A)
- Gasoline engines (R18A)
- Diesel engines (N22A)
- Cooling and lubrication (L13A)
- Cooling and lubrication (R18A)
- Cooling and lubrication (N22A)
- Injection system (gasoline)
- Injection system (diesel)
- Toxicity reduction system
- Troubleshooting
- Transmission
- Clutch and drive shafts
- Mechanical gearbox
- Chassis and running gear
- Suspension and wheels
- Steering
- Brake system
- Body and interior
- Exterior (external elements)
- Doors, locks and windows
- Electrical equipment
- Equipment and devices
- Headlights and lighting
- Power devices
- Electrical circuits
- General information
- User manual
- Maintenance
- Power unit
- Engines D15B and D17A
- K20A Engines
- Overhaul engine
- Cooling system
- Lubrication system
- Fuel injection system
- Toxicity reduction system
- Engine electrical equipment
- Transmission
- Clutch
- Manual gearbox
- Automatic gearbox
- Variator (CVT)
- Drive shafts
- Chassis and running gear
- Car suspension
- Steering
- Brake system
- Body and interior
- Exterior (external elements)
- Interior (internal elements)
- Doors, locks and windows
- Heater and air conditioner
- Manual air conditioner
- Automatic air conditioner
- Security system
- Electrical equipment
- Equipment and devices
- Headlights and lighting
- Windscreen wipers
- Audio system
- Electrical diagrams
- General information
- Introduction to guide
- User manual
- Maintenance
- Power unit
- Engine in car (Civic)
- Engine in car (Integra)
- Engine overhaul
- Cooling and heating
- Power and exhaust systems
- Engine electrical equipment
- Engine management systems
- Transmission
- Manual gearbox
- Automatic transmission (AT/CVT)
- Clutch and drive shafts
- Chassis and running gear
- Brake system
- Car suspension
- Steering
- Body and interior
- Exterior (external elements)
- Interior (internal elements)
- Doors, locks and windows
- Electrical equipment
- Equipment and devices
- Electrical circuits
- Power unit
- SOHC engines
- DOHC engines
- Engine overhaul
- Cooling and lubrication system
- Intake and exhaust system
- Fuel injection system (SOHC)
- Fuel injection system (DOHC)
- Carburetor
- Transmission
- Clutch
- Manual gearbox S4C
- Manual gearbox S40
- Automatic gearbox
- Drive shafts
- Chassis and running gear
- Car suspension
- Steering
- Brake system
- Body and interior
- Body elements
- Heater and air conditioner
- Electrical equipment
- Power devices
- Equipment and instruments
- Electrical circuits
- General information
- Maintenance
- Power unit
- Engine in a car
- Engine overhaul
- Cooling system
- Power and exhaust system
- Engine electrical equipment
- Emission control system
- Transmission
- Mechanical gearbox
- Automatic gearbox
- Clutch and drive shafts
- Four-wheel drive
- Chassis and running gear
- Brake system
- Car suspension
- Steering
- Body and interior
- Body elements
- Electrical equipment
- Equipment and devices
- Electrical circuits