
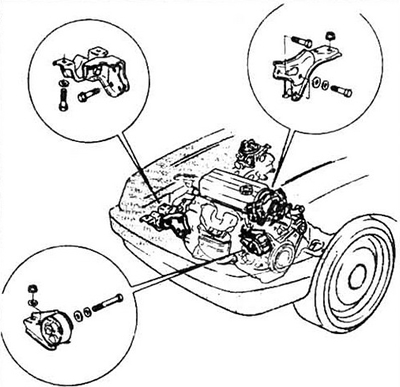
Pic. 17.1 Engine mounts
Control
2. During the inspection, the engine should be slightly suspended to relieve the loads from the supports.
3. Place the vehicle on stands and place a jack under the engine oil pan. Place a piece of wood between a pallet and jack and carefully lift the engine until the engine mounts are free.
4. Check for cracks in rubber parts or separation of rubber from metal parts.
5. Check the mutual movement of the mounting plates of the engine mounts in the mount/frame and mount/engine connections.
If movement is detected, tighten the mounting bolts.
6. Once a month, lubricate the supports with a special protective compound to prevent rubber aging.
Replacement
7. Hang the car (if it hasn't been done before) and disconnect the negative cable from the battery.
8. Place a jack under the oil pan and lift the engine over a block of wood.
Caution: Do not move any part of your body between the engine and frame when the engine is only on the jack.
Note: When replacing supports, apply sealant to threaded connections.
9. Turn away bolts of fastening of support to the case (rear support) and to the box (side support).
10. On the rear leg attached to the chassis, remove the top retaining nut that blocks access to the bottom of the leg.
11. On the side support, unscrew the two bolts attached to the frame. Remove the support.
Upper support
12. Remove the through bolt securing the support to the chassis.
13. Turn away the top supporting bolts and remove an arm.
All supports
14. Installation is made in the return to removal order. Tighten securely.