


Headlights, exterior and interior lighting Honda Civic 7
.

Removal and installation the headlight
1. Remove the front bumper. 2. Disconnect the connectors (A). 3. Loosen the screws and bolts, remove the trim (C) and headlight (B). Halogen lamp - 65/55 W Gas discharge lamp - 35 W Front side light bulb - 5W Front turn...
1. Remove the front bumper. 2. Disconnect the connectors (A). 3. Loosen the screws and bolts, remove the trim (C) and headlight (B). Halogen lamp - 65/55 W Gas discharge lamp - 35 W Front side light bulb - 5W Front turn...
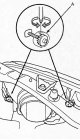
Headlight adjustment
1. Check the tire pressure. 2. Place the unloaded vehicle on a flat, horizontal surface. 3. Place the person in the driver's seat. 4. Adjust the headlight by turning the adjusting screws (A).
1. Check the tire pressure. 2. Place the unloaded vehicle on a flat, horizontal surface. 3. Place the person in the driver's seat. 4. Adjust the headlight by turning the adjusting screws (A).
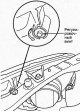
Replacing a gas discharge lamp
Attention: to prevent electric shock, replace gas discharge lamps in a dry room, dry your hands thoroughly before starting work; when the headlights are turned on, high voltage is supplied to the gas discharge lamp...
Attention: to prevent electric shock, replace gas discharge lamps in a dry room, dry your hands thoroughly before starting work; when the headlights are turned on, high voltage is supplied to the gas discharge lamp...
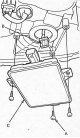
Gas discharge lamp control unit
1. Turn the light switch to the "OFF" position and disconnect the cable from the negative battery terminal. 2. Remove the headlight unit. 3. Loosen the block mounting screws (A). 4. Disconnect the connector (B) and...
1. Turn the light switch to the "OFF" position and disconnect the cable from the negative battery terminal. 2. Remove the headlight unit. 3. Loosen the block mounting screws (A). 4. Disconnect the connector (B) and...

Removal and installation the headlight mode switching solenoid wire
1. Remove the headlight unit. 2. Remove the lamp cover. 3. Remove the gas discharge lamp control unit. 4. Disconnect the connector (A). 5. Turn the adjustment screws counterclockwise four turns. 6. Remove the diode...
1. Remove the headlight unit. 2. Remove the lamp cover. 3. Remove the gas discharge lamp control unit. 4. Disconnect the connector (A). 5. Turn the adjustment screws counterclockwise four turns. 6. Remove the diode...

Removal and installation the headlight mode switching electromagnet
1. Remove the headlight unit. 2. Remove the lamp cover and lamp. 3. Turn the adjustment screws counterclockwise eight turns. 4. Unscrew the two screws (A) and remove the electromagnet (B). 5. Install in the reverse...
1. Remove the headlight unit. 2. Remove the lamp cover and lamp. 3. Turn the adjustment screws counterclockwise eight turns. 4. Unscrew the two screws (A) and remove the electromagnet (B). 5. Install in the reverse...
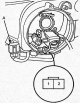
Checking the headlight mode switching electromagnet
1. Remove the lamp cover. 2. Turn the left headlight adjusting screws counterclockwise eight turns. 3. Remove the lamp and disconnect the connector (A). 4. Connect the battery to terminals "1" (+) and "2" (-) and make...
1. Remove the lamp cover. 2. Turn the left headlight adjusting screws counterclockwise eight turns. 3. Remove the lamp and disconnect the connector (A). 4. Connect the battery to terminals "1" (+) and "2" (-) and make...

Removal and installation fog lights (models produced since 9/2003)
1. Remove the front bumper. 2. Disconnect the connector (A) from the fog lamp. 3. Loosen the bolt and remove the fog light. 4. Install in the reverse order of removal. 5. Adjust the fog lights if necessary.
1. Remove the front bumper. 2. Disconnect the connector (A) from the fog lamp. 3. Loosen the bolt and remove the fog light. 4. Install in the reverse order of removal. 5. Adjust the fog lights if necessary.
Adjusting the fog lights (models produced since 9/2003)
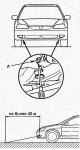
1. Check the tire pressure. 2. Place the unloaded vehicle on a flat, horizontal surface. 3. Place the person in the driver's seat. 4. Adjust the headlight by turning the adjusting screw.
1. Check the tire pressure. 2. Place the unloaded vehicle on a flat, horizontal surface. 3. Place the person in the driver's seat. 4. Adjust the headlight by turning the adjusting screw.

Replacing fog light bulbs (models produced since 9/2003)
1. Disconnect the connector (A), turn the socket (B) and remove the bulb (C) from the fog light. 2. Install in the reverse order of removal.
1. Disconnect the connector (A), turn the socket (B) and remove the bulb (C) from the fog light. 2. Install in the reverse order of removal.
Removal and installation turn signal repeaters
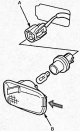
Caution: Be careful not to damage the wing. 1. Press the turn signal repeater (B) at the location indicated by the arrow in the figure and remove it. 2. Disconnect the connector (A) and remove the socket and lamp. Turn...
Caution: Be careful not to damage the wing. 1. Press the turn signal repeater (B) at the location indicated by the arrow in the figure and remove it. 2. Disconnect the connector (A) and remove the socket and lamp. Turn...
Removal and installation the rear combination light
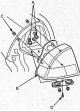
Sedan 1. Remove the rear bumper. 2. Remove the luggage compartment side trim. 3. Disconnect the connectors (A) from the combination lamp (B). 4. Rotate the cartridges 45° and remove them. Brake/tail light bulb - 21/5W...
Sedan 1. Remove the rear bumper. 2. Remove the luggage compartment side trim. 3. Disconnect the connectors (A) from the combination lamp (B). 4. Rotate the cartridges 45° and remove them. Brake/tail light bulb - 21/5W...

Removal and installation an additional brake light
Sedan (in the salon) 1. Raise the trunk lid and disconnect the connector (A) from the additional brake light (B). 2. Remove the rear shelf and additional brake light (B). 3. Remove the socket (C) and the bulb (D)....
Sedan (in the salon) 1. Raise the trunk lid and disconnect the connector (A) from the additional brake light (B). 2. Remove the rear shelf and additional brake light (B). 3. Remove the socket (C) and the bulb (D)....
Removal and installation the license plate light bulb
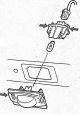
Sedan 1. Remove the upper license plate trim. 2. Disconnect the connector and remove the cartridge. 3. Press the lampshade in the place indicated by the arrow in the figure. License Plate Light - 2x5W 4. Install in the...
Sedan 1. Remove the upper license plate trim. 2. Disconnect the connector and remove the cartridge. 3. Press the lampshade in the place indicated by the arrow in the figure. License Plate Light - 2x5W 4. Install in the...
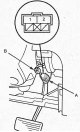
Checking the brake light switch
1. Check fuse #7 (15A) (mounting block in the engine compartment). 2. Disconnect the connector (B) from the brake light switch (A). 3. Check the conductivity at the switch terminals according to the table. Pedal...
1. Check fuse #7 (15A) (mounting block in the engine compartment). 2. Disconnect the connector (B) from the brake light switch (A). 3. Check the conductivity at the switch terminals according to the table. Pedal...

Hazard warning lights — turn signal relay check
1. Remove the turn signal flasher relay (B) (mounting block in the passenger compartment (A)). 2. Check the turn signal flasher relay according to Table 1 "Checking the turn signal flasher relay". If a malfunction is...
1. Remove the turn signal flasher relay (B) (mounting block in the passenger compartment (A)). 2. Check the turn signal flasher relay according to Table 1 "Checking the turn signal flasher relay". If a malfunction is...
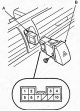
Removal, installation and checking the hazard warning switch
Sedan 1. Remove the center panel 2. Disconnect the connector (A) from the hazard warning switch (B). 3. Remove the hazard warning switch. 4. Check for conductivity between the switch terminals according to the table....
Sedan 1. Remove the center panel 2. Disconnect the connector (A) from the hazard warning switch (B). 3. Remove the hazard warning switch. 4. Check for conductivity between the switch terminals according to the table....
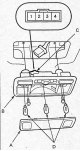
Removal, installation and checking the local lighting lamp/interior lighting lamp (models with sunroof)
1. Turn off the lamp. 2. Using a slotted screwdriver, remove the lamp shade (A). 3. Loosen the two screws and remove the housing (B). 4. Disconnect the connector (C) and remove the bulbs (D). Interior light bulb - 5W...
1. Turn off the lamp. 2. Using a slotted screwdriver, remove the lamp shade (A). 3. Loosen the two screws and remove the housing (B). 4. Disconnect the connector (C) and remove the bulbs (D). Interior light bulb - 5W...
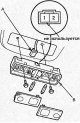
Removal, installation and checking the local lighting lamp (models without sunroof)
1. Turn off the local lighting lamp. 2. Using a slotted screwdriver, remove the lamp shades. 3. Loosen the bolts and remove the local lighting lamp (B). 4. Disconnect the connector (A). Local lighting lamps - 2x8 W 5....
1. Turn off the local lighting lamp. 2. Using a slotted screwdriver, remove the lamp shades. 3. Loosen the bolts and remove the local lighting lamp (B). 4. Disconnect the connector (A). Local lighting lamps - 2x8 W 5....
Removal, installation and checking the interior lighting lamp
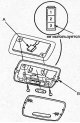
1. Turn off the interior light. 2. Using a slotted screwdriver, remove the lampshade. 3. Loosen the screws and remove the interior light bulb (B). 4. Disconnect the connector (A). Interior light bulb - 8W 5. Check the...
1. Turn off the interior light. 2. Using a slotted screwdriver, remove the lampshade. 3. Loosen the screws and remove the interior light bulb (B). 4. Disconnect the connector (A). Interior light bulb - 8W 5. Check the...
Removal, installation and checking the luggage compartment light
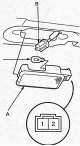
Sedan 1. Remove the luggage compartment light (A). 2. Disconnect the connector (B) and remove the lamp (C). Luggage compartment light - 5W 3. Check for continuity between terminals "1" and "2" of the luggage compartment...
Sedan 1. Remove the luggage compartment light (A). 2. Disconnect the connector (B) and remove the lamp (C). Luggage compartment light - 5W 3. Check for continuity between terminals "1" and "2" of the luggage compartment...
This section is available on: russian, bulgarian, belarusian, ukrainian, serbian, croatian, romanian, polish, slovak, hungarian
Link in different formats to this section
TEXTHTMLBB Code
- General information
- Technical data
- Governing bodies
- Driving and maintenance
- Power unit
- Gasoline engines (L13A)
- Gasoline engines (R18A)
- Diesel engines (N22A)
- Cooling and lubrication (L13A)
- Cooling and lubrication (R18A)
- Cooling and lubrication (N22A)
- Injection system (gasoline)
- Injection system (diesel)
- Toxicity reduction system
- Troubleshooting
- Transmission
- Clutch and drive shafts
- Mechanical gearbox
- Chassis and running gear
- Suspension and wheels
- Steering
- Brake system
- Body and interior
- Exterior (external elements)
- Doors, locks and windows
- Electrical equipment
- Equipment and devices
- Headlights and lighting
- Power devices
- Electrical circuits
- General information
- User manual
- Maintenance
- Power unit
- Engines D15B and D17A
- K20A Engines
- Overhaul engine
- Cooling system
- Lubrication system
- Fuel injection system
- Toxicity reduction system
- Engine electrical equipment
- Transmission
- Clutch
- Manual gearbox
- Automatic gearbox
- Variator (CVT)
- Drive shafts
- Chassis and running gear
- Car suspension
- Steering
- Brake system
- Body and interior
- Exterior (external elements)
- Interior (internal elements)
- Doors, locks and windows
- Heater and air conditioner
- Manual air conditioner
- Automatic air conditioner
- Security system
- Electrical equipment
- Equipment and devices
- Headlights and lighting
- Windscreen wipers
- Audio system
- Electrical diagrams
- General information
- Introduction to guide
- User manual
- Maintenance
- Power unit
- Engine in car (Civic)
- Engine in car (Integra)
- Engine overhaul
- Cooling and heating
- Power and exhaust systems
- Engine electrical equipment
- Engine management systems
- Transmission
- Manual gearbox
- Automatic transmission (AT/CVT)
- Clutch and drive shafts
- Chassis and running gear
- Brake system
- Car suspension
- Steering
- Body and interior
- Exterior (external elements)
- Interior (internal elements)
- Doors, locks and windows
- Electrical equipment
- Equipment and devices
- Electrical circuits
- Power unit
- SOHC engines
- DOHC engines
- Engine overhaul
- Cooling and lubrication system
- Intake and exhaust system
- Fuel injection system (SOHC)
- Fuel injection system (DOHC)
- Carburetor
- Transmission
- Clutch
- Manual gearbox S4C
- Manual gearbox S40
- Automatic gearbox
- Drive shafts
- Chassis and running gear
- Car suspension
- Steering
- Brake system
- Body and interior
- Body elements
- Heater and air conditioner
- Electrical equipment
- Power devices
- Equipment and instruments
- Electrical circuits
- General information
- Maintenance
- Power unit
- Engine in a car
- Engine overhaul
- Cooling system
- Power and exhaust system
- Engine electrical equipment
- Emission control system
- Transmission
- Mechanical gearbox
- Automatic gearbox
- Clutch and drive shafts
- Four-wheel drive
- Chassis and running gear
- Brake system
- Car suspension
- Steering
- Body and interior
- Body elements
- Electrical equipment
- Equipment and devices
- Electrical circuits