
Note: The following procedure is based on the assumption that the spark plug wires are connected correctly and the distributor is installed correctly. If it is necessary to bring the engine to TDC in order to adjust the distributor position, the piston position in the first cylinder of the engine can be determined qualitatively by monitoring the change in compression pressure through the spark plug hole. Then it is necessary to achieve the alignment of the corresponding installation marks.
Top dead center (TDC) is the highest point of the piston stroke in its cylinder. Strictly speaking, in 4-stroke engines, during the rotation of the crankshaft, this position is reached by each of the pistons twice: once at the end of the compression stroke and the second time at the end of the exhaust stroke. When adjusting the valve timing and setting the ignition timing angle, in the vast majority of cases, the TDC position of the end of the piston compression stroke (usually the first cylinder) is used.
The need to bring the piston(s) to the TDC position arises when performing many procedures, in particular such as removing/installing the camshaft, timing drive components and ignition distributor.
Make sure the transmission is in neutral, then firmly set the parking brake or chock the rear wheels of the vehicle. Also immobilize the ignition system by disconnecting the electrical connectors of the primary (PB) coil circuit (see Chapter Engine electrical equipment). Remove the spark plugs (see Chapter Settings and ongoing maintenance).
Bringing any of the pistons to the TDC position is done by turning the engine crankshaft in one of the ways described below. When looking at the engine from the front (from the drive belt side), the normal direction of rotation of the crankshaft is counterclockwise. Remember that attempting to turn the shaft clockwise may result in a violation of the timing belt adjustments.
- a) The most effective method is to turn the shaft in the normal direction by means of a bolt screwed into the end of its front journal using a ratchet socket wrench;
- b) A time-saving measure is to use a remote starter switch (follow the manufacturers instructions). As soon as the piston is close enough to TDC on the compression stroke, the starter stops and further adjustment is made using the method described in (a);
- c) If an assistant is available, the engine can be pre-cranked by short jerks from the driver's seat under the operator's guidance. The principle is the same as described in point (b). The final adjustment is again made manually, using a socket wrench (see point a).
1. Note the position of the spark plug wire connection terminal for the first cylinder on the distributor cap. If the terminal is not marked, follow the wire from the spark plug to the cap and mark it yourself.
Note: The spark plug terminal for the first cylinder on the distributor cap is usually marked with the designation A1 (engines with VTEC) or A (engines without VTEC).
2. Remove the distributor cap and set it aside (see Chapter Settings and ongoing maintenance).
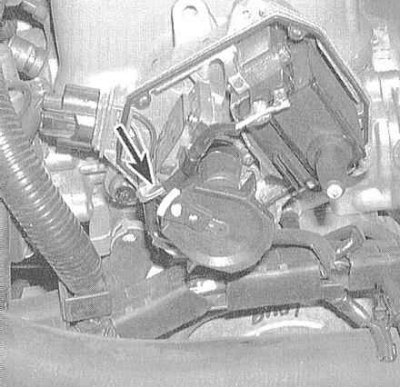
3. Mark the distributor housing rim at a point directly below the number one cylinder cap terminal.
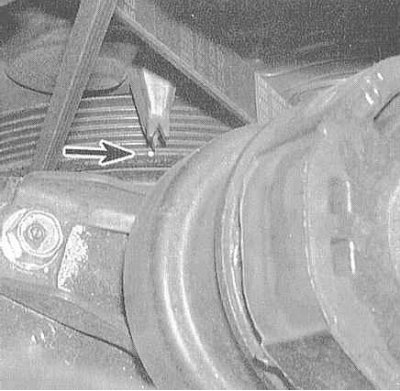
4. Turn the crankshaft counterclockwise so that the white TDC mark on its pulley aligns with the triangular cutout of the pointer. 5. Now check the position of the distributor runner - it should be turned with its nose exactly on the mark on the rim of the housing.
6. If the runner is turned 180° relative to the mark, then the piston of the first cylinder is in the TDC position at the end of the exhaust stroke.
7. In order to bring the piston to TDC at the end of the compression stroke, the crankshaft should be turned one more full revolution (360°) counterclockwise. Now the runner should turn with its nose towards the mark.
8. If all the above conditions for aligning the marks are met, the task can be considered completed - the piston of the first cylinder is brought to the TDC position at the end of the compression stroke.
9. Now, in order to bring the remaining pistons to TDC one by one in the order of ignition, you should make the corresponding marks on the rim of the distributor housing (as was done above for the terminal connecting the first spark plug wire). Turning the crankshaft will inevitably be accompanied by rotation of the runner, the alignment of the nose of which with the corresponding mark will confirm that the next piston has been brought to TDC at the end of the compression stroke.
[Full text available on the portal «HondaBook.ru»]