
HondaBook.ru
Auto companies Volkswagen Auto companies Ford Auto companies Lada Auto companies Skoda Auto companies BMW Auto companies Mazda Auto companies Peugeot
English Русский
Български
Беларускі
Український
Српски
Hrvatski
Română
Polski
Slovenský
Magyar
Bookmark Contacts Sitemap   


Accord Civic Fit / Jazz CR-V HR-V Others Articles
Civic 3 and 4 (1983-1991) Civic 5 and 6 (1991-2000) Civic 6 (1995-2000) Civic 7 (2000-2005) Civic 8 (2005-2011)

Master Brake Cylinder — Removal, Repair and Installation (Honda Civic 3)

  • Main
  • Honda Civic
  • 3 (1983-1991)
  • Chassis and running gear
  • Brake system
  • Master Brake Cylinder — Removal, Repair and Installation
0
Contents: Removal ⇊ Repair ⇊ Installation ⇊

Removal


1. The master brake cylinder is installed in the engine compartment on the brake booster housing.

2. Remove the brake fluid from the reservoir using a syringe.

3. Prepare rags and plugs for the brake fluid reservoir pipes.

Caution: Brake fluid may damage painted surfaces of your vehicle.


4. Loosen the nuts securing the brake pipes to the master cylinder. Use a special wrench to prevent damage to the brake pipe nuts.

5. Carefully remove the brake pipes and plug the hole.

6. Disconnect the electrical connector, unscrew the nuts securing the cylinder to the brake booster. Remove the cylinder from the studs and remove it from the car.

Repair


7. Before starting repairs, purchase a repair kit for this model of the master brake cylinder.

8. Loosen the brake fluid reservoir clamp and remove the reservoir from the cylinder.
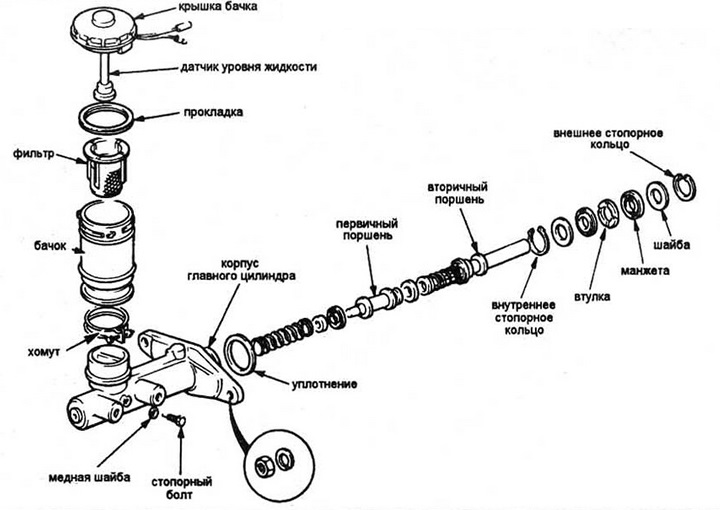
Fig. 7.8 Assembly of a typical brake master…

Fig. 7.8 Assembly of a typical brake master cylinder unit


9. Remove the outer snap ring, washer, cover and bushing.
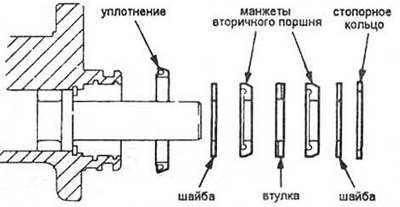
Fig. 7.9 Master cylinder disassembly procedure

Fig. 7.9 Master cylinder disassembly procedure


10. Secure the brake cylinder in a vice and use a punch or screwdriver to push the secondary piston all the way into the opposite end of the master cylinder. While holding the piston in this position, remove the lock bolt on the side of the cylinder.
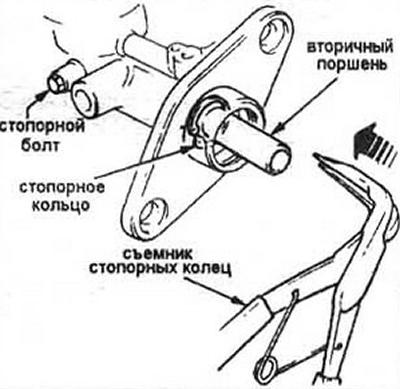


Fig. 7.10 Press the secondary piston and remove…

Fig. 7.10 Press the secondary piston and remove the lock bolt and inner lock ring


11. While holding the piston down, carefully remove the inner retaining ring.

12. Now you can remove all the internal parts of the brake cylinder. Remember the relative positions of the components.
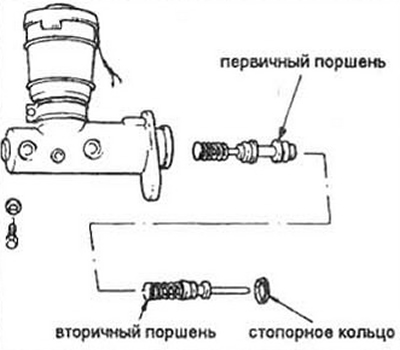
Fig. 7.12 Disassembling the master cylinder

Fig. 7.12 Disassembling the master cylinder


Attention: the two springs have different characteristics, do not confuse them!


13. Carefully inspect the inside surface of the master cylinder. Any deep scratches or other damage require replacement of the entire cylinder.

14. Replace all parts included in the repair kit. Wash the remaining parts in clean brake fluid. Lubricate the brake fluid in time, and tighten the connections.


15. Lower the assembled parts into the cylinder bore, press them to the lower end, install the lock bolt with a new copper washer.

16. Install the new inner snap ring, making sure it is seated in the groove.

17. Lubricate the seal, secondary piston seals and bushing with brake fluid. Install them together with the washers (see fig. 7.9). Install the locking ring.

18. Install the tank and securely fasten the clamp.

19. Before installing the master cylinder, it is recommended to bleed it on the workbench. This is necessary to supply pressure to the master cylinder pistons. Bleed the master brake cylinder, securing it in a vice by the mounting flange.

20. Place the threaded plugs in the inlet holes of the master cylinder so that there is no air leakage and at the same time they can be easily unscrewed.

21. Fill the reservoir with brake fluid recommended for your vehicle (see Chapter 1).

22. Unscrew one plug and press the piston to remove air from the master cylinder.

23. Screw in the plug and release the piston.

24. Repeat these operations until only brake fluid comes out of the hole. Then bleed the second circuit in the same way. Periodically top up the brake fluid in the reservoir to compensate for leaks.

25. If you don't have any suitable plugs, you can use your own finger. It's less convenient, but the result will be the same.

Installation


26. Install the brake cylinder onto the brake booster studs and tighten the mounting nuts by hand.

27. Tighten the brake pipes. Since the brake cylinder is not yet secured, this allows the pipe nuts to be threaded correctly.


28. Fully tighten the cylinder and brake pipe mounting nuts.

29. Fill the reservoir with brake fluid and bleed the brake system (see Section 10).

(Original article on the website: «hondabook.ru»)
This article is available at: russian, bulgarian, belarusian, ukrainian, serbian, croatian, romanian, polish, slovak, hungarian
This information has been verified: Yaroslav Shiryaev
Share with friends:
◀ Previous
Civic 3 and 4: Brake system
Next ▶

Wheel Brake Cylinder — Removal, Repair and Installation
Drum brake shoes — replacement
Brake disc — inspection, removal and installation
Disc Brake Caliper — Removal, Repair and Installation
Brake pads — replacement
Brake force distributor — general information
Brake pipes and hoses — inspection and replacement
Bleeding the brake system
Brake booster — inspection, removal and installation
Parking brake — adjustment
See also other articles from Honda manuals:
Master brake cylinder Honda Accord 3 (1985-1989)
Master Brake Cylinder — Removal and Installation Honda Fit 1 (2001-2008)
Brake master cylinder Honda CR-V 1 (1995-2001, petrol)
Clutch Master Cylinder — Repair and Inspection Honda HR-V 1 (1998-2006, petrol)
Master Cylinder and Brake Booster — Removal and Installation Honda Avancier 1 (1999-2003, petrol)
Link in different formats to this article
Comments and feedback from visitors
No comments yet


How much will 27 + 16 ?


Civic 8 (2005-2011) 
  • General information
  • Technical data
  • Governing bodies
  • Driving and maintenance
  • Power unit
  • Gasoline engines (L13A)
  • Gasoline engines (R18A)
  • Diesel engines (N22A)
  • Cooling and lubrication (L13A)
  • Cooling and lubrication (R18A)
  • Cooling and lubrication (N22A)
  • Injection system (gasoline)
  • Injection system (diesel)
  • Toxicity reduction system
  • Troubleshooting
  • Transmission
  • Clutch and drive shafts
  • Mechanical gearbox
  • Chassis and running gear
  • Suspension and wheels
  • Steering
  • Brake system
  • Body and interior
  • Exterior (external elements)
  • Doors, locks and windows
  • Electrical equipment
  • Equipment and devices
  • Headlights and lighting
  • Power devices
  • Electrical circuits
Civic 7 (2000-2005) 
  • General information
  • User manual
  • Maintenance
  • Power unit
  • Engines D15B and D17A
  • K20A Engines
  • Overhaul engine
  • Cooling system
  • Lubrication system
  • Fuel injection system
  • Toxicity reduction system
  • Engine electrical equipment
  • Transmission
  • Clutch
  • Manual gearbox
  • Automatic gearbox
  • Variator (CVT)
  • Drive shafts
  • Chassis and running gear
  • Car suspension
  • Steering
  • Brake system
  • Body and interior
  • Exterior (external elements)
  • Interior (internal elements)
  • Doors, locks and windows
  • Heater and air conditioner
  • Manual air conditioner
  • Automatic air conditioner
  • Security system
  • Electrical equipment
  • Equipment and devices
  • Headlights and lighting
  • Windscreen wipers
  • Audio system
  • Electrical diagrams
Civic 6 (1995-2000) 
  • General information
  • Introduction to guide
  • User manual
  • Maintenance
  • Power unit
  • Engine in car (Civic)
  • Engine in car (Integra)
  • Engine overhaul
  • Cooling and heating
  • Power and exhaust systems
  • Engine electrical equipment
  • Engine management systems
  • Transmission
  • Manual gearbox
  • Automatic transmission (AT/CVT)
  • Clutch and drive shafts
  • Chassis and running gear
  • Brake system
  • Car suspension
  • Steering
  • Body and interior
  • Exterior (external elements)
  • Interior (internal elements)
  • Doors, locks and windows
  • Electrical equipment
  • Equipment and devices
  • Electrical circuits
Civic 5 and 6 (1991-2000) 
  • Power unit
  • SOHC engines
  • DOHC engines
  • Engine overhaul
  • Cooling and lubrication system
  • Intake and exhaust system
  • Fuel injection system (SOHC)
  • Fuel injection system (DOHC)
  • Carburetor
  • Transmission
  • Clutch
  • Manual gearbox S4C
  • Manual gearbox S40
  • Automatic gearbox
  • Drive shafts
  • Chassis and running gear
  • Car suspension
  • Steering
  • Brake system
  • Body and interior
  • Body elements
  • Heater and air conditioner
  • Electrical equipment
  • Power devices
  • Equipment and instruments
  • Electrical circuits
Civic 3 and 4 (1983-1991) 
  • General information
  • Maintenance
  • Power unit
  • Engine in a car
  • Engine overhaul
  • Cooling system
  • Power and exhaust system
  • Engine electrical equipment
  • Emission control system
  • Transmission
  • Mechanical gearbox
  • Automatic gearbox
  • Clutch and drive shafts
  • Four-wheel drive
  • Chassis and running gear
  • Brake system
  • Car suspension
  • Steering
  • Body and interior
  • Body elements
  • Electrical equipment
  • Equipment and devices
  • Electrical circuits
HondaBook.ru © 2018–2026 • Mobile version • Sitemap: EN BG BY UA RS HR RO PL SK HU • Feedback • Driver Information • Search system • Bookmark
Accord 3 (1985-1989) • Accord 6 (1997-2002) • Civic 3 and 4 (1983-1991) • Civic 5 and 6 (1991-2000) • Civic 6 (1995-2000) • Civic 7 (2000-2005) • Civic 8 (2005-2011) • Fit 1 (2001-2008) • CR-V 1 (1995-2001) • CR-V 2 (2002-2006) • HR-V 1 (1998-2006) • Avancier 1 (1999-2003) •
 
This website uses cookies to ensure proper functioning. By clicking "OK," you agree.