
HondaBook.ru
Auto companies Volkswagen Auto companies Ford Auto companies Lada Auto companies Skoda Auto companies BMW Auto companies Mazda Auto companies Peugeot
English Русский
Български
Беларускі
Український
Српски
Hrvatski
Română
Polski
Slovenský
Magyar
Bookmark Contacts Sitemap   


Accord Civic Fit / Jazz CR-V HR-V Others Articles
Civic 3 and 4 (1983-1991) Civic 5 and 6 (1991-2000) Civic 6 (1995-2000) Civic 7 (2000-2005) Civic 8 (2005-2011)

Brake booster — inspection, removal and installation (Honda Civic 3)

  • Main
  • Honda Civic
  • 3 (1983-1991)
  • Chassis and running gear
  • Brake system
  • Brake booster — inspection, removal and installation
0
Contents: Control of work ⇊ Removal ⇊ Installation ⇊

Control of work


1. With the engine off, press the brake pedal several times to relieve the booster.

2. Press the pedal and start the engine. If the pedal moves down easily, the booster is working normally.

3. Let the engine run for about two minutes and turn it off. Slowly press the brake pedal several times. If the pedal travel increases with each press, there are no leaks in the booster.

4. Press the pedal while the engine is running. Turn off the engine without releasing the pedal. If the pedal does not change its position within 30 seconds, the booster is OK.

Removal


5. The brake booster is a non-separable unit. If the booster fails, replace it with a new one.

6. Remove the brake master cylinder (see Section 7).

7. Locate the connection between the brake pedal and the booster (see fig. 8.1): it is located under the dashboard opposite the driver's seat.

8. Remove the pin cotter pin and take out the pin.

9. Holding the earring with pliers, disconnect the lock nut, remove the earring.

10. Disconnect the hose from the engine to the booster. Do not damage the hose or the booster pipe.

11. Unscrew the four nuts securing the amplifier to the engine compartment wall.

12. Remove the amplifier, bracket and gaskets.

Installation


13. The installation procedure is basically the reverse of disassembly. Tighten the earring nut and the amplifier mounting nuts.

14. After installing the booster, it is necessary to adjust the clearance between the pusher and the piston of the master brake cylinder. Measure the distance between the piston seat of the cylinder and the plane of the mounting flange. Apply a vacuum of 20 mm Hg to the booster and measure the distance between the pusher of the booster and the installation plane of the master cylinder (including gasket). Compare the two measurements and get the required clearance (see fig. 11.14a). If the gap is more or less than recommended (see specification). loosen the lock nut and adjust the clearance (see fig. 11.14b). After adjustment, tighten the lock nut.
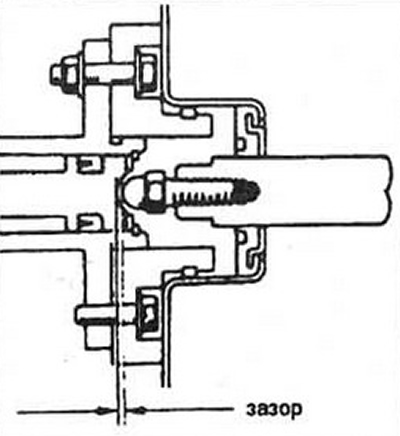


Fig. 11.14a To measure the gap in the pair of…

Fig. 11.14a To measure the gap in the pair of booster pushrod/master brake cylinder piston
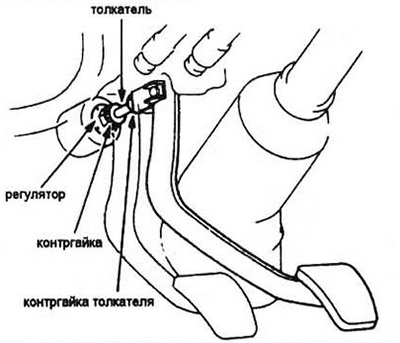

Fig. 11.14b Gap adjustment

Fig. 11.14b Gap adjustment


15. After installing the booster and master cylinder, bleed the brake system (see Section 10).

(You will find the original on the portal www.HondaBook.ru)
This article is available at: russian, bulgarian, belarusian, ukrainian, serbian, croatian, romanian, polish, slovak, hungarian
This information has been verified: Yaroslav Shiryaev
Share with friends:
◀ Previous
Civic 3 and 4: Brake system
Next ▶

Bleeding the brake system
Brake pipes and hoses — inspection and replacement
Brake force distributor — general information
Master Brake Cylinder — Removal, Repair and Installation
Wheel Brake Cylinder — Removal, Repair and Installation
Parking brake — adjustment
Replacing the parking brake cable
Parking brake lever — removal and installation
Brake light switch — inspection, replacement and adjustment
General information about the brake system
See also other articles from Honda manuals:
Brake booster — removal and installation Honda Accord 3 (1985-1989)
Vacuum Brake Booster — Checking and Adjusting the Rod Clearance Honda Fit 1 (2001-2008)
Vacuum Brake Booster — Leak Test Honda CR-V 1 (1995-2001, petrol)
Rubber parts of the brake system and brake booster Honda HR-V 1 (1998-2006, petrol)
Frequency of checking rubber components and brake booster Honda Avancier 1 (1999-2003, petrol)
Link in different formats to this article
Comments and feedback from visitors
No comments yet


How much will 44 + 20 ?


Civic 8 (2005-2011) 
  • General information
  • Technical data
  • Governing bodies
  • Driving and maintenance
  • Power unit
  • Gasoline engines (L13A)
  • Gasoline engines (R18A)
  • Diesel engines (N22A)
  • Cooling and lubrication (L13A)
  • Cooling and lubrication (R18A)
  • Cooling and lubrication (N22A)
  • Injection system (gasoline)
  • Injection system (diesel)
  • Toxicity reduction system
  • Troubleshooting
  • Transmission
  • Clutch and drive shafts
  • Mechanical gearbox
  • Chassis and running gear
  • Suspension and wheels
  • Steering
  • Brake system
  • Body and interior
  • Exterior (external elements)
  • Doors, locks and windows
  • Electrical equipment
  • Equipment and devices
  • Headlights and lighting
  • Power devices
  • Electrical circuits
Civic 7 (2000-2005) 
  • General information
  • User manual
  • Maintenance
  • Power unit
  • Engines D15B and D17A
  • K20A Engines
  • Overhaul engine
  • Cooling system
  • Lubrication system
  • Fuel injection system
  • Toxicity reduction system
  • Engine electrical equipment
  • Transmission
  • Clutch
  • Manual gearbox
  • Automatic gearbox
  • Variator (CVT)
  • Drive shafts
  • Chassis and running gear
  • Car suspension
  • Steering
  • Brake system
  • Body and interior
  • Exterior (external elements)
  • Interior (internal elements)
  • Doors, locks and windows
  • Heater and air conditioner
  • Manual air conditioner
  • Automatic air conditioner
  • Security system
  • Electrical equipment
  • Equipment and devices
  • Headlights and lighting
  • Windscreen wipers
  • Audio system
  • Electrical diagrams
Civic 6 (1995-2000) 
  • General information
  • Introduction to guide
  • User manual
  • Maintenance
  • Power unit
  • Engine in car (Civic)
  • Engine in car (Integra)
  • Engine overhaul
  • Cooling and heating
  • Power and exhaust systems
  • Engine electrical equipment
  • Engine management systems
  • Transmission
  • Manual gearbox
  • Automatic transmission (AT/CVT)
  • Clutch and drive shafts
  • Chassis and running gear
  • Brake system
  • Car suspension
  • Steering
  • Body and interior
  • Exterior (external elements)
  • Interior (internal elements)
  • Doors, locks and windows
  • Electrical equipment
  • Equipment and devices
  • Electrical circuits
Civic 5 and 6 (1991-2000) 
  • Power unit
  • SOHC engines
  • DOHC engines
  • Engine overhaul
  • Cooling and lubrication system
  • Intake and exhaust system
  • Fuel injection system (SOHC)
  • Fuel injection system (DOHC)
  • Carburetor
  • Transmission
  • Clutch
  • Manual gearbox S4C
  • Manual gearbox S40
  • Automatic gearbox
  • Drive shafts
  • Chassis and running gear
  • Car suspension
  • Steering
  • Brake system
  • Body and interior
  • Body elements
  • Heater and air conditioner
  • Electrical equipment
  • Power devices
  • Equipment and instruments
  • Electrical circuits
Civic 3 and 4 (1983-1991) 
  • General information
  • Maintenance
  • Power unit
  • Engine in a car
  • Engine overhaul
  • Cooling system
  • Power and exhaust system
  • Engine electrical equipment
  • Emission control system
  • Transmission
  • Mechanical gearbox
  • Automatic gearbox
  • Clutch and drive shafts
  • Four-wheel drive
  • Chassis and running gear
  • Brake system
  • Car suspension
  • Steering
  • Body and interior
  • Body elements
  • Electrical equipment
  • Equipment and devices
  • Electrical circuits
HondaBook.ru © 2018–2026 • Mobile version • Sitemap: EN BG BY UA RS HR RO PL SK HU • Feedback • Driver Information • Search system • Bookmark
Accord 3 (1985-1989) • Accord 6 (1997-2002) • Civic 3 and 4 (1983-1991) • Civic 5 and 6 (1991-2000) • Civic 6 (1995-2000) • Civic 7 (2000-2005) • Civic 8 (2005-2011) • Fit 1 (2001-2008) • CR-V 1 (1995-2001) • CR-V 2 (2002-2006) • HR-V 1 (1998-2006) • Avancier 1 (1999-2003) •
 
This website uses cookies to ensure proper functioning. By clicking "OK," you agree.