
Note. Do not spill brake fluid on the vehicle body as this may damage the paintwork. If brake fluid comes into contact with the paintwork, wash it off immediately with water.
1. Remove the air purifier.
2. Make sure the ignition is off, then disconnect the negative cable from the battery and remove it from the engine compartment.
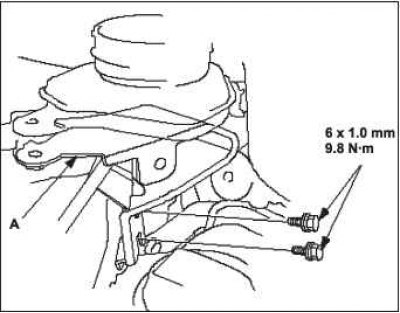
3. Remove the reservoir cap and pump out the brake fluid from the reservoir of the master cylinder with a syringe, then unscrew the bolt securing the bracket A and the expansion tank of the clutch master cylinder B.
4. Turn out a bolt From fastenings of a broad tank.

5. Remove the expansion tank bracket A.
6. Disconnect an electric socket And a signaling device of level of a brake liquid in a tank.
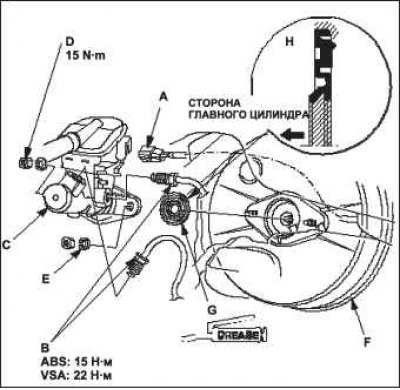
7. Disconnect the pipelines B from the brake master cylinder C. To prevent leakage of brake fluid, it is necessary to close the holes in the disconnected pipelines with special plugs or just small pieces of rags.
8. Turn away nuts D and washers of fastening E of the main cylinder.
9. Disconnect the master cylinder from the brake booster F. Be careful not to damage the brake lines when removing the brake master cylinder.
10. Remove the G rod seal from the master cylinder.
Note. During installation, insert a new rod seal into the master cylinder with the groove side H toward it.
11. Establish the main brake cylinder in an order of performance of operations, the return to removal. Pay attention to the following:
Replace stem seal at installation.
Lubricate the inner lip and bore of the master cylinder rod seal with silicone grease from the repair kit.
Check the position of the brake pedal in height and free play of the pedal. Make the necessary adjustments if necessary.
12. Install the battery and connect the negative battery cable. Set the correct time on the clock.
13. Bleed the brake system.
14. Rotate the wheels to check the resistance to rotation.