
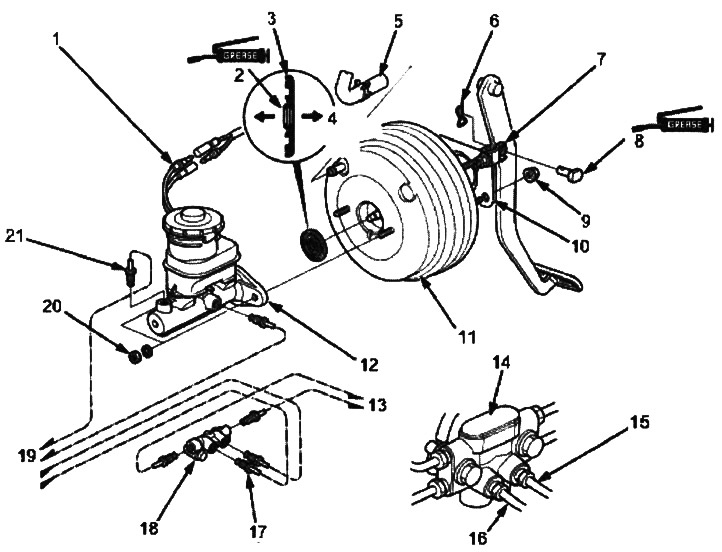
1. BRAKE FLUID LEVEL SENSOR CONNECTORS
2. From the master cylinder side
3. ROD SEAL. Replace
4. From the brake booster side
5. VACUUM HOSE
6. LOCK PIN. Replace
7. PIN WITH HEAD AND HOLE FOR COTTAGE PIN
8. SPLINTER
9. 13 Nm (1.3 kgf/m)
10. GASKET. Replace
11. BRAKE BOOSTER
12. MAIN CYLINDER
13. To the working cylinders of the rear wheels
14. METERING VALVE (Without ABS)
15. Right/left hand drive: to the secondary piston channel of the master cylinder
16. Right/left hand drive: to the primary piston channel of the master cylinder
17. 15 Nm (1.5 kgf/m)
18. 4-WAY VALVE (WITH ABS)
19. To the assembled modulator
20. 15 Nm (1.5 kgf/m)
21. 15 Nm (1.5 kgf/m)
Warning! Do not spill brake fluid on your vehicle as it may damage the paintwork; if liquid does spill, wash it off immediately with water.
1. Disconnect the brake fluid level sensor connectors.
2. Remove the reservoir cap from the master cylinder.
3. Remove the brake fluid from the master cylinder reservoir using a syringe.
4. Disconnect the brake pipes from the master cylinder.
5. Loosen the master cylinder mounting bolts and remove the washers.
6. Remove the master cylinder from the brake booster. Be careful not to bend or damage the brake lines when removing the master cylinder.
7. Remove the rod seal from the brake booster.
8. Unscrew the four mounting nuts of the amplifier.
9. Pull the brake booster forward until the pin contacts the engine compartment bulkhead.
10. Remove the brake booster from the engine compartment.
11. Install the brake booster and master cylinder in the reverse order of removal, taking into account the following:
- If removed, replace all rubber parts with new ones.
- Apply the recommended seal lubricant supplied with the master cylinder kit to the lip of the new rod seal.
- Press the piston rod seal onto the brake booster with the grooved side facing the master cylinder.
- If replacing the master cylinder or brake booster, check and adjust the push rod clearance (see below).
12. Fill the master cylinder reservoir and bleed the brake system (see above).
13. After installation, check the height and free travel of the brake pedal (see above) and adjust if necessary.