
HondaBook.ru
Auto companies Volkswagen Auto companies Ford Auto companies Lada Auto companies Skoda Auto companies BMW Auto companies Mazda Auto companies Peugeot
English Русский
Български
Беларускі
Український
Српски
Hrvatski
Română
Polski
Slovenský
Magyar
Bookmark Contacts Sitemap   


Accord Civic Fit / Jazz CR-V HR-V Others Articles
Civic 3 and 4 (1983-1991) Civic 5 and 6 (1991-2000) Civic 6 (1995-2000) Civic 7 (2000-2005) Civic 8 (2005-2011)

Checking the brake booster (L13A/R18A) (Honda Civic 8)

  • Main
  • Honda Civic
  • 8 (2005-2011)
  • Chassis and running gear
  • Brake system
  • Checking the brake booster (L13A/R18A)
0
Contents: Checking for leaks ⇊ Checking the operation of the brake…⇊ Checking the brake booster check…⇊

Checking for leaks


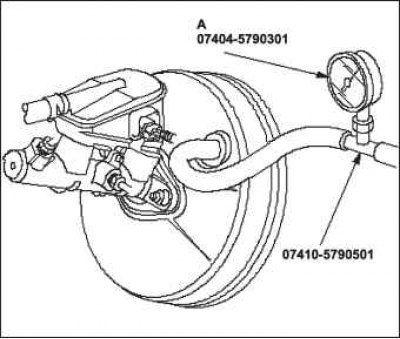
1. Connect vacuum gauge A between the vacuum booster and the check valve.
2. Start the engine, press the accelerator pedal…


2. Start the engine, press the accelerator pedal until the engine speed reaches a level where the vacuum after the throttle valve is 66.7 kPa, then turn off the engine.

3. Read the vacuum gauge readings.

If the vacuum decreases by 2.7 kPa or more within 30 seconds, the following system components must be checked for leaks:
  • check valve;
  • vacuum hoses, pipelines;
  • seals;
  • brake booster;
  • master brake cylinder.

Note: The brake booster cannot be disassembled or repaired. If the brake booster is faulty, it must be replaced.


Checking the operation of the brake booster


1. Connect the vacuum gauge in the same way as during the leak test.

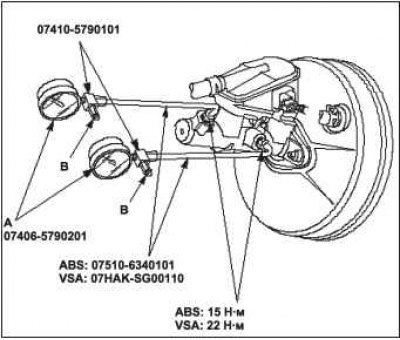
2. Connect the fluid pressure gauges A to the brake master cylinder using the T-fittings as shown in the figure.

3. Remove air through air bleed valves B.
4. Start the engine and let it idle.


4. Start the engine and let it idle.


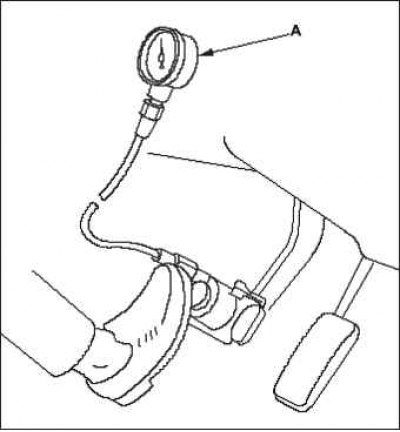
5. Ask an assistant to press the brake pedal. The assistant should press the pedal with a force of 98 N and 294 N on the pressure gauge scale A.
6. The readings of the measuring pressure gauges…


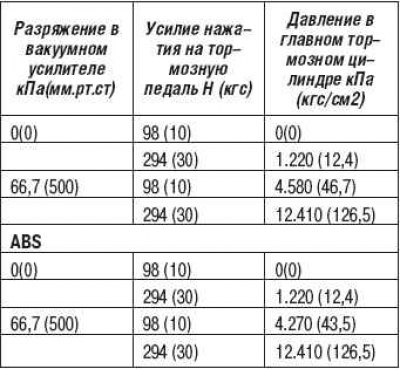
6. The readings of the measuring pressure gauges at different values of vacuum in the intake tract should be as follows.

VSA


7. If the brake fluid pressure after the master…


7. If the brake fluid pressure after the master cylinder is less than the values given in the table, then the tightness of the sealing cuffs of the master cylinder should be checked.

Checking the brake booster check valve


1. Disconnect the brake booster hose (a check valve is built into it) And from the brake booster.
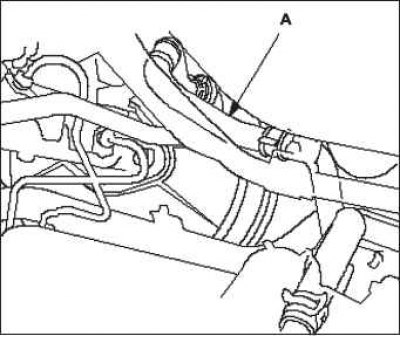
2. Start the engine and let it idle. You should…


2. Start the engine and let it idle. You should feel air leaking from the open end of the vacuum hose. If there is no air leak, the check valve is faulty. Replace the vacuum line together with the check valve and repeat the test.
This article is available at: russian, bulgarian, belarusian, ukrainian, serbian, croatian, romanian, polish, slovak, hungarian
This information has been verified: Yaroslav Shiryaev
Share with friends:
◀ Previous
Civic 8: Brake system
Next ▶

Adjusting the brake pedal and brake pedal position sensor
Inspection of brake hose and pipeline
Inspection of the rear brake disc
Inspection of the front brake disc
Inspection and testing of the brake system
Checking the Parking Brake Switch
Checking the brake fluid level sensor
Replacing the brake hose
Replacing the master brake cylinder
Disassembling the master brake cylinder
See also other articles from Honda manuals:
Checking the serviceability and tightness, removing and installing… Honda Accord 6 (1997-2002)
Vacuum Brake Booster — Checking and Adjusting the Rod Clearance Honda Fit 1 (2001-2008)
Brake Booster — Checking the Check Valve Honda CR-V 2 (2002-2006, petrol)
Rubber parts of the brake system and brake booster Honda HR-V 1 (1998-2006, petrol)
Frequency of checking rubber components and brake booster Honda Avancier 1 (1999-2003, petrol)
Link in different formats to this article
Comments and feedback from visitors
No comments yet


How much will 19 + 37 ?


Civic 8 (2005-2011) 
  • General information
  • Technical data
  • Governing bodies
  • Driving and maintenance
  • Power unit
  • Gasoline engines (L13A)
  • Gasoline engines (R18A)
  • Diesel engines (N22A)
  • Cooling and lubrication (L13A)
  • Cooling and lubrication (R18A)
  • Cooling and lubrication (N22A)
  • Injection system (gasoline)
  • Injection system (diesel)
  • Toxicity reduction system
  • Troubleshooting
  • Transmission
  • Clutch and drive shafts
  • Mechanical gearbox
  • Chassis and running gear
  • Suspension and wheels
  • Steering
  • Brake system
  • Body and interior
  • Exterior (external elements)
  • Doors, locks and windows
  • Electrical equipment
  • Equipment and devices
  • Headlights and lighting
  • Power devices
  • Electrical circuits
Civic 7 (2000-2005) 
  • General information
  • User manual
  • Maintenance
  • Power unit
  • Engines D15B and D17A
  • K20A Engines
  • Overhaul engine
  • Cooling system
  • Lubrication system
  • Fuel injection system
  • Toxicity reduction system
  • Engine electrical equipment
  • Transmission
  • Clutch
  • Manual gearbox
  • Automatic gearbox
  • Variator (CVT)
  • Drive shafts
  • Chassis and running gear
  • Car suspension
  • Steering
  • Brake system
  • Body and interior
  • Exterior (external elements)
  • Interior (internal elements)
  • Doors, locks and windows
  • Heater and air conditioner
  • Manual air conditioner
  • Automatic air conditioner
  • Security system
  • Electrical equipment
  • Equipment and devices
  • Headlights and lighting
  • Windscreen wipers
  • Audio system
  • Electrical diagrams
Civic 6 (1995-2000) 
  • General information
  • Introduction to guide
  • User manual
  • Maintenance
  • Power unit
  • Engine in car (Civic)
  • Engine in car (Integra)
  • Engine overhaul
  • Cooling and heating
  • Power and exhaust systems
  • Engine electrical equipment
  • Engine management systems
  • Transmission
  • Manual gearbox
  • Automatic transmission (AT/CVT)
  • Clutch and drive shafts
  • Chassis and running gear
  • Brake system
  • Car suspension
  • Steering
  • Body and interior
  • Exterior (external elements)
  • Interior (internal elements)
  • Doors, locks and windows
  • Electrical equipment
  • Equipment and devices
  • Electrical circuits
Civic 5 and 6 (1991-2000) 
  • Power unit
  • SOHC engines
  • DOHC engines
  • Engine overhaul
  • Cooling and lubrication system
  • Intake and exhaust system
  • Fuel injection system (SOHC)
  • Fuel injection system (DOHC)
  • Carburetor
  • Transmission
  • Clutch
  • Manual gearbox S4C
  • Manual gearbox S40
  • Automatic gearbox
  • Drive shafts
  • Chassis and running gear
  • Car suspension
  • Steering
  • Brake system
  • Body and interior
  • Body elements
  • Heater and air conditioner
  • Electrical equipment
  • Power devices
  • Equipment and instruments
  • Electrical circuits
Civic 3 and 4 (1983-1991) 
  • General information
  • Maintenance
  • Power unit
  • Engine in a car
  • Engine overhaul
  • Cooling system
  • Power and exhaust system
  • Engine electrical equipment
  • Emission control system
  • Transmission
  • Mechanical gearbox
  • Automatic gearbox
  • Clutch and drive shafts
  • Four-wheel drive
  • Chassis and running gear
  • Brake system
  • Car suspension
  • Steering
  • Body and interior
  • Body elements
  • Electrical equipment
  • Equipment and devices
  • Electrical circuits
HondaBook.ru © 2018–2026 • Mobile version • Sitemap: EN BG BY UA RS HR RO PL SK HU • Feedback • Driver Information • Search system • Bookmark
Accord 3 (1985-1989) • Accord 6 (1997-2002) • Civic 3 and 4 (1983-1991) • Civic 5 and 6 (1991-2000) • Civic 6 (1995-2000) • Civic 7 (2000-2005) • Civic 8 (2005-2011) • Fit 1 (2001-2008) • CR-V 1 (1995-2001) • CR-V 2 (2002-2006) • HR-V 1 (1998-2006) • Avancier 1 (1999-2003) •
 
This website uses cookies to ensure proper functioning. By clicking "OK," you agree.