
HondaBook.ru
Auto companies Volkswagen Auto companies Ford Auto companies Lada Auto companies Skoda Auto companies BMW Auto companies Mazda Auto companies Peugeot
English Русский
Български
Беларускі
Український
Српски
Hrvatski
Română
Polski
Slovenský
Magyar
Bookmark Contacts Sitemap   


Accord Civic Fit / Jazz CR-V HR-V Others Articles
Civic 3 and 4 (1983-1991) Civic 5 and 6 (1991-2000) Civic 6 (1995-2000) Civic 7 (2000-2005) Civic 8 (2005-2011)

Throttle cable — adjustment (Honda Civic 3)

  • Main
  • Honda Civic
  • 3 (1983-1991)
  • Transmission
  • Automatic gearbox
  • Throttle cable — adjustment
0
Contents: Engines with carburetor ⇊ Adjusting the bracket ⇊ Adjusting the throttle valve cable ⇊

Engines with carburetor


1. Remove the air filter housing (see Chapter 4).

2. Disconnect the cable from the bracket and the throttle drive lever.
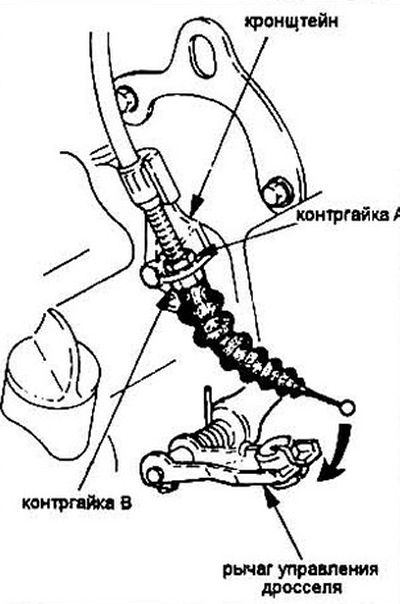
Fig. 3.2 Throttle valve cable

Fig. 3.2 Throttle valve cable


Adjusting the bracket


3. Before adjusting the valve cable, it is necessary to adjust the position of the bracket.

4. Straighten the tongues of the lock washer and unscrew the bracket mounting bolts. Install a new lock washer, tighten the bolts.

5. Make the gauge shown in Figure 3.5.
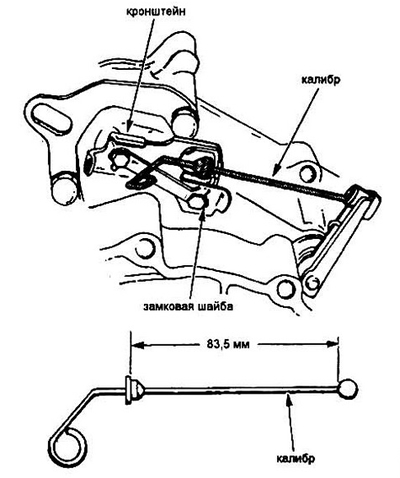
Fig. 3.5 Adjusting the position of the throttle…

Fig. 3.5 Adjusting the position of the throttle valve bracket


6. Install the gauge as shown in Figure 3.5.

7. Adjust the position of the bracket (a gap of up to 0.3 mm is allowed, caliber deflection is not allowed). Make sure there is no deflection of the gauge when tightening the bolts.


Adjusting the throttle valve cable


8. Check the free play of the cable (see Chapter 4).

9. Start the engine and warm it up until the cooling fan comes on.

10. Adjust the idle speed (see Chapter 1).

11. Turn off the engine.

12. Disconnect the cable from the valve control lever and from the bracket on the box (see fig. 3.2).

13. Disconnect the vacuum hose from the damper, connect the vacuum pump and apply vacuum.
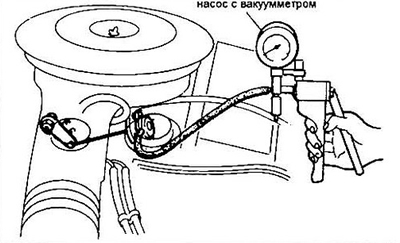
Fig. 3.13 Connecting the vacuum pump to the damper

Fig. 3.13 Connecting the vacuum pump to the damper


14. Hang a weight of approximately 700 grams from the gas pedal. Lift the pedal and release it. This weight should select the free play of the cable

15. Secure the cable in the engine compartment as shown in Fig. 3.15.

Caution: Do not allow the cable to touch the battery terminals.
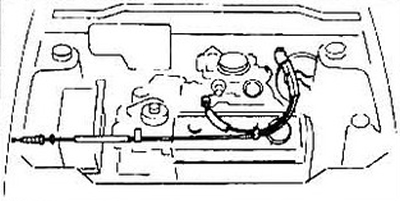

Fig. 3.15 Laying the throttle valve cable for…

Fig. 3.15 Laying the throttle valve cable for adjustment


16. Measure the distance X between the end of the cable and the lock nut A. Compare the measurement result with the specification data and adjust the distance X if necessary.
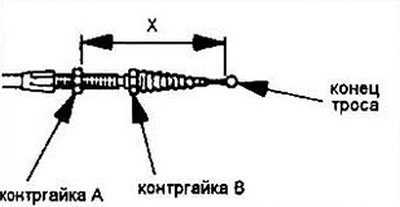


Fig. 3.16 To measure the distance X of the cable

Fig. 3.16 To measure the distance X of the cable


17. Insert the end of the cable into the slot in the lever. Make sure that the cable is not twisted or kinked. Insert the cable into the bracket and tighten nut B.

Check that the cable moves freely when the pedal is depressed.

18. Remove the weight from the gas pedal and check the amount of free play of the valve drive lever.
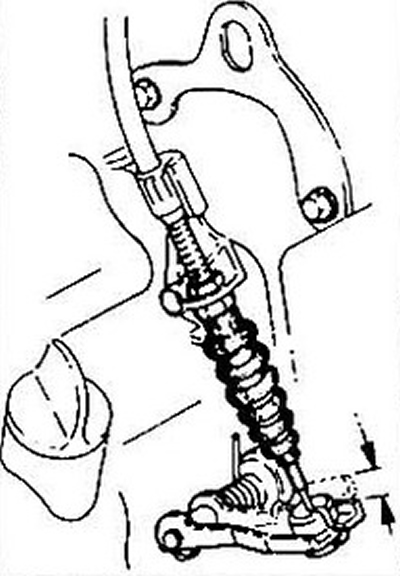
Fig. 3.18 Measuring the valve lever free travel

Fig. 3.18 Measuring the valve lever free travel


19. Start the engine and check the synchronicity of the carburetor and valve cable: the valve lever should begin to move exactly at the moment the engine begins to accelerate.
  • a) if the lever starts to move before the engine starts to accelerate, turn nut A counterclockwise;
  • b) otherwise, everything is the other way around. Fuel injection engines.

20. Make sure that the throttle cable free play is correct (see Chapter 4).


21. Start the engine and warm it up.

22. Adjust the idle speed (see Chapter 4).

23. If you have a CIVIC or CRX produced since 1989 or a Wagon produced since 1990, disconnect the vacuum hose from the damper, connect a vacuum pump and apply vacuum to the damper.
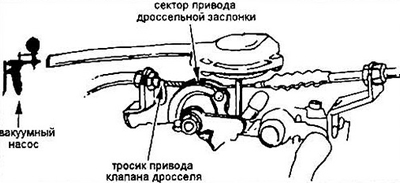
Fig. 3.23 Connecting the vacuum pump to the damper

Fig. 3.23 Connecting the vacuum pump to the damper


24. Loosen nuts A and B of the valve drive cable on the box bracket (see fig. 3.2).

25. Check the amount of free play of the cable by pressing the valve drive lever down until it stops. Fix the lever in this position and rotate the throttle drive sector (see fig. 3.23): there should be no free play.

26. To adjust the free play of the cable, turn nut A until resistance to rotation of the throttle drive sector appears.

27. To check the adjustment made, rotate the throttle drive sector, releasing the valve drive lever. The lever should start moving at the same moment as the sector.

28. With the help of an assistant, check that the cable moves freely without jamming.
This article is available at: russian, bulgarian, belarusian, ukrainian, serbian, croatian, romanian, polish, slovak, hungarian
This information has been verified: Yaroslav Shiryaev
Share with friends:
◀ Previous
Civic 3 and 4: Automatic gearbox
Next ▶

Troubleshooting
Automatic transmission specifications
Gear Shift Cable — Removal, Installation and Adjustment
Neutral Position Key — Check and Replace
Shift Lever — Removal and Installation
Automatic transmission — removal and installation
See also other articles from Honda manuals:
Throttle Cable — 1984-85 Accord Honda Accord 3 (1985-1989)
Gearbox control cable — adjustment Honda Fit 1 (2001-2008)
Adjusting the throttle cable Honda CR-V 2 (2002-2006, petrol)
Throttle cable Honda HR-V 1 (1998-2006, petrol)
Checking the throttle cable Honda Avancier 1 (1999-2003, petrol)
Link in different formats to this article
Comments and feedback from visitors
No comments yet


How much will 17 + 28 ?


Civic 8 (2005-2011) 
  • General information
  • Technical data
  • Governing bodies
  • Driving and maintenance
  • Power unit
  • Gasoline engines (L13A)
  • Gasoline engines (R18A)
  • Diesel engines (N22A)
  • Cooling and lubrication (L13A)
  • Cooling and lubrication (R18A)
  • Cooling and lubrication (N22A)
  • Injection system (gasoline)
  • Injection system (diesel)
  • Toxicity reduction system
  • Troubleshooting
  • Transmission
  • Clutch and drive shafts
  • Mechanical gearbox
  • Chassis and running gear
  • Suspension and wheels
  • Steering
  • Brake system
  • Body and interior
  • Exterior (external elements)
  • Doors, locks and windows
  • Electrical equipment
  • Equipment and devices
  • Headlights and lighting
  • Power devices
  • Electrical circuits
Civic 7 (2000-2005) 
  • General information
  • User manual
  • Maintenance
  • Power unit
  • Engines D15B and D17A
  • K20A Engines
  • Overhaul engine
  • Cooling system
  • Lubrication system
  • Fuel injection system
  • Toxicity reduction system
  • Engine electrical equipment
  • Transmission
  • Clutch
  • Manual gearbox
  • Automatic gearbox
  • Variator (CVT)
  • Drive shafts
  • Chassis and running gear
  • Car suspension
  • Steering
  • Brake system
  • Body and interior
  • Exterior (external elements)
  • Interior (internal elements)
  • Doors, locks and windows
  • Heater and air conditioner
  • Manual air conditioner
  • Automatic air conditioner
  • Security system
  • Electrical equipment
  • Equipment and devices
  • Headlights and lighting
  • Windscreen wipers
  • Audio system
  • Electrical diagrams
Civic 6 (1995-2000) 
  • General information
  • Introduction to guide
  • User manual
  • Maintenance
  • Power unit
  • Engine in car (Civic)
  • Engine in car (Integra)
  • Engine overhaul
  • Cooling and heating
  • Power and exhaust systems
  • Engine electrical equipment
  • Engine management systems
  • Transmission
  • Manual gearbox
  • Automatic transmission (AT/CVT)
  • Clutch and drive shafts
  • Chassis and running gear
  • Brake system
  • Car suspension
  • Steering
  • Body and interior
  • Exterior (external elements)
  • Interior (internal elements)
  • Doors, locks and windows
  • Electrical equipment
  • Equipment and devices
  • Electrical circuits
Civic 5 and 6 (1991-2000) 
  • Power unit
  • SOHC engines
  • DOHC engines
  • Engine overhaul
  • Cooling and lubrication system
  • Intake and exhaust system
  • Fuel injection system (SOHC)
  • Fuel injection system (DOHC)
  • Carburetor
  • Transmission
  • Clutch
  • Manual gearbox S4C
  • Manual gearbox S40
  • Automatic gearbox
  • Drive shafts
  • Chassis and running gear
  • Car suspension
  • Steering
  • Brake system
  • Body and interior
  • Body elements
  • Heater and air conditioner
  • Electrical equipment
  • Power devices
  • Equipment and instruments
  • Electrical circuits
Civic 3 and 4 (1983-1991) 
  • General information
  • Maintenance
  • Power unit
  • Engine in a car
  • Engine overhaul
  • Cooling system
  • Power and exhaust system
  • Engine electrical equipment
  • Emission control system
  • Transmission
  • Mechanical gearbox
  • Automatic gearbox
  • Clutch and drive shafts
  • Four-wheel drive
  • Chassis and running gear
  • Brake system
  • Car suspension
  • Steering
  • Body and interior
  • Body elements
  • Electrical equipment
  • Equipment and devices
  • Electrical circuits
HondaBook.ru © 2018–2026 • Mobile version • Sitemap: EN BG BY UA RS HR RO PL SK HU • Feedback • Driver Information • Search system • Bookmark
Accord 3 (1985-1989) • Accord 6 (1997-2002) • Civic 3 and 4 (1983-1991) • Civic 5 and 6 (1991-2000) • Civic 6 (1995-2000) • Civic 7 (2000-2005) • Civic 8 (2005-2011) • Fit 1 (2001-2008) • CR-V 1 (1995-2001) • CR-V 2 (2002-2006) • HR-V 1 (1998-2006) • Avancier 1 (1999-2003) •
 
This website uses cookies to ensure proper functioning. By clicking "OK," you agree.