
Warning! Do not forget that gasoline is a highly flammable liquid - when working with components of the power system, follow all fire safety precautions. Do not smoke or approach the work area with an open flame or an uncovered carrier. Do not service the system in a room equipped with natural gas-fired, pilot flame-equipped heaters (such as water heaters and clothes dryers). Do not forget that gasoline is one of the carcinogenic substances that contribute to the development of cancer - try to avoid getting fuel on open areas of the body - use protective rubber gloves, in case of accidental unforeseen contact, wash your hands thoroughly with warm water and soap. Clean up spilled fuel immediately and do not store fuel-soaked rags near open flames. Remember that the fuel injection system of models equipped with fuel injection is constantly under pressure. Relieve any residual pressure in the system before disconnecting fuel lines (see chapter Power and exhaust systems). Wear safety goggles when servicing power system components. Keep a class B fire extinguisher handy at all times!
The air conditioning system path is also constantly under pressure, and therefore, before disconnecting the refrigeration lines, it is necessary to discharge the system in a specialized workshop.
Note. On the models under consideration, the engine is removed complete with transmission. Before starting work, carefully read the materials of this Section. It will be useful to saturate in advance with penetrating oil such hard-to-release fasteners, such as nuts / bolts for fastening the exhaust manifold, power unit supports, etc.
Withdrawal
1. Relieve the pressure in the supply system (see chapter Power and exhaust systems).
2. Disconnect the negative cable from the battery. Disconnect also a positive wire, then release fasteners of opposite tips of both wires and take the last from an impellent compartment. on Civic models, remove the battery and remove its installation tray from the engine compartment (see chapter Engine electrical equipment).
Attention! If the stereo system installed in the car is equipped with a security code, before disconnecting the battery, make sure that you have the correct combination to activate the audio system!
3. Cover the fenders and the air baffle under the windshield of the car with special protective covers, or just old blankets. Open the hood as wide as possible (Civic models), or remove it entirely (Integra models) (see chapter Body).
4. On Integra models, remove the engine bay spacer bar (see accompanying illustration). 5. Remove the air cleaner assembly with the air intake sleeve (see chapter Power and exhaust systems).
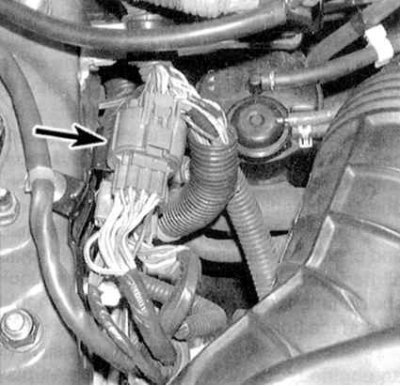
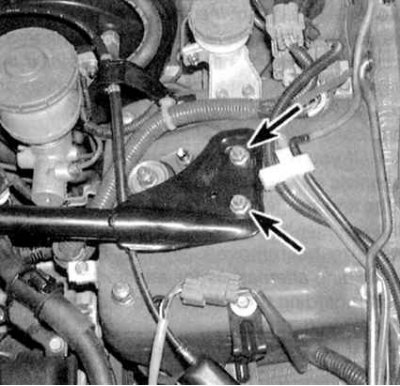
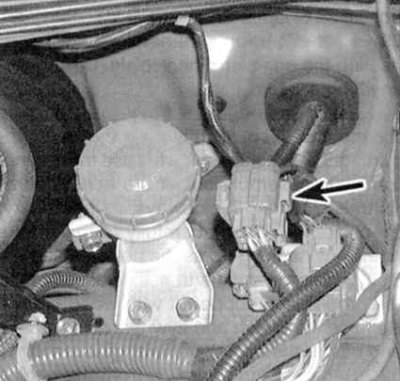
6a. Clearly label and disconnect all vacuum lines, emission control hoses, connectors, wiring harnesses, ground bars, and fuel lines from the engine (see accompanying illustrations). On Civic models, disconnect the wiring from the power control module (RSM) inside the car (see chapter Engine management systems), then remove the rubber bushings from the rear bulkhead of the engine compartment and push the main electrical cable through the bulkhead. Marking electrical wiring, lines and hoses is best done with adhesive tape. It will also be useful to draw up a scheme for laying communications, or to take a series of photographs.
6b. On Integra models, the main scythe connector is located on the left side of the engine compartment. 7. Having marked, disconnect from the engine all hoses of system of cooling.
8. Remove expansion tank, cooling fan with shroud and radiator (see chapter Cooling and heating systems).
9. Remove the drive belt (And) and tension roller (if provided) (see chapter Current service).
10. Disconnect fuel lines from engine to chassis (see chapter Power and exhaust systems). Seal the open ends of lines and fittings to prevent dirt from entering the supply system.
11. Disconnect the accelerator rod from the engine (see chapter Power and exhaust systems), as well as the drive cable and the tempostat actuator (with appropriate vehicle equipment).
12. Unbolt the steering pump and move it to the side without disconnecting the hydraulic lines (see chapter Suspension and steering). Make sure the pump is fixed vertically.
13. On models equipped with air conditioning (K/V), unscrew and move the compressor to the side - do not disconnect the refrigeration lines (see chapter Cooling and heating systems).
Note. Securely fasten the removed compressor with wire, not allowing it to hang on the hoses.
14. Unbolt the generator and slide it to the side along with the support bar (see chapter Engine electrical equipment).
15. Jack up the car and put it on stands. Empty the cooling system (see chapter Current service).
16. Drain the engine oil and remove the oil filter (see chapter Current service).
17. Remove the starter (see chapter Engine electrical equipment).
18. Remove the crankcase protection (see chapter Body).
19. On models with AT, disconnect the throttle cable from the transmission housing. Also disconnect all electrical wiring and shift cable from the transmission (see 4-speed and continuously variable automatic transmissions (at and cvt)).
20. On models with AT, also disconnect the ATF cooling lines from the transmission.
21. Remove the crankshaft pulley and screw the bolt into place.
22. Disconnect from the engine a reception pipe of system of release of the fulfilled gases (see chapter Power and exhaust systems).
23. Support the transmission with a trolley jack. Remember to place a block of wood between the jack head and the transmission case to distribute the load.
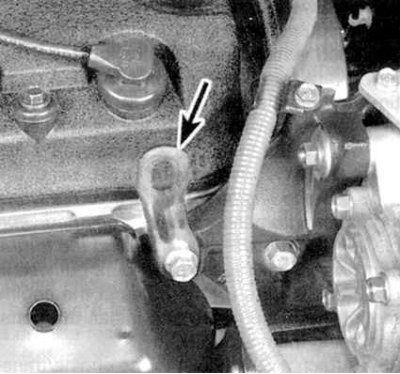
24. Attach slings or chains to the engine (see accompanying illustration). 25. Move winch to working position (directly above the engine) and stuff the rigging without lifting the engine yet.
Attention! Try not to put your hands under the suspended power unit!
26. Remove drive shafts (see chapter cordon and drive shafts).
27. On models with manual transmission, unbolt the clutch slave cylinder and slide it to the side without disconnecting the hydraulic lines (see chapter cordon and drive shafts). Disconnect the shift rods (see 5-speed manual gearbox).
28. Turn out bolts of fastening of supports of the power unit to elements of the chassis (see parts Engine repair without removal from the car - Civic models or Engine repair without removal from the car - Integra models this Chapter).
29. Make sure nothing else is connecting the power unit to the vehicle. If necessary, make the necessary disconnections, having previously marked the forgotten communications.
30. Slowly lift the engine, carefully releasing its supports. Jack up the transmission at the same time. After making sure that there is no interference, remove the power unit assembly from the engine compartment.
31. Carefully lower the power unit assembly to the garage floor and support it with wooden blocks. If necessary, remove the flywheel/drive plate and mount the engine on a mounting stand.
32. Separate the transmission from the engine (see chapter Gear box).
Installation
1. Check the condition of the power unit supports. Replace defective components.
2. On models with manual transmission, check the condition of the clutch components (it will be correct to replace the entire assembly). Install the clutch (see chapter Clutch and drive shafts) and lubricate the transmission input shaft splines with high temperature grease.
3. Carefully connect the transmission to the engine.
Attention! To avoid damage to major components, never use the mounting bolts to align the transmission and engine with each other! On models with AT, special care should be taken when installing the rotation converter (strictly follow the instructions in 4-speed and continuously variable automatic transmissions (at and cvt)).
4. Connect the rigging to the power unit, lift the assembly and carefully place it in its regular place in the engine compartment of the car.
5. Screw in the fixing bolts and tighten them firmly. Further assembly is carried out in the reverse order of dismantling.
6. Add coolant and engine oil to the engine, fill the transmission and power steering system (see chapter Current service).
7. Start the engine and check for proper operation and signs of leaks. Switch off the ignition and check the levels of working fluids of the power unit. If filmed (Integra models), reinstall the hood. Carry out a road test of the vehicle.
8. On models equipped with A/C, evacuate and charge the air conditioning system in a specialized workshop.