
Examination
Note: Check the following before testing: idle speed, ignition timing and CO content.
If the engine is running:
1. With the engine running, disconnect the connectors of each injector individually and notice the change in idle speed.
If the speed drops almost equally on each cylinder, the injectors are normal.
If the idle speed and smoothness remain the same when any cylinder is disconnected, replace that injector and recheck.
2. Check the clicking sound of each injector using a stethoscope at idle.
If any injector does not make the characteristic clicking sound, replace it and check the sound again.
If there is still no sound, check the following:
- There may be shorts, breaks or poor contacts in the yellow/black wire between the main injection system relay and the common connector.
- The common connector may be open or oxidized.
- There may be shorts, breaks or poor-quality contacts in the red/black wire between the common connector and the injector.
- There may be short circuits, breaks or poor-quality contacts in the wiring between the injector and the electronic control unit.
- If all of the above are in order, check the electronic control unit and the main injection relay.
If the engine does not start:
1. Disconnect the injector connectors and measure the resistance between the two injector contacts.
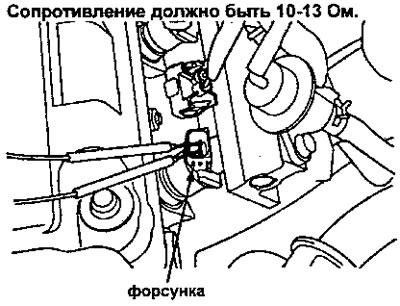
If the resistance is not within the specified limits, replace the injector.
If resistance is normal, check fuel pressure.
If fuel pressure is normal, check the following:
- There may be shorts, breaks or poor contacts in the yellow/black wire between the main injection system relay and the common connector.
- The common connector may be open or oxidized. There may be shorts, breaks or poor-quality contacts in the red/black wire between the common connector and the injector.
- There may be short circuits, breaks or poor-quality contacts in the wiring between the injector and the electronic control unit.
- If all of the above are OK, check the electronic control unit.
Replacement
Attention: Do not smoke when working on the fuel system. Keep open flames away from your work area.
1. Relieve fuel pressure.
2. Disconnect the connectors from the fuel injectors (D14AZ, D14A4, D15Z4, D15Z5 engine: remove ACL).
3. Disconnect the vacuum hoses and fuel return hose from the fuel pressure regulator.
Caution: Place a rag or rag over the hoses before disconnecting them.
4. Loosen the retaining nuts on the fuel manifold.
5. Disconnect the fuel manifold.
6. Remove the fuel injectors from the intake manifold.
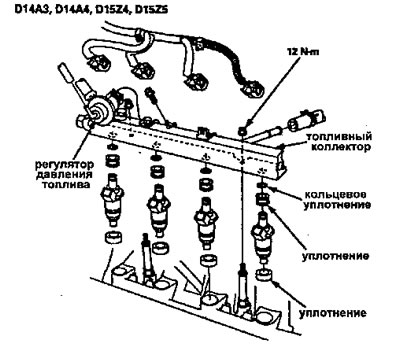 | 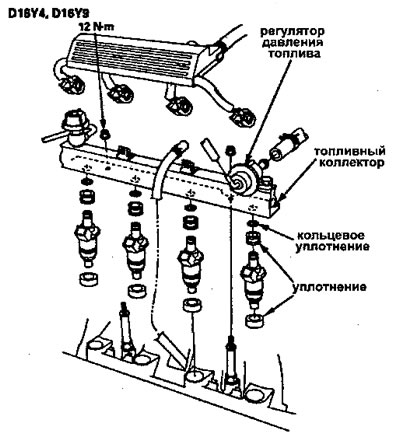 |
7. Place new seals on the injectors.
8. Apply engine oil to the new O-rings and install them on the injectors.
9. Insert the injectors into the fuel manifold first.
10. Coat the new O-rings with clean engine oil and install them into the intake manifold.
11. Install the fuel injectors and fuel manifold assembly onto the intake manifold.
Caution: Be careful not to damage the O-ring when installing.
12. Install and tighten (compress) holder nuts (retainer).
13. Connect the vacuum hoses and fuel return hose to the fuel pressure regulator.
14. Connect the injector connectors (engine D14A3, D14A4, D15Z4, D15Z5: Install ACL).
15. Turn on the ignition (II), but do not crank the engine with the starter. After the fuel pump runs for approximately two seconds, the fuel pressure in the fuel line will increase. Repeat this two or three times, then check for fuel leakage.