HondaBook.ru
Auto companies Volkswagen Auto companies Ford Auto companies Lada Auto companies Skoda Auto companies BMW Auto companies Mazda Auto companies Peugeot
English Русский
Български
Беларускі
Український
Српски
Hrvatski
Română
Polski
Slovenský
Magyar
Bookmark Contacts Sitemap   


Accord Civic Fit / Jazz CR-V HR-V Others Articles
Civic 3 and 4 (1983-1991) Civic 5 and 6 (1991-2000) Civic 6 (1995-2000) Civic 7 (2000-2005) Civic 8 (2005-2011)

Fuel hose/quick couplings (Honda Civic 5)

  • Main
  • Honda Civic
  • 5 (1991-2000)
  • Power unit
  • Fuel injection system (SOHC)
  • Fuel hose/quick couplings
0
Contents: Precautionary measures ⇊ Disconnection ⇊ Compound ⇊

Precautionary measures


  • Do not smoke while working on the fuel system.
  • Avoid open flames in the workplace.

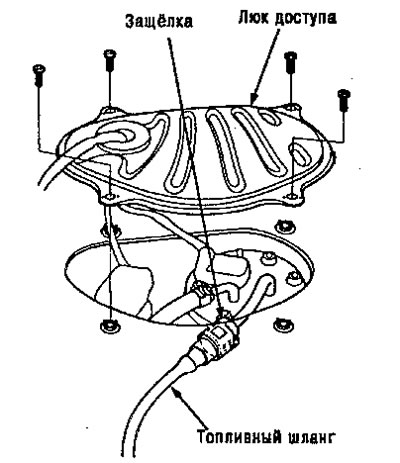
The fuel hose assembly with quick-release couplings serves to connect the fuel line and the fuel pump built into the gas tank. To remove or install the pump or gas tank, it is necessary to disconnect or connect the quick-release couplings. In this case, pay attention to the following:
  • The fuel hose with quick-release couplings is not a heat-protected assembly;
  • Be careful not to damage these parts during welding or other thermal work.

The fuel hose with quick-release couplings is not acid-resistant. Do not touch these parts with cloths or rags that were used to wipe the battery. Replace the fuel hose with quick-release couplings if they come into contact with electrolyte or similar substances.

When connecting or disconnecting, do not bend or twist the hose excessively. Replace it if damaged.

A disconnected quick-connect fitting can be reconnected, but the latch on the inner tube cannot be reused if it has been removed from the tube. Replace the latch if:
  • replacement of the fuel pump.
  • replacement of the fuel line.
  • in case of removal from the branch pipe.
  • in case of damage.

in case of damage.


Disconnection


Do not smoke while working on the fuel system. Keep open flames away from the work area.

1. Disconnect the negative terminal from the battery.

2. Remove the tank cap to relieve vapor pressure in the tank.

3. Relieve the fuel pressure in the system.

4. Inspect the quick release coupling for dirt and wipe clean if necessary.

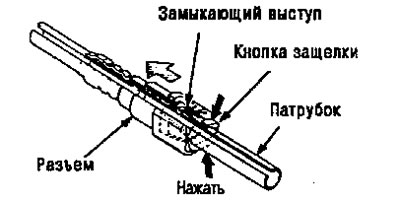
5. Hold the connector with one hand and press the latch buttons with the other, then pull the pipe out of the connection.

Note:
  • Be careful not to damage the tubes or other parts. Do not use tools.
  • If the hose does not come out of the connector, hold the latch buttons down and periodically move the connector in/out until it comes loose.
  • Do not remove the latch from the pipe; once removed, the latch must be replaced.

Do not remove the latch from the pipe; once…


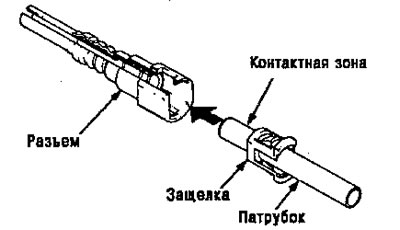
6. Check the contact area of the pipe for contamination or damage.

If the surface is dirty, clean it.

If the surface is rusted or damaged, replace the fuel pump or fuel line.
If the surface is rusted or damaged, replace the…


7. To prevent damage and contamination, cover the ends of the tubes with plastic bags.
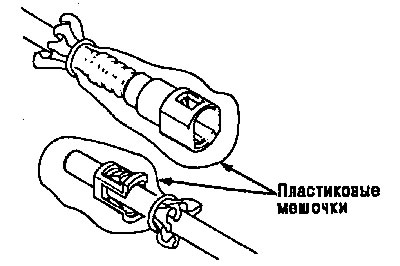


7. To prevent damage and contamination, cover the…


Note:

The latch cannot be reused if it has been removed from the nozzle.

Replace the latch if:
  • fuel pump replacement,
  • replacement of fuel lines,
  • in case of removal from the branch pipe,
  • in case of damage.


Compound


Do not smoke while working on the fuel system. Keep open flames away from the work area,

1. Check the contact area of the pipe for damage and contamination, clean if necessary.
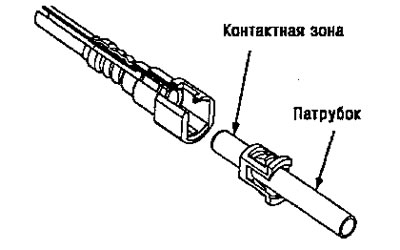
1. Check the contact area of the pipe for damage…


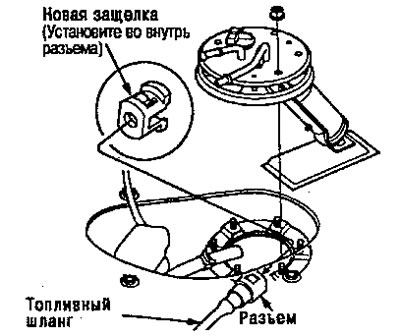
2. Install a new latch + into the connector if the latch is damaged or if:
  • fuel pump replacement,
  • replacement of fuel lines,
  • in case of removal of the spartubka.

in case of removal of the spartubka.


Before installing the new hose/quick disconnect assembly, remove the old latch from the fitting.
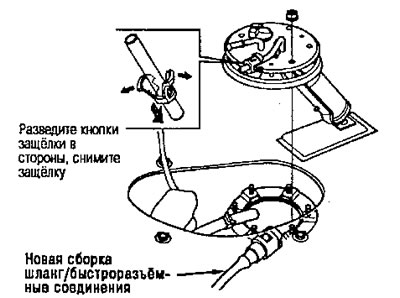


Before installing the new hose/quick disconnect…


3. Align the quick-release coupling with the pipe and align the tabs of the latch with the slots of the connector. Then push the pipe into the coupling until both tabs lock with a distinctive click.

Note: If it is difficult to push the hose into the joint, lubricate the end of the hose with a small amount of engine oil.
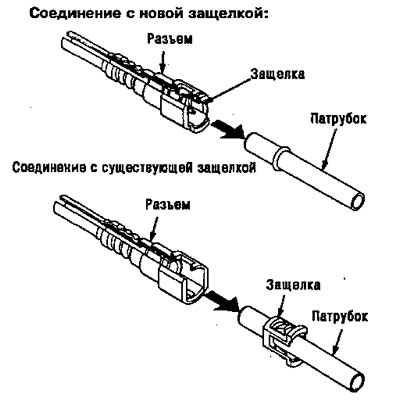

Note: If it is difficult to push the hose into…


4. Make sure the connection is secure and the protrusions are securely fastened in place. Check visually and by trying to remove the pipe from the connection.
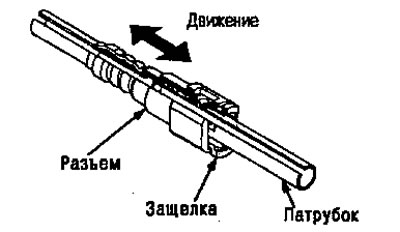
4. Make sure the connection is secure and the…


5. Reconnect the cable to the negative terminal of the battery and turn on the ignition. The fuel pump will operate for two seconds and the fuel pressure will increase. Repeat the activation two or three times and check the system for leaks.

[You will find the original on the portal «www.hondabook.ru»]
This article is available at: russian, bulgarian, belarusian, ukrainian, serbian, croatian, romanian, polish, slovak, hungarian
This information has been verified: Mikhail Kopasov
Share with friends:
◀ Previous
Civic 5 and 6: Fuel injection system (SOHC)
Next ▶

Fuel lines — device
Checking and adjusting the idle speed
Removal the electronic engine control unit
Self-diagnosis procedure
Single Camshaft Engine Injection System (SOHC) — component Layout
Fuel system — description
Fuel pressure
Fuel injectors — description
Check valve
Fuel filter
See also other articles from Honda manuals:
Fuel filter — removal and installation Honda Accord 3 (1985-1989)
Fuel quantity indicator Honda Fit 1 (2001-2008)
Precautions when handling fuel pipes/quick couplings Honda CR-V 2 (2002-2006, petrol)
Fuel line and quick release couplings Honda HR-V 1 (1998-2006, petrol)
Removal and installation fuel pipes with quick-release couplings Honda Avancier 1 (1999-2003, petrol)
Link in different formats to this article
Comments and feedback from visitors
No comments yet


How much will 11 + 38 ?


Civic 8 (2005-2011) 
  • General information
  • Technical data
  • Governing bodies
  • Driving and maintenance
  • Power unit
  • Gasoline engines (L13A)
  • Gasoline engines (R18A)
  • Diesel engines (N22A)
  • Cooling and lubrication (L13A)
  • Cooling and lubrication (R18A)
  • Cooling and lubrication (N22A)
  • Injection system (gasoline)
  • Injection system (diesel)
  • Toxicity reduction system
  • Troubleshooting
  • Transmission
  • Clutch and drive shafts
  • Mechanical gearbox
  • Chassis and running gear
  • Suspension and wheels
  • Steering
  • Brake system
  • Body and interior
  • Exterior (external elements)
  • Doors, locks and windows
  • Electrical equipment
  • Equipment and devices
  • Headlights and lighting
  • Power devices
  • Electrical circuits
Civic 7 (2000-2005) 
  • General information
  • User manual
  • Maintenance
  • Power unit
  • Engines D15B and D17A
  • K20A Engines
  • Overhaul engine
  • Cooling system
  • Lubrication system
  • Fuel injection system
  • Toxicity reduction system
  • Engine electrical equipment
  • Transmission
  • Clutch
  • Manual gearbox
  • Automatic gearbox
  • Variator (CVT)
  • Drive shafts
  • Chassis and running gear
  • Car suspension
  • Steering
  • Brake system
  • Body and interior
  • Exterior (external elements)
  • Interior (internal elements)
  • Doors, locks and windows
  • Heater and air conditioner
  • Manual air conditioner
  • Automatic air conditioner
  • Security system
  • Electrical equipment
  • Equipment and devices
  • Headlights and lighting
  • Windscreen wipers
  • Audio system
  • Electrical diagrams
Civic 6 (1995-2000) 
  • General information
  • Introduction to guide
  • User manual
  • Maintenance
  • Power unit
  • Engine in car (Civic)
  • Engine in car (Integra)
  • Engine overhaul
  • Cooling and heating
  • Power and exhaust systems
  • Engine electrical equipment
  • Engine management systems
  • Transmission
  • Manual gearbox
  • Automatic transmission (AT/CVT)
  • Clutch and drive shafts
  • Chassis and running gear
  • Brake system
  • Car suspension
  • Steering
  • Body and interior
  • Exterior (external elements)
  • Interior (internal elements)
  • Doors, locks and windows
  • Electrical equipment
  • Equipment and devices
  • Electrical circuits
Civic 5 and 6 (1991-2000) 
  • Power unit
  • SOHC engines
  • DOHC engines
  • Engine overhaul
  • Cooling and lubrication system
  • Intake and exhaust system
  • Fuel injection system (SOHC)
  • Fuel injection system (DOHC)
  • Carburetor
  • Transmission
  • Clutch
  • Manual gearbox S4C
  • Manual gearbox S40
  • Automatic gearbox
  • Drive shafts
  • Chassis and running gear
  • Car suspension
  • Steering
  • Brake system
  • Body and interior
  • Body elements
  • Heater and air conditioner
  • Electrical equipment
  • Power devices
  • Equipment and instruments
  • Electrical circuits
Civic 3 and 4 (1983-1991) 
  • General information
  • Maintenance
  • Power unit
  • Engine in a car
  • Engine overhaul
  • Cooling system
  • Power and exhaust system
  • Engine electrical equipment
  • Emission control system
  • Transmission
  • Mechanical gearbox
  • Automatic gearbox
  • Clutch and drive shafts
  • Four-wheel drive
  • Chassis and running gear
  • Brake system
  • Car suspension
  • Steering
  • Body and interior
  • Body elements
  • Electrical equipment
  • Equipment and devices
  • Electrical circuits
HondaBook.ru © 2018–2026 • Mobile version • Sitemap: EN BG BY UA RS HR RO PL SK HU • Feedback • Driver Information • Search system • Bookmark
Accord 3 (1985-1989) • Accord 6 (1997-2002) • Civic 3 and 4 (1983-1991) • Civic 5 and 6 (1991-2000) • Civic 6 (1995-2000) • Civic 7 (2000-2005) • Civic 8 (2005-2011) • Fit 1 (2001-2008) • CR-V 1 (1995-2001) • CR-V 2 (2002-2006) • HR-V 1 (1998-2006) • Avancier 1 (1999-2003) •
 
This website uses cookies to ensure proper functioning. By clicking "OK," you agree.