
Models with carburetors - pre-check
1. Disconnect the negative cable from the battery and remove the air filter housing (see Section 7).
2. Check for leaks in the system.
3. If there are no visible leaks, check the operation of the fuel pump.
Fuel pump control
4. Connect the remote control starter key according to the manufacturer's instructions. If you do not have a remote key, you will need the help of an assistant to control the pump.
5. Disconnect the fuel supply pipe from the carburetor.
6. Connect the negative cable to the battery.
7. Disconnect the low voltage wire from the ignition coil (see chapter 5).
8. Under the open end of the outlet pipeline of the fuel pump disconnected from the carburetor, bring a container to collect gasoline.
9. Scroll the engine with a starter for a few seconds.
10. With a free and strong exit of gasoline from the pipe, there are no malfunctions in the fuel pump. Otherwise, replace the pump (see Section 4).
Fuel pressure control
11. Place a pressure gauge in the line break before the fuel filter.
12. Disconnect the return line from the fuel pump and plug the pump outlet with a suitable cap.
13. Start the engine and record the fuel pressure while idling. Turn off the engine.
14. Fuel pressure must correspond to the values given in the specification. In case of deviations, replace the fuel pump. Models with fuel injection.
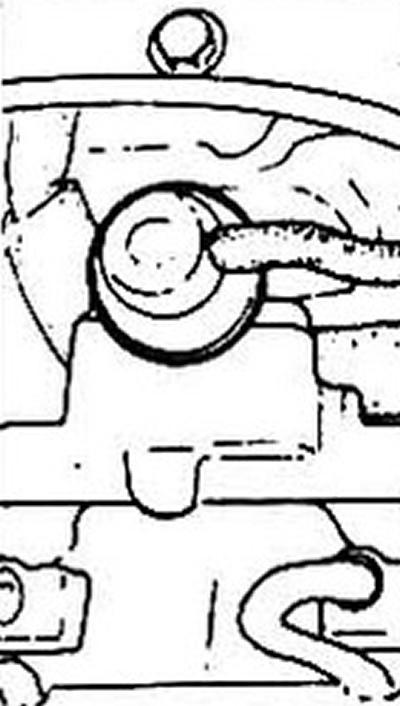
Application: on models 1985-1987, the fuel pump is located near the tank at the rear left wheel. On more recent models, the pump is installed in the tank.
15. Put the car on the parking brake. When you turn the ignition key to the second position, you should hear the operation of the fuel pump. The sound has a buzzing character and continues for 2-3 seconds. Start the engine. The buzzing sound should reappear (although it is difficult to distinguish against the background of a working moving la). If this does not happen, there is a defect in the booster pump or the main control relay.
Pressure control
16. Unload the fuel system (see section 2).
17. Remove the bolt from the fuel filter cover and attach a pressure gauge.
18. Start the engine. Disconnect the vacuum hose from the pressure regulator. When the engine is idling, write it down! pressure gauge reading and compare it with these specifications.
Pic. 3.18a Pressure regulator (multipoint injection system)
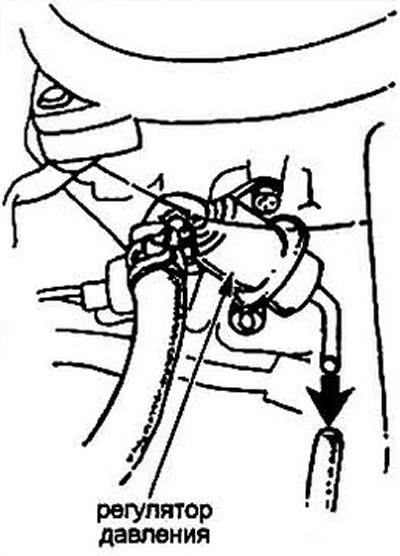
Pic. 3.186 Location of fuel filter and pressure regulator (two-point injection system)
19. If the pressure deviates from the recommended:
A) if the pressure is higher, check the operation of the regulator (see Section 14) or the presence of kinks and kinks in the return tubes and hoses.
b) if the pressure is lower:
- 1) check the fuel filter;
- 2) inspect the tubes and hoses from the tank to the filter. Kinks and creases are not allowed.
- 3) check the operation of the regulator (see Section 14);
- 4) check for fuel leaks.
- 5) did you forget to remove the vacuum hose?
20. If the above malfunctions are not detected, proceed to control the operation of the fuel pump.
Fuel pump control
21. You will need an assistant. When you turn the ignition key to the second position, you should hear a short humming sound from the pump and the pressure should begin to rise. Start the engine. A buzzing sound should be heard constantly.
22. If pump noise is not audible, perform the following steps:
23. Raise the rear of the car and put it on a stand.
24. Remove the left rear wheel.
25. On models of release 1985-1987. remove the protective casing of the fuel pump (see Section 4) and disconnect the black and black-yellow wires (the engine must be stopped and the ignition key in the "ABOUT"). On models since 1988, the fuel pump connector is located on top of the fuel tank and can be disconnected from the passenger compartment after removing the rear seat. The connector must have wires of the same colors (black and black-yellow).
26. Connect the voltmeter terminal to the black-yellow wire, and turn the ignition key to the black terminal and read the voltmeter readings.
27. If there is voltage, replace the pump (see Section 4).
28. If there is no voltage, check the main relay (see below).
Main relay control
29. Remove the relay from its socket under the fuse panel.
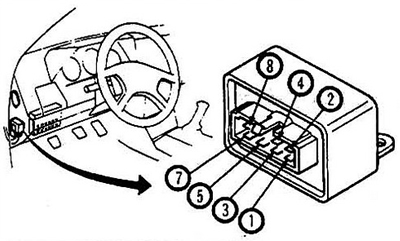
Pic. 3.29 The main relay is located under the dashboard near the fuse panel. The numbers indicate the legs of the relay
30. Using wires of sufficient length, connect the positive battery terminal to leg No. 4, ground leg No. 8 to the body and check the conductivity from leg No. 5 to leg No. 7. If there is no conductivity, replace the relay.
31. Connect "plus" battery with leg No. 5, ground leg No. 2 to the body and check the current conductivity between legs No. 1 and No. 3. If there is no conductivity, replace the relay.
32. Connect "plus" battery with leg No. 3 and ground leg No. 8 to the body. Check for current between legs No. 5 and No. 7. If there is no current, replace the relay.