
Note: During this procedure, the air temperature should be between 15 and 38°C.
After completing this procedure, you must reset the Engine Control Module (ECM), otherwise the ECM will continue to inhibit the injectors. Reset the ECM using the Honda Diagnostic System (HDS).
The battery must be in good condition and fully charged.
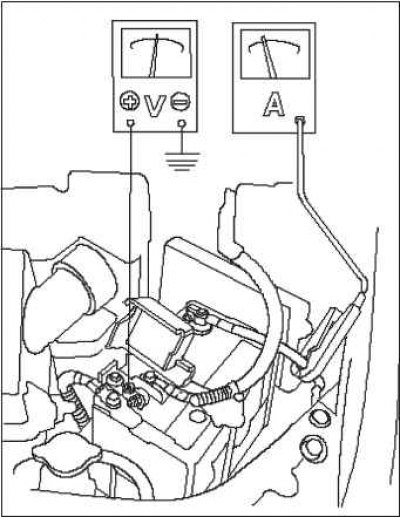
1. Connect the following equipment: ammeter, 0-400 A, voltmeter 0-20 V (with a measurement accuracy of at least 0.1 V).
2. Connect the HDS to the data link connector (DLC)
3. Turn the ignition on by turning the key to the "ON" (II) position.
4. Verify that the HDS is communicating with the vehicle and the ECM. If not, troubleshoot the DLC circuit.
5. Select PGM-FI, "INSPECTION", then "ALL INJECTORS OFF" in the HDS diagnostic system.
6. Turn the ignition switch to the "ON" (II) position and press the engine start button. Did the starter turn the engine shaft normally?
- YES - the starter system is OK. Go to step 11.
- NO - go to step 7.
7. Check the condition of the battery. Check the connection of the cable terminals to the battery terminals, the negative battery cable to the body, loose contact and corrosion of the body and starter ground cables. Then try to start the engine again.
Did the starter turn the engine shaft?
- YES - Fixing the poor cable connection solved the problem. The starter system is OK. Go to step 13.
- NO - check the following.
If the starter does not turn the engine shaft at all, proceed to step 8.
If it turns the engine shaft jerkily or very slowly, go to step 10.
If it does not disengage from the flywheel ring gear when you release the button, replace the starter or remove and disassemble it to check the following:
Malfunction of the electrical winding of the traction relay or switch. o Contamination of the drive gear or overrunning clutch.
8. Make sure the transmission is in neutral and set the parking brake. Disconnect the connector from the S terminal of the starter solenoid. Connect a jumper wire from the positive terminal of the battery to the terminal of the electrical winding.
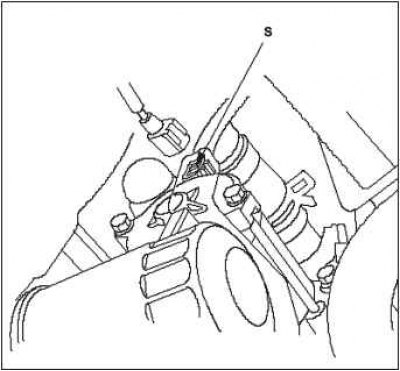
Did the starter turn the engine shaft?
- YES - go to step 9.
- NO - Remove the starter and repair or replace it if necessary.
9. Check the following items in the order shown until you find an open circuit:
WHT wire and connectors between the under-dash fuse/relay box and the starter current interrupt relay 2.
Wires RED and BLK/WHT and connectors between relay 2 interrupting current supply to the starter and the starter.
10. When starting the engine, check the voltage of the engine shaft cranking by the starter and the current of the starter traction relay movement.
Is the starter motor cranking voltage greater than or equal to 9 V, and is the starter motor traction relay moving current less than or equal to 150 A?
- YES - go to step 11.
- NO - Replace the starter, or remove and disassemble it to check for the following: starter armature lockup, short circuit in the armature winding, excessive resistance to engine cranking.
11. Check the engine speed when cranking it with the starter. Does the engine speed exceed 100 rpm?
- YES - go to step 12.
- NO - Replace the starter, or remove and disassemble it to check the following points.
Open circuit between the plates of the starter armature collector.
Excessive wear of starter brushes.
Broken chain in the commutator brushes.
Contamination or breakage of the spiral splines or pinion gear.
Malfunction of the pinion drive mechanism.
12. Remove the starter and check the condition of its pinion or flywheel ring gear. Replace any broken parts.
13. Select ECM data reset to stop the function "ALL INJECTORS OFF" in the HDS diagnostic system.
(Full version on the source website: «HondaBook»)