
HondaBook.ru
Auto companies Volkswagen Auto companies Ford Auto companies Lada Auto companies Skoda Auto companies BMW Auto companies Mazda Auto companies Peugeot
English Русский
Български
Беларускі
Український
Српски
Hrvatski
Română
Polski
Slovenský
Magyar
Bookmark Contacts Sitemap   


Accord Civic Fit / Jazz CR-V HR-V Others Articles
Accord 3 (1985-1989) Accord 6 (1997-2002)

Checking the condition, replacing and adjusting the starter circuit breaker switch sensor (Honda Accord 6)

  • Main
  • Honda Accord
  • 6 (1997-2002)
  • Transmission
  • Clutch and drive shafts
  • Checking the condition, replacing and adjusting the starter circuit breaker switch sensor
0
Contents: Examination ⇊ Replacement ⇊ Adjustment ⇊

Examination


Examination


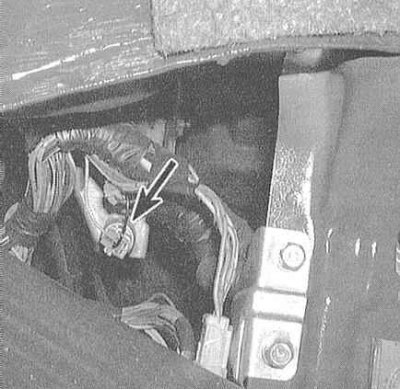
1. The starter circuit breaker switch is located near the upper end of the clutch pedal. Two wires are connected to the switch, one from the starter relay, the second is ground. When the ignition key is turned to the START position and the clutch pedal is depressed, the switch causes the starter relay to be shorted to ground, which activates the starter motor.

2. If the engine does not turn over when the clutch pedal is depressed, it is necessary to adjust the switch sensor and then try again. If the adjustment does not help to achieve the desired result, check the condition of the switch sensor and replace it if necessary. If the engine starts when the clutch pedal is released, adjust the switch sensor and try again.

3. If the engine does not turn when the clutch pedal is depressed, then either the conductivity between the terminals of the sensor-switch is broken, or the latter is not supplied with power from the starter relay.

4. Check the power supply with a voltmeter or test lamp. When the ignition key is turned to the START position and the pedal is depressed, there should be voltage on the wire coming from the starter relay. If there is no voltage, check the wiring between the relay and the sensor-switch for a break. If the power is supplied correctly, check for voltage on the opposite side of the sensor-switch (with the clutch pedal depressed). The presence of voltage on both sides of the sensor-switch confirms that it is functioning properly. Try adjusting it. If there is no voltage, replace the sensor-switch.


Replacement


Disconnect the wiring connector, loosen the adjusting nut and unscrew the sensor-switch from its support bracket. Installation is carried out in the reverse order.

Adjustment


Loosen the lock nut and, by rotating the sensor switch, ensure that there is conductivity between its terminals with the clutch pedal depressed.

(Information obtained from this source: www.HondaBook.ru)
This article is available at: russian, bulgarian, belarusian, ukrainian, serbian, croatian, romanian, polish, slovak, hungarian
This information has been verified: Timofey Goryachev
Share with friends:
◀ Previous
Accord 6: Clutch and drive shafts
Next ▶

Adjusting the clutch pedal
Removal, checking and installation the release bearing and clutch release fork
Removal, condition check and installation of clutch assembly components
Bleeding air from the hydraulic circuit of the clutch release drive
Removal and installation the clutch slave cylinder
Removal and installation drive shafts
Removal and installation the intermediate shaft
Replacing protective covers and checking the condition of CV joints
See also other articles from Honda manuals:
Checking, replacing and adjusting the starter circuit breaker switch… Honda Civic 6 (1995-2000)
Checking the Heater Fan Speed Switch Circuit (Right Hand Drive Models) Honda Fit 1 (2001-2008)
Spark plugs — checking and replacing Honda CR-V 1 (1995-2001, petrol)
Checking the starter brushes Honda HR-V 1 (1998-2006, petrol)
Checking/replacing the windshield wiper/washer switch Honda Avancier 1 (1999-2003, petrol)
Link in different formats to this article
Comments and feedback from visitors
No comments yet


How much will 12 + 42 ?


Accord 6 (1997-2002) 
  • General information
  • Introduction to the guide
  • User manual
  • Maintenance
  • Power unit
  • Four-cylinder engines
  • Six-cylinder engines
  • Engine overhaul
  • Cooling system
  • Heater and air conditioner
  • Power and exhaust systems
  • Engine electrical equipment
  • Engine management
  • Transmission
  • Mechanical gearbox
  • Automatic gearbox
  • Clutch and drive shafts
  • Chassis and running gear
  • Brake system
  • Car suspension
  • Steering
  • Body and interior
  • Exterior (external elements)
  • Interior (internal elements)
  • Electrical equipment
  • Equipment and devices
  • Electrical circuits
Accord 3 (1985-1989) 
  • General information
  • Maintenance
  • Power unit
  • Engine adjustment
  • Engine repair
  • Engine electrics
  • Emission management
  • Engine management (carburetor)
  • Electronic injection
  • Programmable injection
  • Schematic of emission system
  • Fuel system
  • Feedback management
  • Transmission
  • Manual gearbox
  • Automatic gearbox
  • Clutch
  • Chassis and running gear
  • Front suspension
  • Rear suspension
  • Steering
  • Brake system
  • Electrical equipment
  • Ventilation and heating
  • Air conditioner
  • Cruise control system
  • Equipment and devices
HondaBook.ru © 2018–2026 • Mobile version • Sitemap: EN BG BY UA RS HR RO PL SK HU • Feedback • Driver Information • Search system • Bookmark
Accord 3 (1985-1989) • Accord 6 (1997-2002) • Civic 3 and 4 (1983-1991) • Civic 5 and 6 (1991-2000) • Civic 6 (1995-2000) • Civic 7 (2000-2005) • Civic 8 (2005-2011) • Fit 1 (2001-2008) • CR-V 1 (1995-2001) • CR-V 2 (2002-2006) • HR-V 1 (1998-2006) • Avancier 1 (1999-2003) •
 
This website uses cookies to ensure proper functioning. By clicking "OK," you agree.