
HondaBook.ru
Auto companies Volkswagen Auto companies Ford Auto companies Lada Auto companies Skoda Auto companies BMW Auto companies Mazda Auto companies Peugeot
English Русский
Български
Беларускі
Український
Српски
Hrvatski
Română
Polski
Slovenský
Magyar
Bookmark Contacts Sitemap   


Accord Civic Fit / Jazz CR-V HR-V Others Articles
Civic 3 and 4 (1983-1991) Civic 5 and 6 (1991-2000) Civic 6 (1995-2000) Civic 7 (2000-2005) Civic 8 (2005-2011)

Removal and installation the steering knuckle and hub assembly (Honda Civic 6)

  • Main
  • Honda Civic
  • 6 (1995-2000)
  • Chassis and running gear
  • Car suspension
  • Removal and installation the steering knuckle and hub assembly
0
Contents: Removal ⇊ Installation ⇊

Removal


Removal


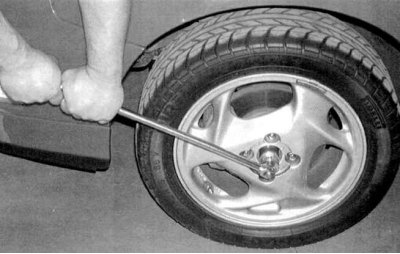
1. Remove the wheel cap. Loosen the hub nut (see accompanying illustration). Loosen the wheel nuts, then jack up the front of the car and place it on supports. Remove the wheel. Unscrew the hub nut.

2. Release the flexible brake hose from the bracket on the steering knuckle assembly. Unbolt the brake caliper and tie it with wire to the coil spring. Also remove the caliper anchor bracket and the brake disc (see Chapter Brake system).

3. Disconnect the steering tie rod end from the steering knuckle (see Removal and installation tie rod ends).

4. Separate the lower control arm from the ball joint at the bottom of the steering knuckle (see Removal and installation the lower control arm of the front suspension).

5. Separate the upper end of the knuckle from the upper control arm ball joint.

6. Carefully pull the knuckle and hub assembly outward, removing it from the drive shaft journal. If necessary, tap the end of the journal with a soft-faced hammer to release it from the hub. Tie the drive shaft assembly with wire to avoid damaging the inner CV joint.


Installation


1. Lightly lubricate the splines of the outer journal of the drive shaft with special grease. Pass the journal through the hole in the hub, simultaneously tucking the steering knuckle into place.

2. Connect the upper part of the knuckle to the ball joint of the upper control arm (see Removal and installation the upper control arm of the front suspension). Tighten the ball joint nut to the required torque.

3. Connect the ball joint at the bottom of the knuckle to the lower control arm (see Removal and installation the lower control arm of the front suspension).

4. Reinstall the brake disc, anchor bracket and caliper (see Chapter Brake system).

5. Screw the hub nut onto the drive shaft journal and tighten it securely.

6. Install the wheel, lower the vehicle to the ground and tighten the wheel nuts to the required torque (see Specifications to the Chapter Routine maintenance).

7. Tighten the hub nut to the required torque.

Based on materials from the website HONDABOOK.ru
This article is available at: russian, bulgarian, belarusian, ukrainian, serbian, croatian, romanian, polish, slovak, hungarian
This information has been verified: Timofey Goryachev
Share with friends:
◀ Previous
Civic 6: Car suspension
Next ▶

Removal and installation the lower control arm of the front suspension
Removal and installation the upper control arm of the front suspension
Removal and installation the front anti-roll bar with support bushings
Replacing the shock absorber or coil spring of the front suspension strut…
Removal and installation the front shock absorber assembly with a coil spring
Removal and installation the front hub assembly with wheel bearing
Replacing ball joints
Removal and installation the rear shock absorber assembly with a coil spring
Removal and installation the rear anti-roll bar with support bushings
Removal and installation the rear hub assembly with wheel bearing
See also other articles from Honda manuals:
Wheel Hub, Steering Knuckle & Bearings — 1984-85 Accord Honda Accord 3 (1985-1989)
Front wheel steering knuckle and hub Honda Fit 1 (2001-2008)
Steering knuckle — removal and installation Honda CR-V 1 (1995-2001, petrol)
Replacing the steering knuckle and hub Honda HR-V 1 (1998-2006, petrol)
Front Suspension Steering Knuckle and Hub — Removal and Installation Honda Avancier 1 (1999-2003, petrol)
Link in different formats to this article
Comments and feedback from visitors
No comments yet


How much will 37 + 48 ?


Civic 8 (2005-2011) 
  • General information
  • Technical data
  • Governing bodies
  • Driving and maintenance
  • Power unit
  • Gasoline engines (L13A)
  • Gasoline engines (R18A)
  • Diesel engines (N22A)
  • Cooling and lubrication (L13A)
  • Cooling and lubrication (R18A)
  • Cooling and lubrication (N22A)
  • Injection system (gasoline)
  • Injection system (diesel)
  • Toxicity reduction system
  • Troubleshooting
  • Transmission
  • Clutch and drive shafts
  • Mechanical gearbox
  • Chassis and running gear
  • Suspension and wheels
  • Steering
  • Brake system
  • Body and interior
  • Exterior (external elements)
  • Doors, locks and windows
  • Electrical equipment
  • Equipment and devices
  • Headlights and lighting
  • Power devices
  • Electrical circuits
Civic 7 (2000-2005) 
  • General information
  • User manual
  • Maintenance
  • Power unit
  • Engines D15B and D17A
  • K20A Engines
  • Overhaul engine
  • Cooling system
  • Lubrication system
  • Fuel injection system
  • Toxicity reduction system
  • Engine electrical equipment
  • Transmission
  • Clutch
  • Manual gearbox
  • Automatic gearbox
  • Variator (CVT)
  • Drive shafts
  • Chassis and running gear
  • Car suspension
  • Steering
  • Brake system
  • Body and interior
  • Exterior (external elements)
  • Interior (internal elements)
  • Doors, locks and windows
  • Heater and air conditioner
  • Manual air conditioner
  • Automatic air conditioner
  • Security system
  • Electrical equipment
  • Equipment and devices
  • Headlights and lighting
  • Windscreen wipers
  • Audio system
  • Electrical diagrams
Civic 6 (1995-2000) 
  • General information
  • Introduction to guide
  • User manual
  • Maintenance
  • Power unit
  • Engine in car (Civic)
  • Engine in car (Integra)
  • Engine overhaul
  • Cooling and heating
  • Power and exhaust systems
  • Engine electrical equipment
  • Engine management systems
  • Transmission
  • Manual gearbox
  • Automatic transmission (AT/CVT)
  • Clutch and drive shafts
  • Chassis and running gear
  • Brake system
  • Car suspension
  • Steering
  • Body and interior
  • Exterior (external elements)
  • Interior (internal elements)
  • Doors, locks and windows
  • Electrical equipment
  • Equipment and devices
  • Electrical circuits
Civic 5 and 6 (1991-2000) 
  • Power unit
  • SOHC engines
  • DOHC engines
  • Engine overhaul
  • Cooling and lubrication system
  • Intake and exhaust system
  • Fuel injection system (SOHC)
  • Fuel injection system (DOHC)
  • Carburetor
  • Transmission
  • Clutch
  • Manual gearbox S4C
  • Manual gearbox S40
  • Automatic gearbox
  • Drive shafts
  • Chassis and running gear
  • Car suspension
  • Steering
  • Brake system
  • Body and interior
  • Body elements
  • Heater and air conditioner
  • Electrical equipment
  • Power devices
  • Equipment and instruments
  • Electrical circuits
Civic 3 and 4 (1983-1991) 
  • General information
  • Maintenance
  • Power unit
  • Engine in a car
  • Engine overhaul
  • Cooling system
  • Power and exhaust system
  • Engine electrical equipment
  • Emission control system
  • Transmission
  • Mechanical gearbox
  • Automatic gearbox
  • Clutch and drive shafts
  • Four-wheel drive
  • Chassis and running gear
  • Brake system
  • Car suspension
  • Steering
  • Body and interior
  • Body elements
  • Electrical equipment
  • Equipment and devices
  • Electrical circuits
HondaBook.ru © 2018–2026 • Mobile version • Sitemap: EN BG BY UA RS HR RO PL SK HU • Feedback • Driver Information • Search system • Bookmark
Accord 3 (1985-1989) • Accord 6 (1997-2002) • Civic 3 and 4 (1983-1991) • Civic 5 and 6 (1991-2000) • Civic 6 (1995-2000) • Civic 7 (2000-2005) • Civic 8 (2005-2011) • Fit 1 (2001-2008) • CR-V 1 (1995-2001) • CR-V 2 (2002-2006) • HR-V 1 (1998-2006) • Avancier 1 (1999-2003) •
 
This website uses cookies to ensure proper functioning. By clicking "OK," you agree.