
2. Check the shock absorber for signs of leaks, dents, cracks and other mechanical damage. Inspect the coil spring for chips, cracks, signs of sagging, and the rubber pads of its supports for signs of hardening and aging of the material. Shock absorbers with coil springs are always available from Honda service centers on an exchange basis, which can significantly reduce time and cost. With that said, before you start disassembling a shock absorber for the purpose of overhauling it, conduct marketing by determining the prices of replacement components and comparing them with the cost of purchasing a remanufactured assembly.
Note. Removing the coil spring from the damper assembly is potentially hazardous and should only be done using a good quality special tool.
3. Clamp the shock absorber assembly in a vise with soft jaws (not too hard).
4. Mark the position of the support base in relation to the spring (if the spring is to be replaced, then in relation to the damper assembly).
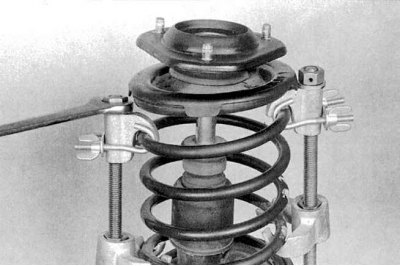
5. Following the manufacturers instructions, install the coil spring compression tool. Tightening nuts on tool studs (see accompanying illustration), compress the spring enough to completely unload the support base.

6. Remove the protective cap and give the self-locking nut (see accompanying illustration), holding the damper rod from turning with a bar wrench. Remove the top mount components from the shock by laying them out on a clean surface in the order in which they appear on the assembly.
7. Carefully remove the compressed coil spring from the assembly and store it in a safe place.
Attention! Do not turn the compressed spring ends towards you!
8. Remove the remaining components from the damper rod and lay them out on a workbench (in assembly order).
9. Move the recoil buffer with its own plate, dust cover and its plate to the new damper assembly. Pull the stem out of the damper all the way and thread it through the components to be installed.
10. Carefully slide the compressed helical spring over the assembly. Make sure the lower end of the spring is properly seated in your saddle.
11. Install the spring seat rubber, stem seat bushing, seat assembly base, machine nut washer, and new self-locking nut. Before tightening the nut, make sure that the marks made during the dismantling process are aligned correctly.
12. While holding the stem from turning with a spanner, tighten the self-locking nut to the required torque. Release the spring compression tool and remove it from the assembly. Install the protective cap.
13. Get the assembly to your regular place and install on the car (see Removal and installation of assembly of the forward shock-absorber with a screw spring or Removal and installation of assembly of the back shock-absorber with a screw spring).