HondaBook.ru
Auto companies Volkswagen Auto companies Ford Auto companies Lada Auto companies Skoda Auto companies BMW Auto companies Mazda Auto companies Peugeot
English Русский
Български
Беларускі
Український
Српски
Hrvatski
Română
Polski
Slovenský
Magyar
Bookmark Contacts Sitemap   


Accord Civic Fit / Jazz CR-V HR-V Others Articles
Civic 3 and 4 (1983-1991) Civic 5 and 6 (1991-2000) Civic 6 (1995-2000) Civic 7 (2000-2005) Civic 8 (2005-2011)

Injectors — checking and replacement (Honda Civic 5)

  • Main
  • Honda Civic
  • 5 (1991-2000)
  • Power unit
  • Fuel injection system (DOHC)
  • Injectors — checking and replacement
0
Note: Before starting the test, check the following: idle speed, fuel injection and CO ₂ at idle.


If the engine is running:

1. With the engine idling, disconnect each injector connector individually and observe the idle speed change.

If the idle drop is almost the same on each cylinder, the injectors are OK. If the idle speed or quality remains the same when you disconnect an individual injector, replace the injector and check again.

2. With the engine idling, use a stethoscope to check the clicking sound of each injector.

If any of the injectors does not produce the typical clicking sound, check the sound again after replacing the injector.

If the clicking sound is still missing, check the following:

Whether there is a short circuit in the circuit, a broken wire or a bad connection in the YEL / BLK wire between the main relay of the injection system and the nozzle. Whether there is a break or corrosion in the connector of the connection. Whether there is a short circuit, a broken wire, or a bad connection in the RED/BLK wire between the connection connector and the nozzle. Is there a short circuit in the circuit, a broken wire, or a bad connection in the wire between the nozzle and the electronic engine control unit/AUTOMATIC transmission (ECM/RSM). If everything is in order, check the electronic engine control unit/Automatic transmission (ECM/PCM) and the main relay of the injection system.

If the engine cannot be started:

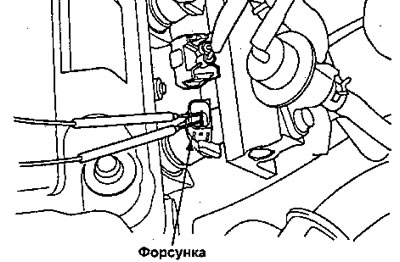
1. Remove the injector connector and measure the resistance between the two injector contacts.


  • Resistance should be: 10-13 Ohm

Resistance should be: 10-13 Ohm


If resistance is out of specification, replace injector. If resistance is within specification, check fuel pressure.

If the fuel pressure is within specification, check the following:

Is there a short circuit, open wire or poor connection in the YEL/BLK wire between the main fuel injection relay and the injector?.

Is there any break or corrosion in the connection connector?.

Is there a short circuit, broken wire or poor connection in the RED/BLK wire between the connector and the injector,

Is there a short circuit, open wire, or poor connection in the wire between the injector and the engine control module/automatic transmission (ECM/PCM).

If everything is OK, check the engine/transmission control module (ECM/PCM)

Replacement


Caution: Do not smoke when working on the fuel system. Keep open flames away from your work area.


1. Reduce (release) fuel pressure.

2. Disconnect the connectors from the fuel injectors (D16Y7 engine: Remove the air filter).

3. Disconnect the vacuum hoses and fuel return hose from the fuel pressure regulator (D16Y5, 016Y8 engine: Disconnect the vacuum hoses and 2P connector from the fuel vapor removal system cleaning system from the intake manifold controls the solenoid valve).


Caution: Place a rag or cloth over the hoses before disconnecting them.


4. Loosen the retainer nuts on the fuel manifold.

5. Disconnect the fuel rail.

6. Remove the fuel injectors from the intake manifold.
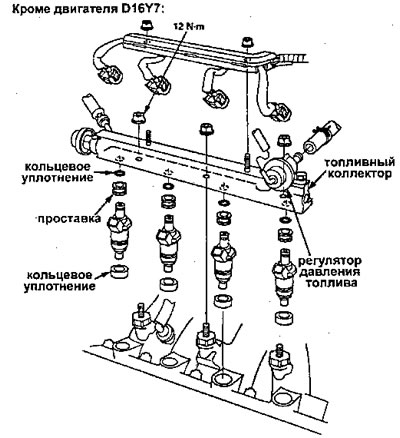
6. Remove the fuel injectors from the intake…


7. Move the new pillow rings onto the fuel injectors.

8. Lubricate the new O-rings with a layer of clean engine oil and place them on the injectors.

9. Insert the injectors into the fuel manifold first.

10. Coat the new O-rings with clean engine oil and press them into the intake manifold.
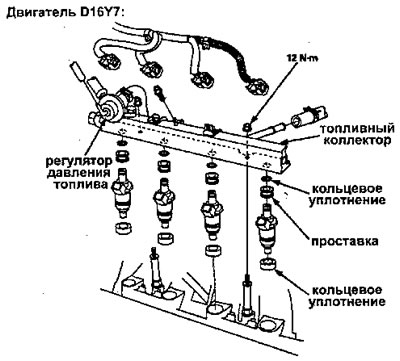
10. Coat the new O-rings with clean engine oil…


11. Install the injectors and torus assembly into the intake manifold.

Caution: To prevent damage to the O-ring, install the fuel injectors in the fuel rail first, then install them in the intake manifold.


12. Install, and tighten the nuts of the holder (retainer).


13. Connect the vacuum hoses and fuel return hose to the fuel pressure regulator (D16Y5, D16Y8 engine: Connect the vacuum hoses and 2P connector to the fuel vapor removal system cleaning from the intake manifold controls the solenoid valve).

14. Install the connectors on the fuel injectors (D16Y7 Engine: Install Air Filter).

15. Turn on the ignition (11), but do not use the starter. After the fuel pump runs for about two seconds, the fuel pressure in the fuel line increases. Repeat this two or three times, then check if there is any fuel leakage.

(Original material on the website: www.hondabook.ru)
This article is available at: russian, bulgarian, belarusian, ukrainian, serbian, croatian, romanian, polish, slovak, hungarian
This information has been verified: Mikhail Kopasov
Share with friends:
◀ Previous
Civic 5 and 6: Fuel injection system (DOHC)
Next ▶

Fuel pressure
Idle Speed Control System
Self-diagnosis procedure
Dual Camshaft Engines (DOHC) — device
FIRST Fuel Pressure Regulator
Fuel filter
Description of the exhaust gas toxicity reduction system
Throttle body KART
Emission Control System — Exhaust
See also other articles from Honda manuals:
Drive Belts — Checking and Adjusting Tension Honda Accord 3 (1985-1989)
Checking tire pressure and condition Honda Fit 1 (2001-2008)
Battery — Checking, Removing and Installing Honda CR-V 1 (1995-2001, petrol)
Checking the starter brushes Honda HR-V 1 (1998-2006, petrol)
Checking fuel injectors Honda Avancier 1 (1999-2003, petrol)
Link in different formats to this article
Comments and feedback from visitors
No comments yet


How much will 45 + 11 ?


Civic 8 (2005-2011) 
  • General information
  • Technical data
  • Governing bodies
  • Driving and maintenance
  • Power unit
  • Gasoline engines (L13A)
  • Gasoline engines (R18A)
  • Diesel engines (N22A)
  • Cooling and lubrication (L13A)
  • Cooling and lubrication (R18A)
  • Cooling and lubrication (N22A)
  • Injection system (gasoline)
  • Injection system (diesel)
  • Toxicity reduction system
  • Troubleshooting
  • Transmission
  • Clutch and drive shafts
  • Mechanical gearbox
  • Chassis and running gear
  • Suspension and wheels
  • Steering
  • Brake system
  • Body and interior
  • Exterior (external elements)
  • Doors, locks and windows
  • Electrical equipment
  • Equipment and devices
  • Headlights and lighting
  • Power devices
  • Electrical circuits
Civic 7 (2000-2005) 
  • General information
  • User manual
  • Maintenance
  • Power unit
  • Engines D15B and D17A
  • K20A Engines
  • Overhaul engine
  • Cooling system
  • Lubrication system
  • Fuel injection system
  • Toxicity reduction system
  • Engine electrical equipment
  • Transmission
  • Clutch
  • Manual gearbox
  • Automatic gearbox
  • Variator (CVT)
  • Drive shafts
  • Chassis and running gear
  • Car suspension
  • Steering
  • Brake system
  • Body and interior
  • Exterior (external elements)
  • Interior (internal elements)
  • Doors, locks and windows
  • Heater and air conditioner
  • Manual air conditioner
  • Automatic air conditioner
  • Security system
  • Electrical equipment
  • Equipment and devices
  • Headlights and lighting
  • Windscreen wipers
  • Audio system
  • Electrical diagrams
Civic 6 (1995-2000) 
  • General information
  • Introduction to guide
  • User manual
  • Maintenance
  • Power unit
  • Engine in car (Civic)
  • Engine in car (Integra)
  • Engine overhaul
  • Cooling and heating
  • Power and exhaust systems
  • Engine electrical equipment
  • Engine management systems
  • Transmission
  • Manual gearbox
  • Automatic transmission (AT/CVT)
  • Clutch and drive shafts
  • Chassis and running gear
  • Brake system
  • Car suspension
  • Steering
  • Body and interior
  • Exterior (external elements)
  • Interior (internal elements)
  • Doors, locks and windows
  • Electrical equipment
  • Equipment and devices
  • Electrical circuits
Civic 5 and 6 (1991-2000) 
  • Power unit
  • SOHC engines
  • DOHC engines
  • Engine overhaul
  • Cooling and lubrication system
  • Intake and exhaust system
  • Fuel injection system (SOHC)
  • Fuel injection system (DOHC)
  • Carburetor
  • Transmission
  • Clutch
  • Manual gearbox S4C
  • Manual gearbox S40
  • Automatic gearbox
  • Drive shafts
  • Chassis and running gear
  • Car suspension
  • Steering
  • Brake system
  • Body and interior
  • Body elements
  • Heater and air conditioner
  • Electrical equipment
  • Power devices
  • Equipment and instruments
  • Electrical circuits
Civic 3 and 4 (1983-1991) 
  • General information
  • Maintenance
  • Power unit
  • Engine in a car
  • Engine overhaul
  • Cooling system
  • Power and exhaust system
  • Engine electrical equipment
  • Emission control system
  • Transmission
  • Mechanical gearbox
  • Automatic gearbox
  • Clutch and drive shafts
  • Four-wheel drive
  • Chassis and running gear
  • Brake system
  • Car suspension
  • Steering
  • Body and interior
  • Body elements
  • Electrical equipment
  • Equipment and devices
  • Electrical circuits
HondaBook.ru © 2018–2026 • Mobile version • Sitemap: EN BG BY UA RS HR RO PL SK HU • Feedback • Driver Information • Search system • Bookmark
Accord 3 (1985-1989) • Accord 6 (1997-2002) • Civic 3 and 4 (1983-1991) • Civic 5 and 6 (1991-2000) • Civic 6 (1995-2000) • Civic 7 (2000-2005) • Civic 8 (2005-2011) • Fit 1 (2001-2008) • CR-V 1 (1995-2001) • CR-V 2 (2002-2006) • HR-V 1 (1998-2006) • Avancier 1 (1999-2003) •
 
This website uses cookies to ensure proper functioning. By clicking "OK," you agree.