
HondaBook.ru
Auto companies Volkswagen Auto companies Ford Auto companies Lada Auto companies Skoda Auto companies BMW Auto companies Mazda Auto companies Peugeot
English Русский
Български
Беларускі
Український
Српски
Hrvatski
Română
Polski
Slovenský
Magyar
Bookmark Contacts Sitemap   


Accord Civic Fit / Jazz CR-V HR-V Others Articles
Accord 3 (1985-1989) Accord 6 (1997-2002)

Drive Belts — Checking and Adjusting Tension (Honda Accord 3)

  • Main
  • Honda Accord
  • 3 (1985-1989)
  • General information
  • Maintenance
  • Drive Belts — Checking and Adjusting Tension
0
Contents: Examination ⇊ Checking and adjusting tension ⇊

Examination


On Accord and Prelude models, check the drive belts at least every 30,000 miles or 24 months. Determine the belt tension at the midpoint between the pulleys by gently pressing on the belt with your thumb. The belt should have a play of about 1/4 in. (6 mm) for belt lengths of 7.5–10.5 in. (178–254 mm) and 0.5 in. (13 mm) for belt lengths of 13.5–16.5 in. (330–406 mm). If the belt plays more or less, adjust the tension.
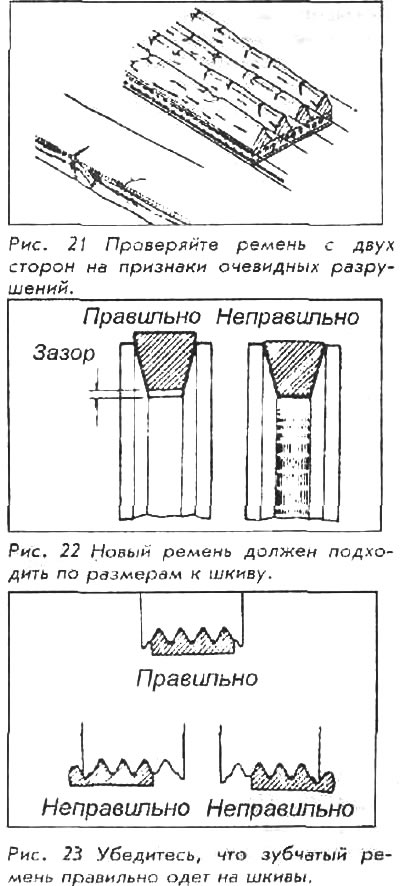
On Accord and Prelude models, check the drive…


When adjusting the tension, do not try to make it as tight as possible. Excessive belt tension will cause premature wear of the drive components. When the belt is correctly adjusted, the drive components will operate quietly.


Checking and adjusting tension


Before adjusting, inspect the belt for cracks or wear. Make sure there is no grease or oil on the surface. A worn belt will be completely smooth and shiny from slipping; a belt in good condition will have some visible grain. Cracks will start on the inside of the belt and run outward. Replace the belt at the first sign of cracking or if it is seriously worn.
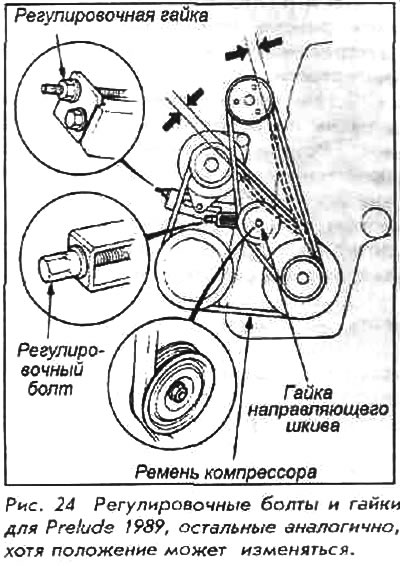


Before adjusting, inspect the belt for cracks or…


1. Apply gentle pressure to the belt midway between the pulleys. The belt should deflect about 13 mm. The deflection should be slightly less on a new belt, as the elasticity will be lost fairly quickly in the first half hour or so of operation.

2. If the belt tension needs to be adjusted on a 1984 Accord, loosen the adjusting bolt and move the synchroscope outward. On all other models, loosen the upper mounting bolt, then turn the adjusting nut on the outboard synchroscope. This will allow the synchroscope to be moved without effort.

3. When the belt tension is set correctly, tighten the upper mounting bolt. Recheck the tension and repeat the adjustment if necessary.

4. If the air conditioner compressor belt needs adjustment, tighten it by turning the adjusting bolt. Depending on the model, this may affect either the compressor or the tension pulley.

Do not apply excessive force to either the casing or the components.


The article was taken from the website www.hondabook.ru
This article is available at: russian, bulgarian, belarusian, ukrainian, serbian, croatian, romanian, polish, slovak, hungarian
This information has been verified: Yaroslav Shiryaev
Share with friends:
◀ Previous
Accord 3: Maintenance
Next ▶

Jump starting a dead car from another car's battery
Battery — General Information
Crankcase ventilation valve (PCV valve)
Fuel filter — removal and installation
Air cleaner — removal and installation
Drive belts — removal and installation
Replacing hoses
Air conditioning system — operation and testing
Air Conditioning System — System Discharge
Wheels and tires — replacement and wheels
See also other articles from Honda manuals:
Checking, adjusting tension and replacing drive belts (every 12,000… Honda Civic 6 (1995-2000)
Checking and adjusting the clearance in the valve drive (L1ZA) Honda Fit 1 (2001-2008)
Attachment drive belts Honda CR-V 1 (1995-2001, petrol)
Checking and adjusting the alternator drive belt Honda HR-V 1 (1998-2006, petrol)
Checking and adjusting the tension of the alternator and air… Honda Avancier 1 (1999-2003, petrol)
Link in different formats to this article
Comments and feedback from visitors
No comments yet


How much will 15 + 12 ?


Accord 6 (1997-2002) 
  • General information
  • Introduction to the guide
  • User manual
  • Maintenance
  • Power unit
  • Four-cylinder engines
  • Six-cylinder engines
  • Engine overhaul
  • Cooling system
  • Heater and air conditioner
  • Power and exhaust systems
  • Engine electrical equipment
  • Engine management
  • Transmission
  • Mechanical gearbox
  • Automatic gearbox
  • Clutch and drive shafts
  • Chassis and running gear
  • Brake system
  • Car suspension
  • Steering
  • Body and interior
  • Exterior (external elements)
  • Interior (internal elements)
  • Electrical equipment
  • Equipment and devices
  • Electrical circuits
Accord 3 (1985-1989) 
  • General information
  • Maintenance
  • Power unit
  • Engine adjustment
  • Engine repair
  • Engine electrics
  • Emission management
  • Engine management (carburetor)
  • Electronic injection
  • Programmable injection
  • Schematic of emission system
  • Fuel system
  • Feedback management
  • Transmission
  • Manual gearbox
  • Automatic gearbox
  • Clutch
  • Chassis and running gear
  • Front suspension
  • Rear suspension
  • Steering
  • Brake system
  • Electrical equipment
  • Ventilation and heating
  • Air conditioner
  • Cruise control system
  • Equipment and devices
HondaBook.ru © 2018–2026 • Mobile version • Sitemap: EN BG BY UA RS HR RO PL SK HU • Feedback • Driver Information • Search system • Bookmark
Accord 3 (1985-1989) • Accord 6 (1997-2002) • Civic 3 and 4 (1983-1991) • Civic 5 and 6 (1991-2000) • Civic 6 (1995-2000) • Civic 7 (2000-2005) • Civic 8 (2005-2011) • Fit 1 (2001-2008) • CR-V 1 (1995-2001) • CR-V 2 (2002-2006) • HR-V 1 (1998-2006) • Avancier 1 (1999-2003) •
 
This website uses cookies to ensure proper functioning. By clicking "OK," you agree.