
HondaBook.ru
Auto companies Volkswagen Auto companies Ford Auto companies Lada Auto companies Skoda Auto companies BMW Auto companies Mazda Auto companies Peugeot
English Русский
Български
Беларускі
Український
Српски
Hrvatski
Română
Polski
Slovenský
Magyar
Bookmark Contacts Sitemap   


Accord Civic Fit / Jazz CR-V HR-V Others Articles
Civic 3 and 4 (1983-1991) Civic 5 and 6 (1991-2000) Civic 6 (1995-2000) Civic 7 (2000-2005) Civic 8 (2005-2011)

Ignition switch — inspection and replacement (Honda Civic 3)

  • Main
  • Honda Civic
  • 3 (1983-1991)
  • Electrical equipment
  • Equipment and devices
  • Ignition switch — inspection and replacement
0
Contents: Control ⇊ Models since 1988 ⇊ Replacement ⇊

Control


1. Remove the lower instrument panel.

2. Disconnect the ignition switch connector.

Models from 1984 to 1987.


3. Turn the key to position 1 and check the conductivity between the ACC contacts (white and red wire) and VAT (white wire) on the lock connector. There should be conductivity.

4. Turn the key to position II. Continuity between contacts ACC and BAT should be maintained. Check the continuity between contacts IG1 (black and yellow wire) and IG2 (black and yellow wire), then between contacts IG1 (black and yellow wire) and VAT (white wire). In all cases, conductivity must be present.

5. Turn the key to position III. Continuity between contacts IG1 and IG2 should be maintained. Then check the continuity between contacts IG1 (black and yellow wire) and 5T (black and white wire): it must be.

Models since 1988


Note: The lock contacts are located on the fuse box and main wiring harness.


6. Turn the key to position I. Check the conductivity between the ACC contacts (white-red wire of 4-pin connector) and VAT-8 (black and white wire of 5-pin connector): it must be.

7. Turn the key to position II and check the continuity in the following sequence
  • a) ACC and IG2-B terminals (white and blue wire of 5-pin connector) — there must be conductivity.
  • b) terminals IG2-B and BAT-B should have conductivity.
  • c) terminals BA-A (white wire of 5-pin connector) and IG1 (black and yellow wire of 4-pin connector) — there must be conductivity.
  • d) terminals IG1 and IG2-A (yellow wire of 4-pin connector) - there must be conductivity.

8. Turn to position III and check the conductivity in the following sequence


  • a) terminals BAT-A and IG1 - there should be conductivity.
  • b) terminals IG1 and ST (black and white wire of 4-pin connector) — there must be conductivity.

9. Connect the connectors and install the bottom panel

Replacement


Ignition switch


10. Disconnect the cable from the negative battery terminal.

11. Remove the steering column cover, see section 6 and the lower instrument panel.

12. Ignition key in position 0.

13. Disconnect the ignition switch connectors, unscrew the two mounting screws and remove the switch.
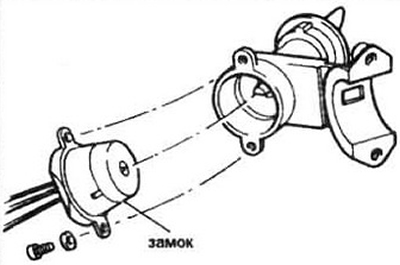
Fig. 7.13 Fastening the ignition switch

Fig. 7.13 Fastening the ignition switch


14. Installation is performed in the reverse order of removal. Align the steering drive with the ignition switch.

Steering wheel lock (models 1984-1987.)


Note: On these models the steering lock is integral with the steering column.


15. Remove the steering column cover (see section 6).

16. Disconnect the ignition switch connectors.

17. Punch and drill out the heads of the shear-off bolts using a 9.5 mm drill bit.

18. Remove the lock from the column.

19. Install the new lock and install new mounting bolts.

Steering wheel lock (models since 1988)


Note: On 1990 CIVIC and Shuttle models, the steering lock is the same as on 1984-1987 models (see above).


20. Remove the steering wheel (see Chapter 10) and steering column cover (see section 6).

21. Turn the ignition key to position 1.

22. Press the pin located at the top of the lock body and pull out the lock.

23. To install the lock, turn the key to position 0 and put the lock on.

24. Turn the key almost to position 1 and set the lock so that the pin enters the housing.

25. Turn the key to position I. Press the finger and insert it until it clicks.
This article is available at: russian, bulgarian, belarusian, ukrainian, serbian, croatian, romanian, polish, slovak, hungarian
This information has been verified: Yaroslav Shiryaev
Share with friends:
◀ Previous
Civic 3 and 4: Equipment and devices
Next ▶

Multi-function switch (turn signal, hazard warning light, headlight switching)…
Relay — General Information
Thermal fuses — general information
Fuses — General Information
Electrical Wiring Faults — General Information
Headlights — removal and installation
Headlights — adjustment
Lamps — replacement
Radio and antenna — removal and installation
Instrument cluster — removal and installation
See also other articles from Honda manuals:
Ignition switch Honda Accord 6 (1997-2002)
Ignition switch — check Honda Fit 1 (2001-2008)
Contact part of the ignition switch — removal and installation Honda CR-V 1 (1995-2001, petrol)
Ignition switch Honda HR-V 1 (1998-2006, petrol)
Ignition switch Honda Avancier 1 (1999-2003, petrol)
Link in different formats to this article
Comments and feedback from visitors
No comments yet


How much will 32 + 43 ?


Civic 8 (2005-2011) 
  • General information
  • Technical data
  • Governing bodies
  • Driving and maintenance
  • Power unit
  • Gasoline engines (L13A)
  • Gasoline engines (R18A)
  • Diesel engines (N22A)
  • Cooling and lubrication (L13A)
  • Cooling and lubrication (R18A)
  • Cooling and lubrication (N22A)
  • Injection system (gasoline)
  • Injection system (diesel)
  • Toxicity reduction system
  • Troubleshooting
  • Transmission
  • Clutch and drive shafts
  • Mechanical gearbox
  • Chassis and running gear
  • Suspension and wheels
  • Steering
  • Brake system
  • Body and interior
  • Exterior (external elements)
  • Doors, locks and windows
  • Electrical equipment
  • Equipment and devices
  • Headlights and lighting
  • Power devices
  • Electrical circuits
Civic 7 (2000-2005) 
  • General information
  • User manual
  • Maintenance
  • Power unit
  • Engines D15B and D17A
  • K20A Engines
  • Overhaul engine
  • Cooling system
  • Lubrication system
  • Fuel injection system
  • Toxicity reduction system
  • Engine electrical equipment
  • Transmission
  • Clutch
  • Manual gearbox
  • Automatic gearbox
  • Variator (CVT)
  • Drive shafts
  • Chassis and running gear
  • Car suspension
  • Steering
  • Brake system
  • Body and interior
  • Exterior (external elements)
  • Interior (internal elements)
  • Doors, locks and windows
  • Heater and air conditioner
  • Manual air conditioner
  • Automatic air conditioner
  • Security system
  • Electrical equipment
  • Equipment and devices
  • Headlights and lighting
  • Windscreen wipers
  • Audio system
  • Electrical diagrams
Civic 6 (1995-2000) 
  • General information
  • Introduction to guide
  • User manual
  • Maintenance
  • Power unit
  • Engine in car (Civic)
  • Engine in car (Integra)
  • Engine overhaul
  • Cooling and heating
  • Power and exhaust systems
  • Engine electrical equipment
  • Engine management systems
  • Transmission
  • Manual gearbox
  • Automatic transmission (AT/CVT)
  • Clutch and drive shafts
  • Chassis and running gear
  • Brake system
  • Car suspension
  • Steering
  • Body and interior
  • Exterior (external elements)
  • Interior (internal elements)
  • Doors, locks and windows
  • Electrical equipment
  • Equipment and devices
  • Electrical circuits
Civic 5 and 6 (1991-2000) 
  • Power unit
  • SOHC engines
  • DOHC engines
  • Engine overhaul
  • Cooling and lubrication system
  • Intake and exhaust system
  • Fuel injection system (SOHC)
  • Fuel injection system (DOHC)
  • Carburetor
  • Transmission
  • Clutch
  • Manual gearbox S4C
  • Manual gearbox S40
  • Automatic gearbox
  • Drive shafts
  • Chassis and running gear
  • Car suspension
  • Steering
  • Brake system
  • Body and interior
  • Body elements
  • Heater and air conditioner
  • Electrical equipment
  • Power devices
  • Equipment and instruments
  • Electrical circuits
Civic 3 and 4 (1983-1991) 
  • General information
  • Maintenance
  • Power unit
  • Engine in a car
  • Engine overhaul
  • Cooling system
  • Power and exhaust system
  • Engine electrical equipment
  • Emission control system
  • Transmission
  • Mechanical gearbox
  • Automatic gearbox
  • Clutch and drive shafts
  • Four-wheel drive
  • Chassis and running gear
  • Brake system
  • Car suspension
  • Steering
  • Body and interior
  • Body elements
  • Electrical equipment
  • Equipment and devices
  • Electrical circuits
HondaBook.ru © 2018–2026 • Mobile version • Sitemap: EN BG BY UA RS HR RO PL SK HU • Feedback • Driver Information • Search system • Bookmark
Accord 3 (1985-1989) • Accord 6 (1997-2002) • Civic 3 and 4 (1983-1991) • Civic 5 and 6 (1991-2000) • Civic 6 (1995-2000) • Civic 7 (2000-2005) • Civic 8 (2005-2011) • Fit 1 (2001-2008) • CR-V 1 (1995-2001) • CR-V 2 (2002-2006) • HR-V 1 (1998-2006) • Avancier 1 (1999-2003) •
 
This website uses cookies to ensure proper functioning. By clicking "OK," you agree.