
Note:
- When the Malfunction Indicator Lamp (MIL) is on.
- Proceed with the Ignition Control Module (ICM) Input Test after performing the basic ignition, fuel, and emission system tests.
Motors DI4A3, DI4A4, DI5Z4, DI5Z5, DI6Y4 and DI6Y9:
1. Disconnect the 7K connector from the distributor.
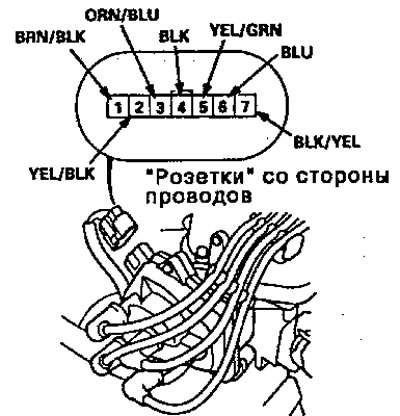
2. Turn the ignition switch ON(II) and check the voltage between contact No.7 and the body.
- There should be battery voltage.
- If there is no battery voltage, check for a break in the red wire (RED) or black / yellow wire (BLK/YEL) between the sub-panel box of fuses and relays and ICM, or fuse No.9 (15A) for burnout.
3. Turn the ignition switch OFF, check the conductivity between contact No.4 and the body.
- There must be conductivity.
- If there is no continuity, check for a break in the black (BLK) wire between the ICM and the chassis or a bad ground at G101.
4. Check the conductivity between contact No.6 and the tachometer connector.
- There must be conductivity.
- If there is no continuity, check for an open in the blue (BLU) wire between the tachometer connector and the ICM.
5. Check the conductivity between contact No.6 and the body.
- There must be conductivity.
- If there is continuity, check for a short in the blue (BLU) wire between the tachometer connector and the ICM to the chassis.
6. Remove the ignition distributor cap (DI), the ignition distributor slider (DI), and the safety cap. Check the black and blue (BLK and BLU) wires and check the ignition coil.
7. If the test results are normal, replace the distributor housing (DI) assembly.
Except for engines DI4A3, DI4A4, DI5Z4, D15Z5, DI6Y4 and D16Y9:
1. Remove the distributor cap (Di), distributor rotor and insulation cover (TEC).
2. Disconnect the wires from the ICM.
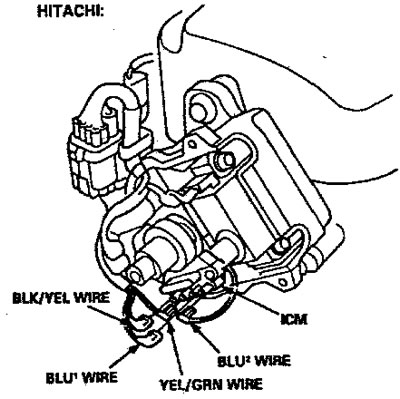
HITACHI
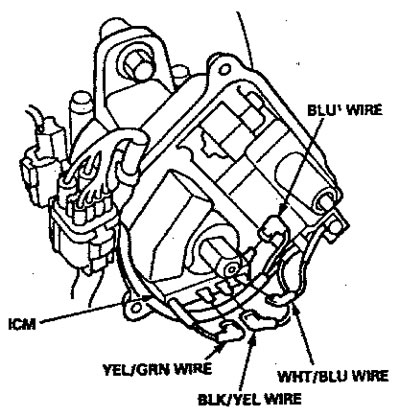
TEC
3. Turn the ignition switch ON (II). Check the voltage between the BLK/YEL wire and the body.
- There should be battery voltage/
- If there is no battery voltage, check the BLK/YEL wire between the under-panel fuse/relay box and the ICM.
- If there is battery voltage, proceed to step 4.
4. Turn the ignition switch ON(II). Check the voltage between wire *1 and the body.
There must be tension.
- If there is no battery voltage, check:
-Ignition coil.
-Wire *1 between ignition coil and ICM.
- If there is battery voltage, proceed to step 5.
*l: BLU2 cable (HITACHI)
WHT/BLU cable (TEC)
5. Check the continuity of the BLU1 wire between the tachometer connector and the ICM. There should be continuity.
6. Check the continuity on the BLU1 wire to the chassis. There should be continuity.
7. If the test results are normal, replace the ICM.
The original text of the article is located on the website: HONDABOOK