HondaBook.ru
Auto companies Volkswagen Auto companies Ford Auto companies Lada Auto companies Skoda Auto companies BMW Auto companies Mazda Auto companies Peugeot
English Русский
Български
Беларускі
Український
Српски
Hrvatski
Română
Polski
Slovenský
Magyar
Bookmark Contacts Sitemap   


Accord Civic Fit / Jazz CR-V HR-V Others Articles
Fit 1 (2001-2008)

Vacuum Brake Booster — Checking and Adjusting the Rod Clearance (Honda Fit 1)

  • Main
  • Honda Fit
  • 1 (2001-2008)
  • Chassis and running gear
  • Brake system
  • Vacuum Brake Booster — Checking and Adjusting the Rod Clearance
0
1. Remove the brake master cylinder.

2. Install the special tool (A) on the brake master cylinder (B). Turn the adjusting nut (F) to set the rod (D) so that its end (C) touches piston No.2 (E) of the brake master cylinder.

Note: Make sure the special tool is installed on the master cylinder without any clearance.
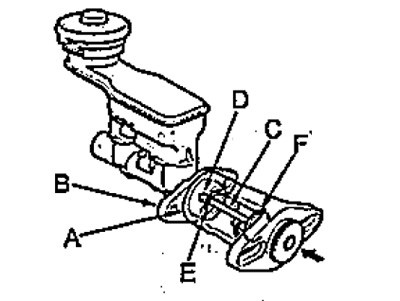

Note: Make sure the special tool is installed on…


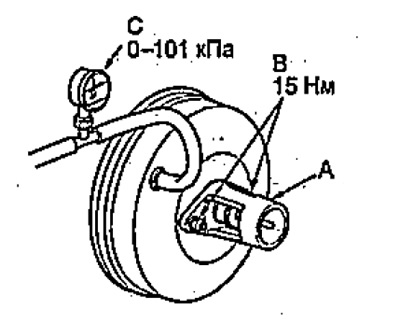
3. Without changing the position of the rod, install the special tool (A) on the brake booster and tighten the nuts (B).
  • Tightening torque - 15 Nm

Tightening torque - 15 Nm


4. Install the vacuum gauge (C) by connecting the hoses as shown in the figure.

5. Start the engine and wait until the engine warms up.

6. By adjusting the engine crankshaft speed with the accelerator pedal, set the vacuum shown by the vacuum gauge to 66.7 kPa.


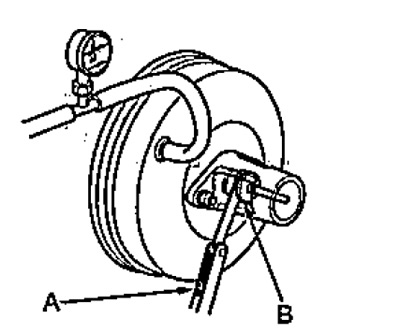
7. Using the feeler gauge (A), measure the gap between the adjusting nut (B) and the body of the special tool.
  • Gap - 0-0.4 mm

Gap - 0-0.4 mm


If the gap between the adjusting nut and the body of the special device is 0.4 mm, then the gap between the rod and piston No.2 is 0 mm and no adjustment is required.

If the gap between the adjusting nut and the body of the special device is 0 mm, then the gap between the rod and piston No.2 is 0.4 mm or more and adjustment is necessary.

8. Adjust the gap.

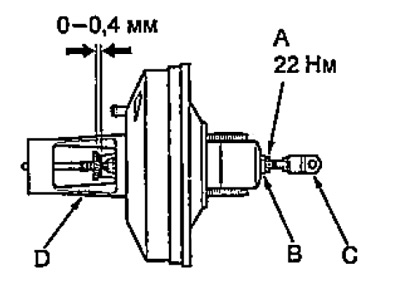
a) Loosen the lock nut (A) and, by turning the adjuster (B), adjust the gap.

Note:
  • Adjustment should be carried out when a vacuum of 66.7 kPa is created in the brake booster.
  • Hold the fork (C) during adjustment.


Hold the fork (C) during adjustment.


b) Tighten the lock nut.


  • Tightening torque - 22 Nm

9. Remove the special device.

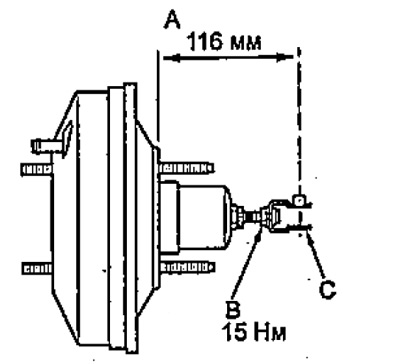
10. Check that the distance (A) shown in the figure is within the standard. If necessary, loosen the lock nut (B) and adjust the clearance by turning the fork (C).
  • Distance "A" - 116 mm

Distance «A» - 116 mm


11. Install the brake master cylinder.

[The original text of the article is located on the website: www.HondaBook.ru]
This article is available at: russian, bulgarian, belarusian, ukrainian, serbian, croatian, romanian, polish, slovak, hungarian
This information has been verified: Varvara Vereshchagina
Share with friends:
◀ Previous
Fit 1: Brake system
Next ▶

Vacuum brake booster — check
Checking the Low Brake Fluid Level Sensor
Master Brake Cylinder — Disassembly and Assembly
Master Brake Cylinder — Removal and Installation
Brake pedal — removal and installation
Vacuum brake booster — removal and installation
Brake hoses
Front brakes — check
Replacing the front brake pads
Removal the front brake pad support
See also other articles from Honda manuals:
Adjusting the clearance of the master brake cylinder tappet Honda Accord 3 (1985-1989)
Vacuum brake booster Honda Civic 7 (2000-2005)
Adjusting the clearance of the brake booster push rod Honda CR-V 2 (2002-2006, petrol)
Parking brake — checking and adjusting Honda HR-V 1 (1998-2006, petrol)
Frequency of checking rubber components and brake booster Honda Avancier 1 (1999-2003, petrol)
Link in different formats to this article
Comments and feedback from visitors
No comments yet


How much will 18 + 21 ?


Fit 1 (2001-2008) 
  • General information
  • User manual
  • Maintenance
  • Power unit
  • Engine repair
  • Cooling and lubrication system
  • Injection and power system
  • Control system
  • Engine electrical equipment
  • Transmission
  • Clutch
  • Mechanical gearbox
  • Automatic gearbox
  • Variator (CVT)
  • Drive shafts and gearbox
  • Chassis and running gear
  • Car suspension
  • Steering
  • Brake system
  • Body and interior
  • Exterior (external elements)
  • Interior (internal elements)
  • Doors, locks and windows
  • Heater and air conditioner
  • Safety system
  • Electrical equipment
  • Equipment and devices
  • Wiring diagrams (since 06.2001)
  • Wiring diagrams (since 06.2004)
HondaBook.ru © 2018–2026 • Mobile version • Sitemap: EN BG BY UA RS HR RO PL SK HU • Feedback • Driver Information • Search system • Bookmark
Accord 3 (1985-1989) • Accord 6 (1997-2002) • Civic 3 and 4 (1983-1991) • Civic 5 and 6 (1991-2000) • Civic 6 (1995-2000) • Civic 7 (2000-2005) • Civic 8 (2005-2011) • Fit 1 (2001-2008) • CR-V 1 (1995-2001) • CR-V 2 (2002-2006) • HR-V 1 (1998-2006) • Avancier 1 (1999-2003) •
 
This website uses cookies to ensure proper functioning. By clicking "OK," you agree.