
Note: Protect the fenders to prevent damage to the paintwork.
To avoid damage, disconnect electrical connectors carefully, holding the connector by its body.
To prevent damage to the cylinder head, wait until the coolant temperature drops below 38°C before releasing the cylinder head bolts.
Label all wire harnesses and hoses to avoid confusion during installation. Also make sure they do not touch other wires or hoses or come into contact with other parts.
1. Relieve fuel pressure.
2. Disconnect the negative cable from the battery.
3. Drain the engine coolant.
4. Remove the drive belt.
5. Remove the intake manifold.
 |
 |
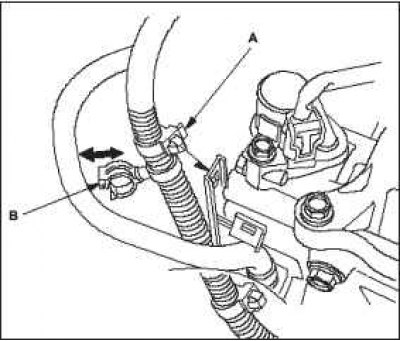
6. Remove harness clamps A and remove the positive crankcase ventilation (PCV) hose from clamp B.
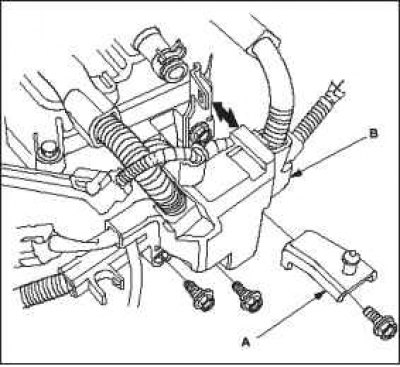
7. Remove the air cleaner housing mounting bracket A, then remove the wire harness retainer B from the cylinder head.
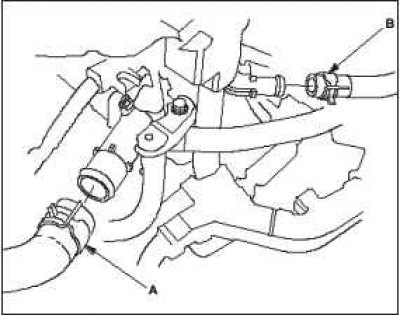
8. Remove the upper radiator hose A and heater hose B.
9. Remove the engine wire harness connectors and wire harness retainers from the cylinder head.
- Four fuel injector connectors.
- Connector of sensor 1 of coolant temperature (ECT).
- Air-to-fuel ratio (A/F) sensor connector.
- Exhaust Gas Oxygen Sensor Connector (secondary HO2S).
- Exhaust Gas Recirculation (EGR) valve connector.
- Rocker arm oil control solenoid valve connector.
- Rocker arm oil pressure sensor connector.
10. Remove the four ignition coils.
11. Remove the three-way catalytic converter (TWC).
12. Remove the thermostat housing.
13. Remove the timing chain.
14. Remove the cylinder head cover bolts. To avoid warping, loosen the bolts 1/3 of a turn each and repeat until all the bolts are loosened.
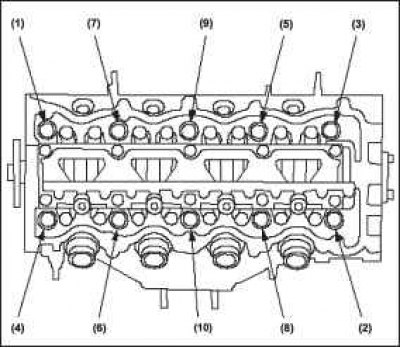
15. Remove the cylinder head.
(Article source on the website «HondaBook.ru»)