
Honda also recommends that all rubber fuel cells be replaced every 100,000 km. This prevents aging and wear of the rubber.
CAUTION: Fuel injection systems operate at high fuel pressures and maintain line pressure when the engine is OFF. Pressure must be relieved before any work is done on fuel lines or fuel system components. Carburetor vehicles can also hold residual pressure in the reservoir and lines. Always remove the filler cap before doing any work on fuel lines or fuel system components. Release pressure slowly and contain leakage. Keep fire-fighting sand and a fire extinguisher handy at all times.
Fuel pressure reduction
Fuel injected vehicles
1. Disconnect the negative battery terminal.
2. Remove the cap from the fuel filler.
3. The fuel hose on top of the fuel filter is held by a large bolt (banjo bolt). There is a smaller bolt on top of this bolt that is service. Use an open end wrench to hold the banjo bolt and a 6mm ring wrench to hold the service.
4. Lay the fabric over the service bolt. Slowly loosen it one turn. The pressure in the systems will decrease as the fuel flows out, and the fuel will be absorbed by the fabric. Now be careful with the fabric - it has become flammable.
5. Although the system pressure is now low, always wrap the fuel line in rags before disconnecting; some differential pressure may remain in the system.
Removal and installation - carburetor engines
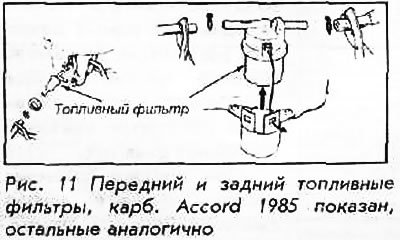
These vehicles use 2 replaceable fuel filters. The small one is in the fuel line under the hood; the large one is located at the back, next to the left wheel.
Whenever you change filters, be careful not to let dirt get into the line. Also, pay attention to the correct installation position.
You can - and very likely - install the filter backwards.
Front
1. Press out the shank and unhook the filter.
2. Loosen the fuel line clamps and slide them back.
3. Using twisting movements, disconnect the fuel line from the filter.
4. To install, use a new fuel filter and reverse the removal procedures. Start the engine and check for leaks.
Behind
1. Raise and secure the rear of the vehicle. Remove the left rear wheel.
2 Press the lug of the fuel filter stopper and remove the stopper from the holder.
3. Depress the two fuel line retaining clips. Be careful not to damage the lines.
4. Loosen the fuel line clamps and slide them back.
5. Using a twisting motion, pull the fuel line away from the fuel filter; remove the filter.
6. Use a new fuel filter to install and reverse the removal procedures.
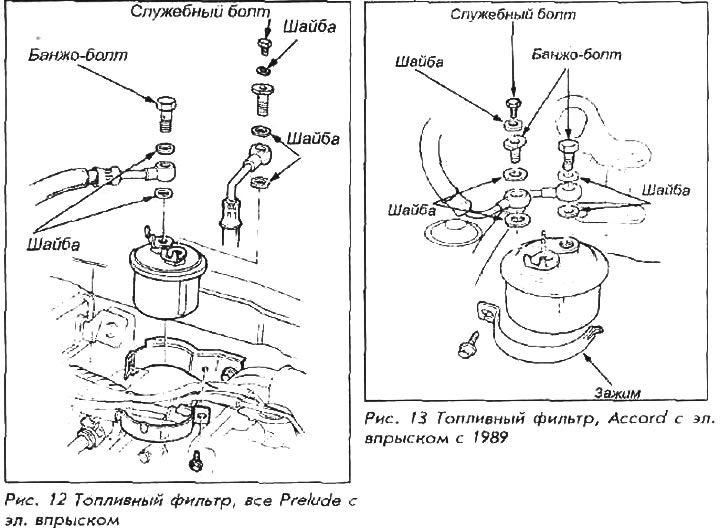
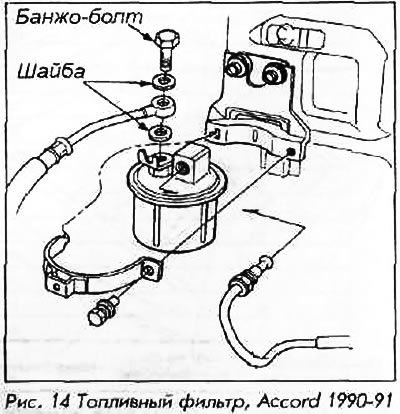
Removal and installation - engines with fuel injection
The fuel filter of a tank is located in an impellent compartment. When purchasing a new filter, purchase new washer washers for the banjo and service bolts. Careless replacement of these gaskets results in high pressure fuel leaks. Gasket replacement is required.
1. Disconnect the negative battery terminal.
2. Fuel system under pressure. Release pressure slowly and contain leakage. Be careful - don't smoke. Keep fire-fighting sand and a fire extinguisher handy at all times.
3. Remove the banjo bolts and gaskets from the fuel filter. For Accord (1990-91), separate 1 banjo bolt and loosen the fuel line flare.
4. Remove the fuel filter clamping bolt and the filter itself.
5. Install a new filter and screw in the bolts.
6. The top and bottom shims for each banjo bolt and the shim for the service bolt MUST be replaced whenever the bolts become loose. Install gaskets and banjo bolts. Tighten the banjo bolts to 22 Nm. For Accord 1990-91, torque the hose to 38 Nm.
7. Service bolt tightening torque - 9 Nm.
8. Start the engine and check for leaks. The engine may run erratically for a while until full fuel pressure returns to normal.