
HondaBook.ru
Auto companies Volkswagen Auto companies Ford Auto companies Lada Auto companies Skoda Auto companies BMW Auto companies Mazda Auto companies Peugeot
English Русский
Български
Беларускі
Український
Српски
Hrvatski
Română
Polski
Slovenský
Magyar
Bookmark Contacts Sitemap   


Accord Civic Fit / Jazz CR-V HR-V Others Articles
Civic 3 and 4 (1983-1991) Civic 5 and 6 (1991-2000) Civic 6 (1995-2000) Civic 7 (2000-2005) Civic 8 (2005-2011)

Launch system (Honda Civic 5)

  • Main
  • Honda Civic
  • 5 (1991-2000)
  • Electrical equipment
  • Power devices
  • Launch system
0

Checking the starter


Note: Before starting the test, the air temperature must be between 15 and 38°C


Recommended order


  • Use a starter system tester.
  • Connect and use equipment in accordance with the manufacturer's instructions.
  • Perform checks as described.

Alternative order


  • Use the following equipment:
    • Ammeter, 0-400 A
    • Voltmeter, 0-20V (with an accuracy of 0.1 volt).
    • Tachometer, 0-1,200 rpm.
  • Connect the voltmeter and ammeter as shown.
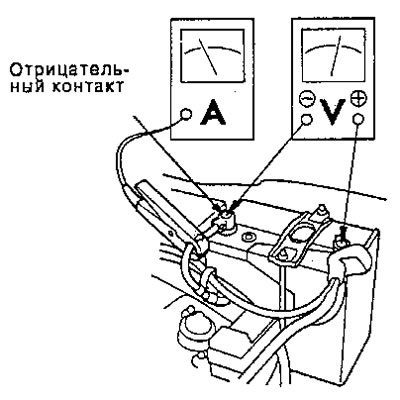
Connect the voltmeter and ammeter as shown.


Note: After checking or repairing, reset the ECM/PCM memory to clear all fault codes.


Check the starter engagement:


1. Remove fuse No.44 (15A) from the underhood fuse box and relay.

2. Turn the ignition switch to START (III) with the shift lever in the [N or [P] position (A/T) or neutral position (M/T). The starter should turn the engine.
  • If the starter does not turn the engine, refer to step 3,
  • If it cranks the engine erratically or too slowly, refer to the chapter "Check for wear and damage".

3. Check the battery, positive battery cable, ground, starter lock relay and wire connections for looseness and corrosion, check again. If the starter still does not turn the engine, go to step 4.


4. Pull out the connector (BLK/WHT wire and solenoid contact) from the starter.

5. Connect the connecting wire from the positive contact of the battery [+) to the contact of the solenoid 1. The starter must turn the engine.
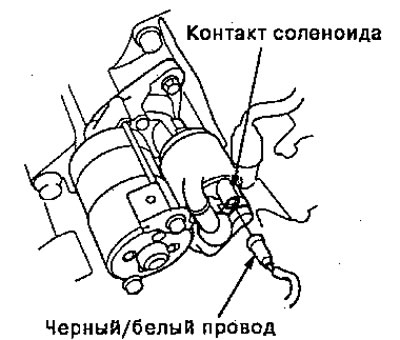
5. Connect the connecting wire from the positive…

  • If the starter still does not turn the engine, remove it and check for problems inside the starter.
  • If the starter turns the engine, proceed to step 6.

6. Check the ignition switch.

7. Check the starter interlock relay.

8. Check the AD gear position indicator switch.

9. Check for a break in the wiring between the ignition switch and the starter.

10. Check the engine blocking system.

Check for wear and damage


The starter should turn the engine smoothly and steadily. If the starter engages but does not turn the engine steadily, remove it and inspect the starter pinion and torque converter or flywheel ring gear for damage.
  • Check the pinion clutch for binding or slipping when the rotor is rotating with the pinion gear secured.
  • If damaged, replace the gear.

Check the starting voltage or starting current.


The voltage at startup must be at least (*1) volts.

The starting current must be at least (*2) amperes.


*1
  • Hitachi: 8.0
  • Nippondenso: 8.0
  • Mitsuba: 8.5

*2
  • Hitachi: 200
  • Nippondenso: 200
  • Mitsuba: 350

If the cranking voltage is too low or the cranking current is too high, check for:
  • The battery is damaged or weakly charged.
  • Open circuit in the contact plate starter.
  • Anchor jamming.
  • The armature winding is closed.
  • Excessive resistance in the engine.

Check RPM when starting


Engine speed during starting Should be above 100 rpm.

If the speed is too slow, check the following:
  • The battery or starter contacts are loose.
  • The starter brushes are excessively worn.
  • Open circuit of starter contact plate.
  • The helical cuts or drive gear are dirty or damaged.
  • The overrunning clutch of the drive gear is damaged.

Checking the starter disconnect


With the shift lever in the [N] or [P] position (A/T) or neutral position (M/T), turn the ignition switch to START (III) and release it to ON (II).

The starter pinion should disengage from the torque converter or flywheel ring gear when you release the key.

If the pinion gear is engaged with the torque converter or flywheel ring gear, check the following:
  • Solenoid core and switch failure.
  • The pinion assembly is dirty or the overrunning clutch is damaged


(The original is located on the website Hondabook.ru)
This article is available at: russian, bulgarian, belarusian, ukrainian, serbian, croatian, romanian, polish, slovak, hungarian
This information has been verified: Mikhail Kopasov
Share with friends:
◀ Previous
Civic 5 and 6: Power devices
Next ▶

 
Checking the starter solenoid
Checking the armature winding
Starter replacement
Checking the ignition coil
Ignition system
See also other articles from Honda manuals:
Air conditioning system — operation and testing Honda Accord 3 (1985-1989)
Headlight range correction system Honda Fit 1 (2001-2008)
Cooling system — checking and replacing fluid Honda CR-V 1 (1995-2001, petrol)
Anti-lock braking system (ABS) Honda HR-V 1 (1998-2006, petrol)
Adaptive Cruise Control (IHCC) System — Device Honda Avancier 1 (1999-2003, petrol)
Link in different formats to this article
Comments and feedback from visitors
No comments yet


How much will 30 + 31 ?


Civic 8 (2005-2011) 
  • General information
  • Technical data
  • Governing bodies
  • Driving and maintenance
  • Power unit
  • Gasoline engines (L13A)
  • Gasoline engines (R18A)
  • Diesel engines (N22A)
  • Cooling and lubrication (L13A)
  • Cooling and lubrication (R18A)
  • Cooling and lubrication (N22A)
  • Injection system (gasoline)
  • Injection system (diesel)
  • Toxicity reduction system
  • Troubleshooting
  • Transmission
  • Clutch and drive shafts
  • Mechanical gearbox
  • Chassis and running gear
  • Suspension and wheels
  • Steering
  • Brake system
  • Body and interior
  • Exterior (external elements)
  • Doors, locks and windows
  • Electrical equipment
  • Equipment and devices
  • Headlights and lighting
  • Power devices
  • Electrical circuits
Civic 7 (2000-2005) 
  • General information
  • User manual
  • Maintenance
  • Power unit
  • Engines D15B and D17A
  • K20A Engines
  • Overhaul engine
  • Cooling system
  • Lubrication system
  • Fuel injection system
  • Toxicity reduction system
  • Engine electrical equipment
  • Transmission
  • Clutch
  • Manual gearbox
  • Automatic gearbox
  • Variator (CVT)
  • Drive shafts
  • Chassis and running gear
  • Car suspension
  • Steering
  • Brake system
  • Body and interior
  • Exterior (external elements)
  • Interior (internal elements)
  • Doors, locks and windows
  • Heater and air conditioner
  • Manual air conditioner
  • Automatic air conditioner
  • Security system
  • Electrical equipment
  • Equipment and devices
  • Headlights and lighting
  • Windscreen wipers
  • Audio system
  • Electrical diagrams
Civic 6 (1995-2000) 
  • General information
  • Introduction to guide
  • User manual
  • Maintenance
  • Power unit
  • Engine in car (Civic)
  • Engine in car (Integra)
  • Engine overhaul
  • Cooling and heating
  • Power and exhaust systems
  • Engine electrical equipment
  • Engine management systems
  • Transmission
  • Manual gearbox
  • Automatic transmission (AT/CVT)
  • Clutch and drive shafts
  • Chassis and running gear
  • Brake system
  • Car suspension
  • Steering
  • Body and interior
  • Exterior (external elements)
  • Interior (internal elements)
  • Doors, locks and windows
  • Electrical equipment
  • Equipment and devices
  • Electrical circuits
Civic 5 and 6 (1991-2000) 
  • Power unit
  • SOHC engines
  • DOHC engines
  • Engine overhaul
  • Cooling and lubrication system
  • Intake and exhaust system
  • Fuel injection system (SOHC)
  • Fuel injection system (DOHC)
  • Carburetor
  • Transmission
  • Clutch
  • Manual gearbox S4C
  • Manual gearbox S40
  • Automatic gearbox
  • Drive shafts
  • Chassis and running gear
  • Car suspension
  • Steering
  • Brake system
  • Body and interior
  • Body elements
  • Heater and air conditioner
  • Electrical equipment
  • Power devices
  • Equipment and instruments
  • Electrical circuits
Civic 3 and 4 (1983-1991) 
  • General information
  • Maintenance
  • Power unit
  • Engine in a car
  • Engine overhaul
  • Cooling system
  • Power and exhaust system
  • Engine electrical equipment
  • Emission control system
  • Transmission
  • Mechanical gearbox
  • Automatic gearbox
  • Clutch and drive shafts
  • Four-wheel drive
  • Chassis and running gear
  • Brake system
  • Car suspension
  • Steering
  • Body and interior
  • Body elements
  • Electrical equipment
  • Equipment and devices
  • Electrical circuits
HondaBook.ru © 2018–2026 • Mobile version • Sitemap: EN BG BY UA RS HR RO PL SK HU • Feedback • Driver Information • Search system • Bookmark
Accord 3 (1985-1989) • Accord 6 (1997-2002) • Civic 3 and 4 (1983-1991) • Civic 5 and 6 (1991-2000) • Civic 6 (1995-2000) • Civic 7 (2000-2005) • Civic 8 (2005-2011) • Fit 1 (2001-2008) • CR-V 1 (1995-2001) • CR-V 2 (2002-2006) • HR-V 1 (1998-2006) • Avancier 1 (1999-2003) •
 
This website uses cookies to ensure proper functioning. By clicking "OK," you agree.