
Contents: Job ⇊ Safety ⇊ System check ⇊ Keep the condenser clean ⇊ Checking the coolant level ⇊ Pressure gauges ⇊
Job
Cooling cycle
Once the air conditioning system is fully charged and leak-free, it is ready to operate. When operating, the compressor lowers the pressure of the refrigerant and thereby lowers the temperature. This refrigerant gas takes heat from the car's interior and heat from the operating compressor.
The gaseous refrigerant enters the condenser. As it passes through the condenser (due to the movement of the vehicle or the action of the fan), this gas is cooled. Now cooled, the gas condenses into a liquid and passes into the receiver/dryer. The receiver/dryer collects the refrigerant and filters it of any moisture that may be present. As the liquid refrigerant flows from the receiver, it passes through an expansion valve, which turns it into a mixture of liquid and gas at a low temperature and low pressure. The cooled refrigerant then passes into the evaporator. Once in the evaporator (inside the vehicle), the refrigerant is exposed to warm air. The refrigerant in the evaporator turns into a gas and absorbs heat from the air forced by the fan. Once completely evaporated, the heated refrigerant gas is drawn through the condenser into the compressor, where the cycle is repeated.
The efficiency of any air conditioner is controlled not only by the system itself, but also by external factors such as air temperature, humidity, vehicle speed and the amount of sunlight.
Safety
There are two hazards associated with the air-conditioning system, and they involve the refrigerant. Refrigerant (generic designation: R-12, trade name: Freon, registered trademark of DuPont Co.) is an extremely cold substance. When released into the atmosphere, it immediately freezes any surface it comes into contact with, including your eyes. The other hazard is fire. Normally non-toxic, refrigerant gas becomes highly toxic in the presence of an open flame. A small whiff of vapor from burning refrigerant can be fatal. Keep all flammable objects (including cigarettes) away from the air conditioner.
System check
Many problems associated with the air conditioner can be avoided if you turn it on for 10 minutes at least once a week, regardless of the season. This will keep the internal parts lubricated and also prevent the hoses from hardening.
Oil leak
Refrigerant leaks will show up as oily areas on system components because the compressor oil circulates throughout the system along with the refrigerant. Look for oil stains on all hoses and lines, and especially on hose and line connections. If there are oil deposits, the system may have a leak. A small amount of oil at the front of the compressor is normal and not a cause for alarm.
Checking the compressor belt
The compressor drive belt (air conditioning belt) should be checked periodically for tension and condition. A loose or slipping belt can cause insufficient cooling or damage to system components.
Keep the condenser clean
The condenser is mounted in front of the radiator (and is often confused with the radiator when viewed from the front of the vehicle). It serves to remove heat from the air-cooling system and cool the refrigerant. Proper air flow through the condenser is important for the system to function. Periodically, inspect the front of the condenser for bent fins or foreign material (dirt, bugs, paper, etc.). If the fins are bent, gently straighten them with a straight, soft tool such as a thin board. You can remove debris with a stiff brush or a stream of water from a hose.
Checking the coolant level
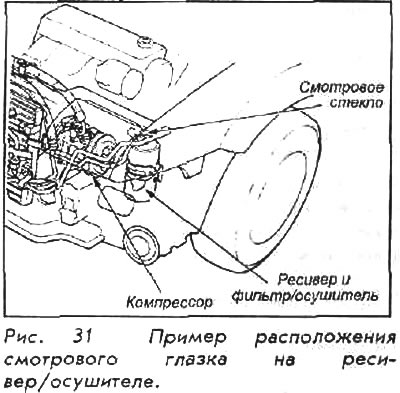
If you suspect a problem, the first thing to do is check the coolant through the sight glass. This is usually located in front of the receiver/dryer in the left front corner of the engine compartment. If you find it, do the following:
1. With the engine running and the air conditioner on, inside the vehicle, look for a flow of refrigerant through the peephole. If the system is operating properly, you will see a steady stream of clean refrigerant through the peephole, and perhaps some occasional bubbles if the system is operating at high temperatures.
2. Cycle the air conditioner on and off to make sure you can see the refrigerant. Since the fluid is clear, it is easy to mistake the system for being full. Turn off the system and look through the peephole; if there is refrigerant in the system, you will see bubbles. If you do not see any bubbles when the system is on and cold air is coming in from the fans, the system is working fine.
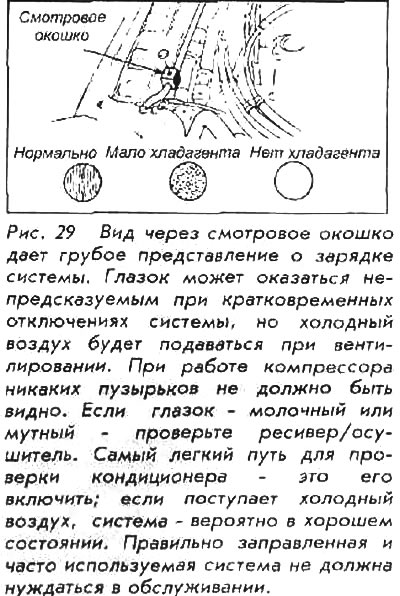
3. If you see bubbles in the sight glass while the system is running, the system is low on refrigerant. The only reason for this is the existence of a leak. Running the air conditioner with insufficient refrigerant will damage it.
4. Pieces of oil in the eye - a sign of trouble. Most often, the oil will appear in pieces, although it can also be a solid stream. In either case, this means a decrease in cooling and possibly a compressor replacement.
Pressure gauges
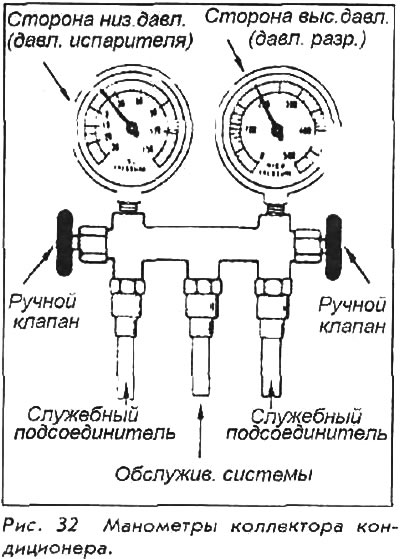
Before attempting any refilling job, you will need a set of air conditioning pressure gauges. The general description of this tool is a set of two pressure gauges and three hoses. By connecting the appropriate hoses to the system, the pressure gauges are used to "monitor" the air conditioning system as it operates. The set of pressure gauges is also used to drain and refill the system.
CAUTION: Wear safety glasses and gloves before repair!
Connecting and disconnecting pressure gauges is always done with the engine off to prevent damage from moving parts. When connecting pressure gauges, first make sure that the valves on them are turned to a position close to the off position.
Connect the high and low pressure hoses to the compressor test ports.
The central hose is used only during filling and draining the system. The central hose is not used for pressure testing.
(Original published on this resource: hondabook)