
Note. The ECM stays on for 15 minutes after the ignition key is turned to «OFF». Bypassing the SCS circuit after turning the ignition switch to the «OFF» cancels this feature. Disabling the ECM during this function without a connection bypassing the SCS circuit may damage the ECM.
1. Make sure you know the anti-theft code for your audio system.
2. Remove the battery.
3. Bypass the SCS circuit with the HDS diagnostic system.
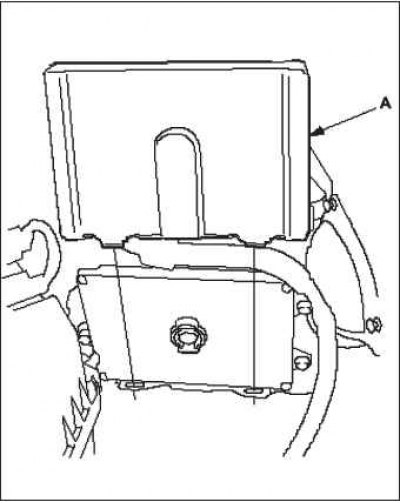
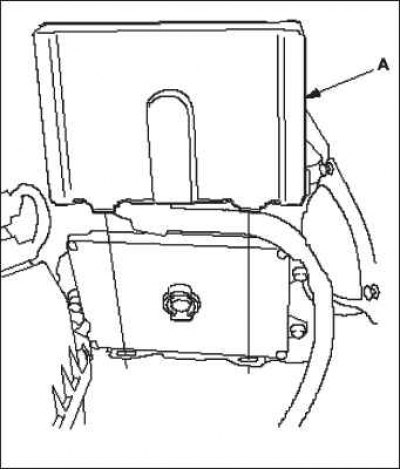
4. Remove cover A.
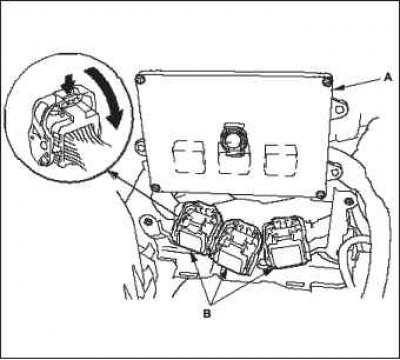
5. Remove the ECM A. Disconnect the connectors B of the ECM and bring the tester probe to the terminals on the terminal side of the connectors.
6. Install the battery, then do the following:
- Enter the anti-theft codes for the audio system.
- Set the correct time on the clock.
7. Connect one part of the terminals of cord A on the pad to the digital multimeter B, and the other part to the banana plug (Pomona Electronics tool #3563 or equivalent) C.
8. When the diagnosis/troubleshooting is completed on the ECM connector, use test socket A above the terminal to test the desired terminal.
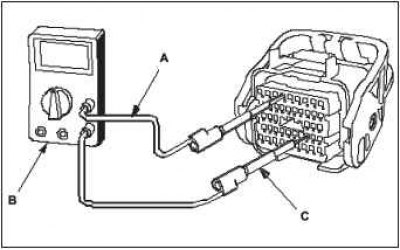 |  |
9. Gently connect the tester (exit) with test terminal socket. Do not force the ferrules into the terminals.
Note. For best results, always use a tester (exit).
To avoid damaging the terminal connectors, do not use tester test leads, paper clips, or other substitutes. Terminal damage results in loose connections and incorrect data. Do not pierce the wire insulation. Piercing the insulation can result in poor quality or intermittent disconnection of the electrical connection.
Rebooting and replacing the ECM for diagnostics
Use this procedure if you have a known-good ECM to run diagnostics on. Reboot the ECM only if it does not have the latest software installed.
Note. Do not turn off the ignition when resetting the ECM. If you turn off the ignition before completing the procedure, the ECM may be damaged.
Note. ECM software update
Note. Make sure you are using the latest HDS software.
Note. To ensure that the latest software is installed, update the ECM software when replacing the ECM temporarily or permanently.
Note. You cannot update the ECM with a program that is already installed in it. The computer accepts only new programs.
Note. Make sure the battery is fully charged before updating the ECM data.
Note. To prevent damage to the ECM, do not turn on any electrical equipment during the data update procedure (audio system, brake system, air conditioning, power windows, sunroof, power door locks, etc.).
Note. If you need to diagnose the Honda interface module (HIM), because the HIM module's red warning light came on (#3) or it flashed during the data update procedure, leave the ignition on (position II), when you disconnect the HIM module from the data link connector (DLC). This will prevent damage to the ECM.
Note. High temperatures in the engine bay can cause the ECM to overheat to trigger updates. If the engine was running prior to this procedure, open the hood and cool the engine compartment wiring harness.
1. Turn on the ignition (position «ON» II), but do not start the engine.
2. Connect the HDS to the data link connector DLC A, located on the driver's side under the control panel.
3. If the HDS does not have an upgrade function, please disconnect it from the car and connect «Honda interface module» (HIM).
4. If the ECM software is the latest, disconnect the HDS or HIM from the DLC and return to the previous procedure.
If the ECM software is not the latest, follow the ECM update procedure as written on the HIM label or on the ECM update system.
Note. If the ECM update procedure requires ECM cooling, follow the instructions on the screen.
5. Perform the ECM Idle Diagnosis procedure.
6. Perform the procedure for erasing the reference position of the TFR/diagnostics on the reference position of the TFR sensor.
Replacing the ECM
1. Make sure you have the anti-theft code for your audio system.
2. Connect the HDS to the data link connector DLC A, located on the driver's side under the control panel.
3. Switch on the ignition by turning the key to position «ON» (II).
4. Verify that the HDS is communicating with the vehicle and the ECM. If not, troubleshoot the DLC circuit.
5. Remove the battery.
6. Remove cover A.
7. Remove bolts D, then remove the ECM E computer.

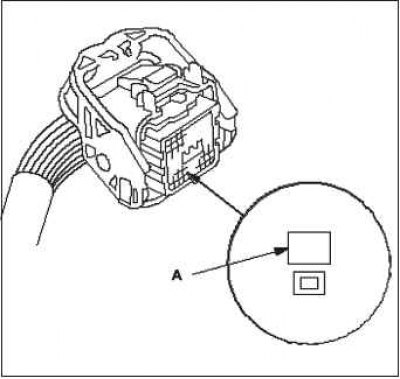
8. Disconnect connectors A, B and C of the ECM.
Note. ECM connectors A, B and C have raised symbols.
9. Install the ECM and battery in the reverse order of removal.
10. Switch on the ignition by turning the key to position «ON» (II).
Note. DTC P0630 ''VIN Not Programmed or Mismatch'' («Missing or mismatched vehicle registration number») will be preserved because the identification number (VIN) not programmed into the ECM. Ignore it and continue with the procedure.
11. Enter the VIN number into the ECM using the HDS system.
12. Update the ECM software if it does not have the latest software.
13. Select a function «IMMOBI SYSTEM» with HDS.
14. Rewrite the immobilizer code using the ECM replacement procedure available in the HDS diagnostic system. This will allow you to start the engine.
15. Zero the ECM using the HDS diagnostic system.
16. Perform the ECM Idle Diagnosis procedure.
17. Perform the diagnostic procedure on the reference position indicated by the CKP sensor.
18. Enter the audio security code and set the clock.