
Attention! Halogen lamps get very hot during operation. Therefore, the presence of traces of oil or dirt on the bulb can quickly disable the lamp. Scratches on the glass bulb are stress concentrators and can also cause the bulb to break when the bulb is heated or shaken.
Replacing high beam bulbs (vehicles with petrol engines)
Open the hood.
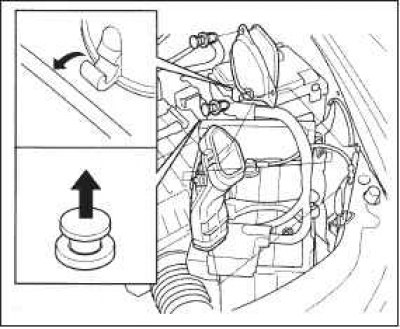
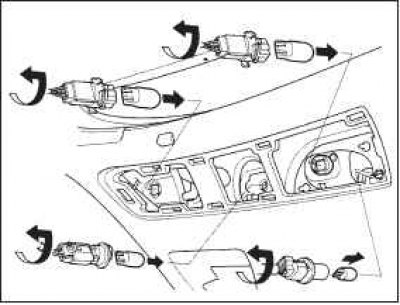
To replace the left headlight bulb, remove the wire from the clamp and release the two breather cover fasteners by pulling on their central parts. Remove the cap first and then the upper breather tube.

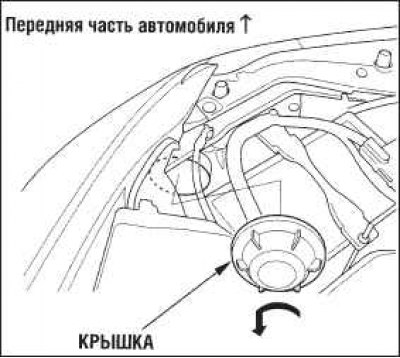
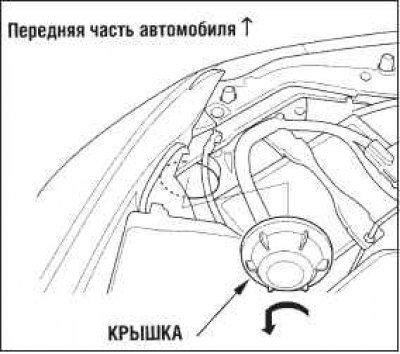
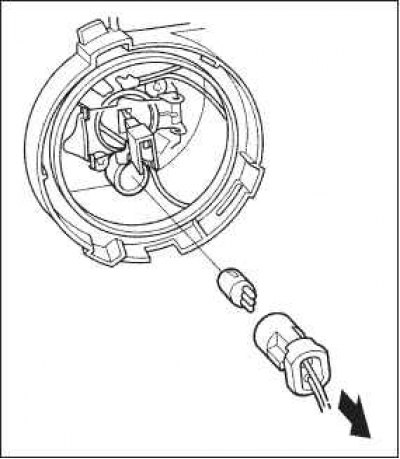
Remove the cover from the back of the headlight assembly by turning it counterclockwise.
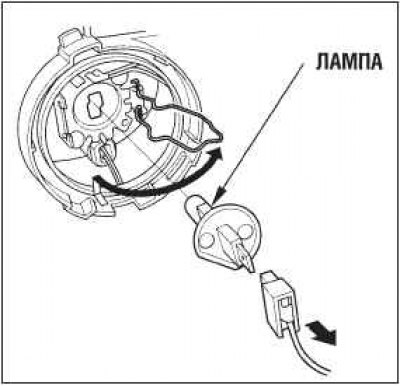
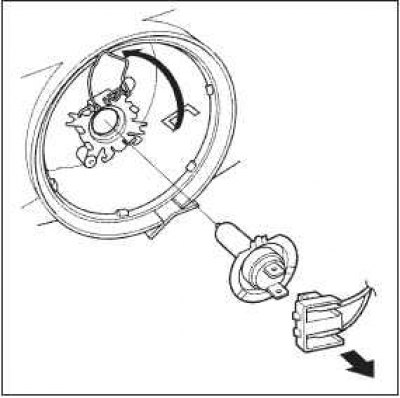
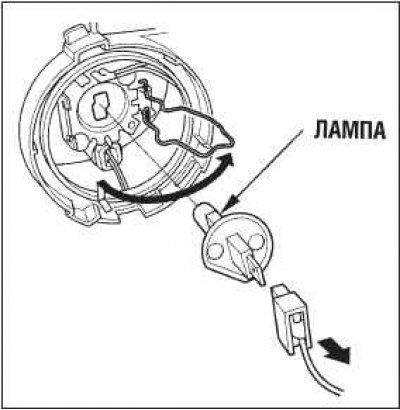
Disconnect the bulb electrical connector by pulling it back without tilting or twisting.
Disconnect the end of the wire clamp, turn it and remove the lamp.
Insert the new bulb into the socket, making sure the tabs fit into the slots. Rotate the wire holder into place and fix it.
Replace the cover located on the back of the headlamp housing. Turn it clockwise to secure.
Connect the electrical connector to the new lamp. Check if the connection is secure.
Turn on the headlights to test the new bulb.
For left headlight of vehicles with 1.8L engine
Reinstall the upper breather tube, then the breather cap. Install the two cover fasteners and press them into place. Reinstall the wire.
Replacing low beam bulbs (vehicles with petrol engines)
Open the hood.
Remove the cover from the back of the headlight assembly by turning it counterclockwise.
Disconnect the bulb electrical connector by pulling it back without tilting or twisting.
 |  |
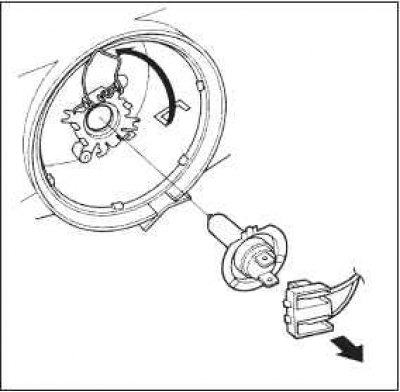
Disconnect the end of the wire clamp, turn it and remove the lamp.
Insert the new bulb into the socket, making sure the tabs fit into the slots. Rotate the wire holder into place and fix it.
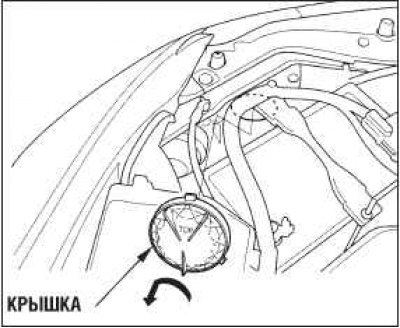
Replace the cover located on the back of the headlamp housing. Turn it clockwise to secure. Make sure the word «TOR» («Top»), applied to the lid turned out to be on top.
Connect the electrical connector to the new lamp. Check if the connection is secure.
Turn on the headlights to test the new bulb.
Replacing high beam bulbs (vehicles with diesel engines)
Open the hood.
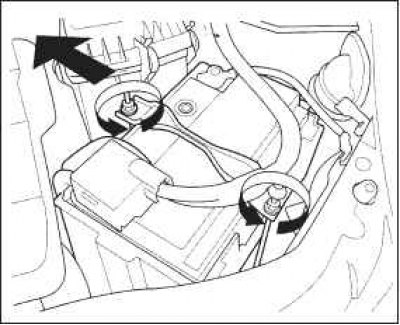
To replace the left headlight bulb, remove the battery stud nuts and slide the battery towards the windshield to make room for work.
To replace the right headlight bulb, remove the upper part of the washer fluid reservoir by pulling it up.
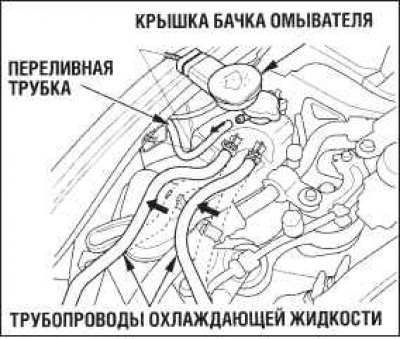
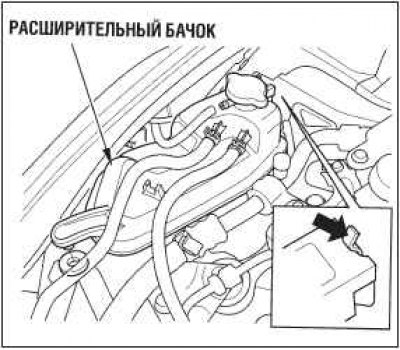
Disconnect the coolant lines from the two clamps and the overflow tube from the expansion tank, then press the tab and remove the expansion tank from the holder in an upward direction.
Make sure the engine and radiator are cold.
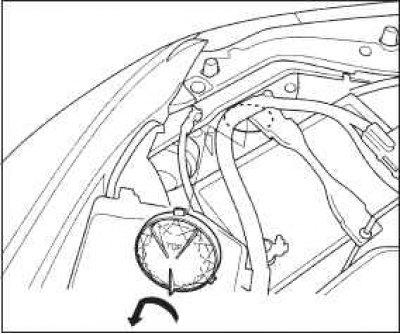
Remove the cover from the back of the headlight assembly by turning it counterclockwise.
Disconnect the bulb electrical connector by pulling it back without tilting or twisting.
Disconnect the end of the wire clamp, turn it and remove the lamp.
Insert the new bulb into the socket, making sure the tabs fit into the slots. Rotate the wire holder into place and fix it.
 |  |
Replace the cover located on the back of the headlamp housing. Turn it clockwise to secure.
Connect the electrical connector to the new lamp. Check if the connection is secure.
Turn on the headlights to test the new bulb.
Left headlight
Reinstall the battery and secure it securely with the nuts.
Right headlight
Reinstall the expansion tank, then securely reconnect the coolant lines and overflow tube. Install the washer fluid reservoir top.
 |  |
Replacing low beam bulbs (vehicles with diesel engines)
Open the hood.
To replace the left headlight bulb, remove the battery stud nuts and slide the battery towards the windshield to make room for work.
Remove the cover from the back of the headlight assembly by turning it counterclockwise.
Disconnect the bulb electrical connector by pulling it back without tilting or twisting.
 |  |
Disconnect the end of the wire clamp, turn it and remove the lamp.
Insert the new bulb into the socket, making sure the tabs fit into the slots. Rotate the wire holder into place and fix it.
Replace the cover located on the back of the headlamp housing. Turn it clockwise to secure. Make sure the word TOR (Top), applied to the lid turned out to be on top.
Connect the electrical connector to the new lamp. Check if the connection is secure.
Turn on the headlights to test the new bulb.
Left headlight
Reinstall the battery and secure it securely with the nuts.
Replacing the bulbs of the front parking lights
The front parking lights are located under the high beam headlights, under the cover.
Open the hood.
For vehicles with diesel engine
To replace the left parking light bulb, slide the battery towards the windshield to make room for work.
Remove the cover from the back of the headlight assembly by turning it counterclockwise.
Disconnect the lamp connector by turning it a quarter of a turn counterclockwise.
Remove the burned-out bulb by pulling it backwards without tilting or turning. Insert a new lamp into the socket, pushing it all the way.
Insert the new bulb into the headlight housing as far as it will go.
Replace the cover located on the back of the headlamp housing. Turn it clockwise to secure. Make sure the word TOR (Top), applied to the lid turned out to be on top.
Turn on the headlights to test the new bulb.
Left headlight
Reinstall the battery and secure it securely with the nuts.
Replacing the front turn signal bulb
To replace the left lamp, start the engine, turn the steering wheel all the way to the right, then stop the engine. To replace the right bulb, turn the steering wheel all the way to the left.
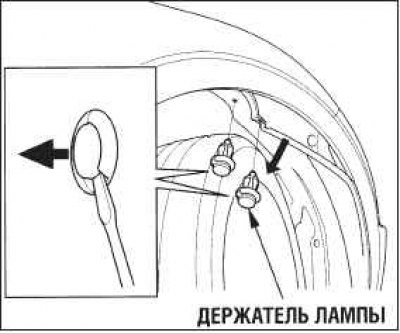
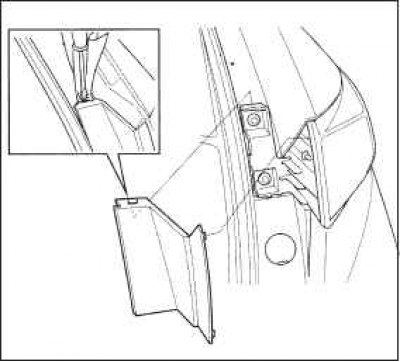
Remove the two clips from the inside of the fender using a small flat-bladed screwdriver.
Move the fender liner away from the fender and bumper.
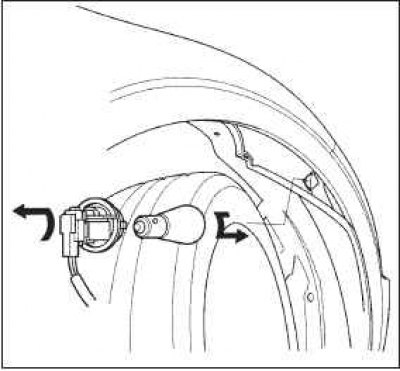
Remove the cartridge from the headlight assembly by turning it a quarter of a turn counterclockwise.
Remove the burned out bulb by pushing it in and turning it counterclockwise to disengage from the socket.
Insert the new bulb into the socket and the socket into the headlight housing. To lock the chuck, turn it clockwise.
Turn on the headlights to test the new bulb.
Install the fender liner. Secure the fender liner with two clips by pressing them.
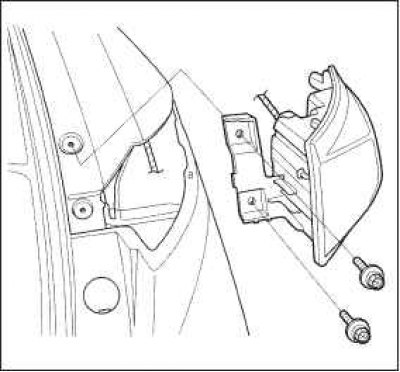
Replacing the lamps in the rear fenders
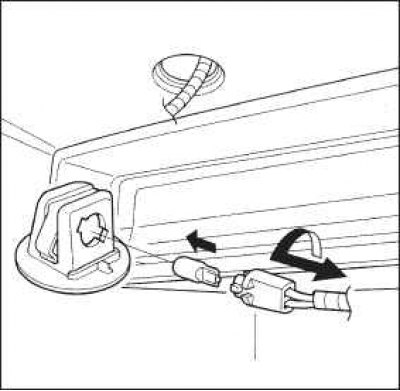
Open the tailgate. Place a piece of fabric on the edge of the lid. Remove the cover using a small flat head screwdriver.
Loosen the two mounting bolts with a wrench.
Remove the light assembly from the rear pillar.
 | 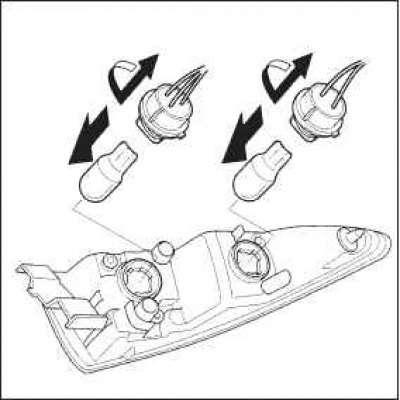 |
Determine which of the two bulbs is burned out: the brake light bulb or the turn signal bulb.
Remove the bulb holder by turning it a quarter of a turn counterclockwise.
Remove the lamp from the socket. You don't need to turn the lamp. Insert the new bulb by sliding it into the socket until it stops.
Install the cartridge in the lamp assembly and lock it by turning it clockwise.
Turn on the lights to check if the new bulb is working.
Reinstall the headlight assembly and securely tighten the mounting bolts.
Align the tab on the cover with the groove on the body. Slide the cover over the rear pillar and secure it securely.
Replacing tailgate lamps
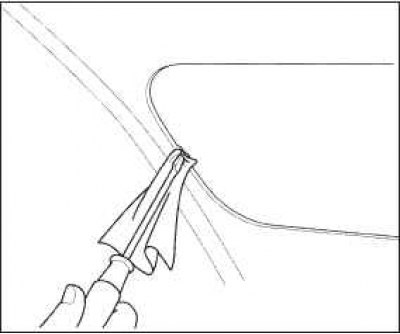
Open the back door. Place a piece of cloth under a small flat-blade screwdriver, slide the screwdriver under the edge of the cover, and carefully pry it off.
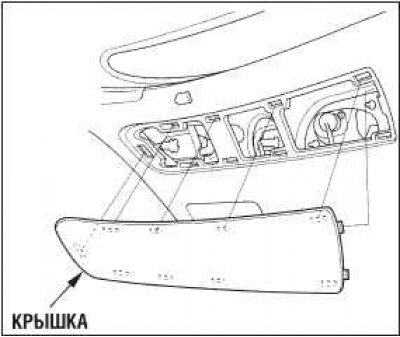
Determine which of the four (or three) bulbs burnt out: brake light, reversing light, registration plate light, or rear fog light (last one on the driver's side).
 |  |
Remove the bulb holder by turning it a quarter of a turn counterclockwise.
Remove the lamp from the socket. You don't need to turn the lamp. Insert the new bulb by sliding it into the socket until it stops.
Install the cartridge in the lamp assembly and lock it by turning it clockwise.
Turn on the lights to check if the new bulb is working.
Replace the cover.
Replacing the front fog light bulb (for some vehicle variants)
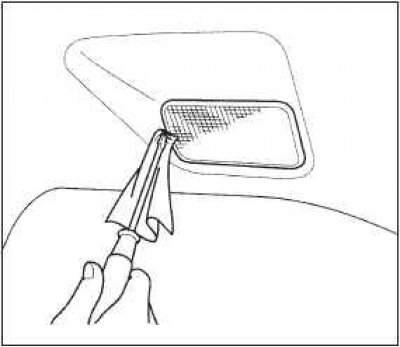
The front fog lamps are fitted with halogen bulbs and should be handled with care. When replacing a burned-out lamp, hold the new lamp only by its plastic base, and do not touch the glass bulb with your fingers. Keep the glass bulb of the lamp away from contact with hard objects. If there are finger marks on the lamp bulb, wipe it with a clean cloth dampened with alcohol.
Attention! Halogen lamps get very hot during operation. Therefore, the presence of traces of oil or dirt on the bulb can quickly disable the lamp. Scratches on the glass bulb are stress concentrators and can also cause the bulb to break when the lamp is heated.
Loosen the bolt with a wrench.
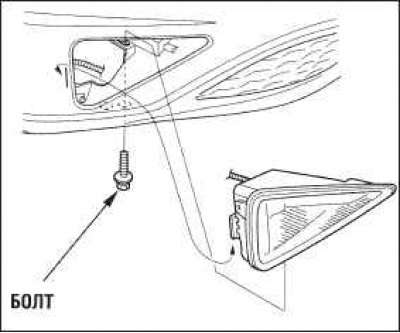 |  |
Gently remove the fog lamp from the bumper while gently pushing it outward.
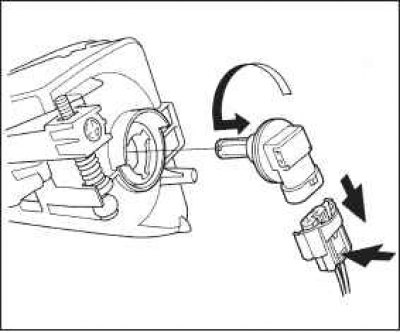
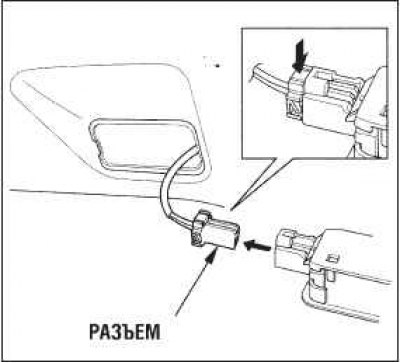
Squeeze the connector to release the retainer and pull it out, then remove it from the lamp socket.
Remove the bulb by turning it a quarter of a turn counterclockwise.
Insert the new bulb into the hole and turn it a quarter of a turn clockwise to secure it.
Connect the electrical connector to the lamp. Check if the connection is secure.
Turn on the fog lights to check if the new bulb is working.
Align the tab on the headlight with the bumper and install the fog lamp in place, then tighten the screw securely.
Replacing lamps in the ceiling lamps of interior lighting
The ceiling lamps for interior lighting and individual lighting are disassembled in the same way. However, they use different lamps.
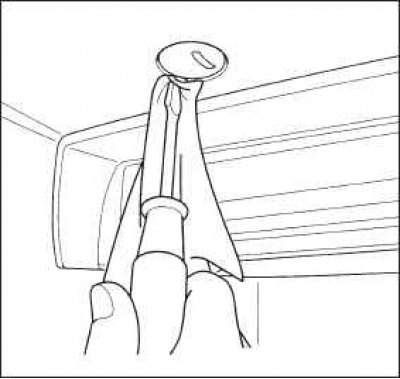
Remove the front cover of the lampshade. Place a piece of cloth under a small flat-blade screwdriver or nail file, slide the screwdriver under the edge of the lid, and carefully pry it off.
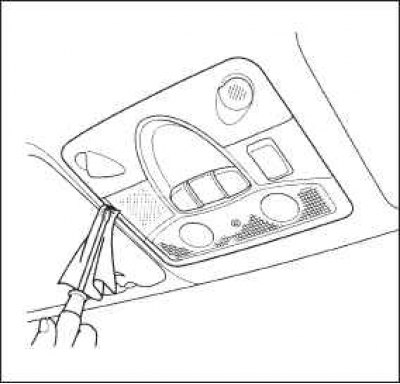
Using a screwdriver as a lever, press on the edge of the front cover.
Rear upper cover
Using a screwdriver as a lever, press on the side edge of the diffuser of the ceiling.
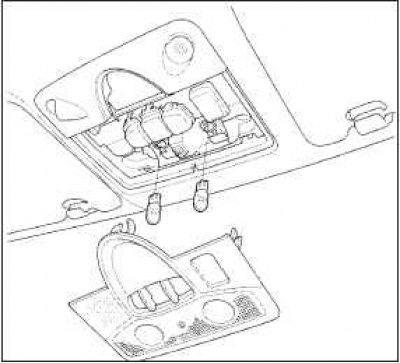
Sun visor lamp: Using a screwdriver as a lever, press the top edge of the lens.
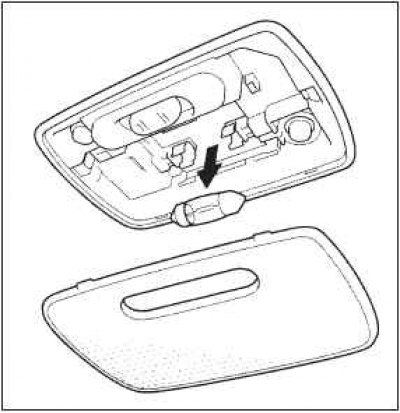
Take out the lamp. You don't need to rotate it.
Insert the new bulb into the socket. Press down on the diffuser until it clicks into place.
Replacing the luggage compartment lamp
Open the back door.
Place a piece of cloth under a small flathead screwdriver, slide the screwdriver under the edge of the cover and pry it out.
To disconnect the electrical connector from the dome light, pull the connector without turning it.
Turn up the plastic cover of the lampshade and remove it.
 |  |
Remove the lamp from the socket. You don't need to turn the lamp. Insert the new bulb by sliding it into the socket until it stops.
Replace the cover, then connect the electrical connector.
Insert the plafond into the hole. Insert the back first. Press down on the front of the canopy until it clicks into place.
Replacing the lamp in the glove box
Open the glove box. Place a piece of cloth under a small flat-blade screwdriver, slide the screwdriver under the edge of the plastic diffuser and press it down.
Pull on the diffuser to remove the lamp housing.
Remove the lamp from the socket. You don't need to turn the lamp. Insert the new bulb by sliding it into the socket until it stops.
Turn on the side lights and make sure the new bulb is working.
Insert the plafond into the hole. Close the glove box.
Lamps for lighting and signaling devices
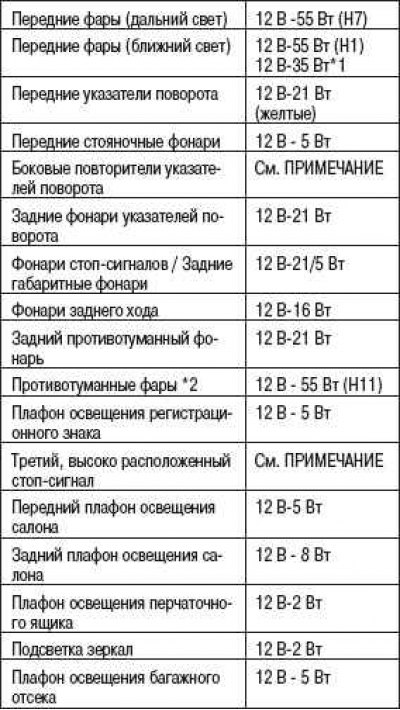
*1: Vehicles with HID low beam headlamps (replaced only at the dealer service center).
*2: For some vehicle versions.
Replacing the turn signal lamps integrated in the outside rear-view mirrors must be done by your dealer only.