HondaBook.ru
Auto companies Volkswagen Auto companies Ford Auto companies Lada Auto companies Skoda Auto companies BMW Auto companies Mazda Auto companies Peugeot
English Русский
Български
Беларускі
Український
Српски
Hrvatski
Română
Polski
Slovenský
Magyar
Bookmark Contacts Sitemap   


Accord Civic Fit / Jazz CR-V HR-V Others Articles
Civic 3 and 4 (1983-1991) Civic 5 and 6 (1991-2000) Civic 6 (1995-2000) Civic 7 (2000-2005) Civic 8 (2005-2011)

Removal and installation the steering column (Honda Civic 8)

  • Main
  • Honda Civic
  • 8 (2005-2011)
  • Chassis and running gear
  • Steering
  • Removal and installation the steering column
0
Contents: Removal ⇊ Installation ⇊
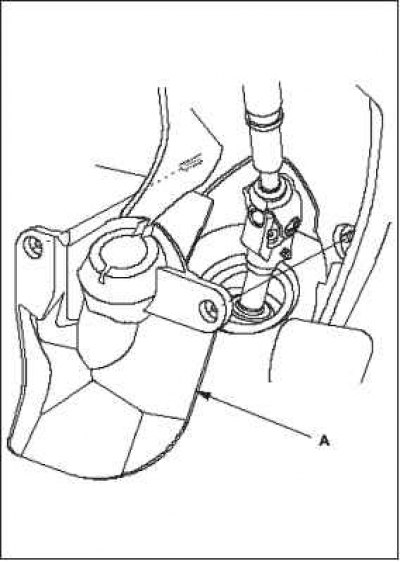
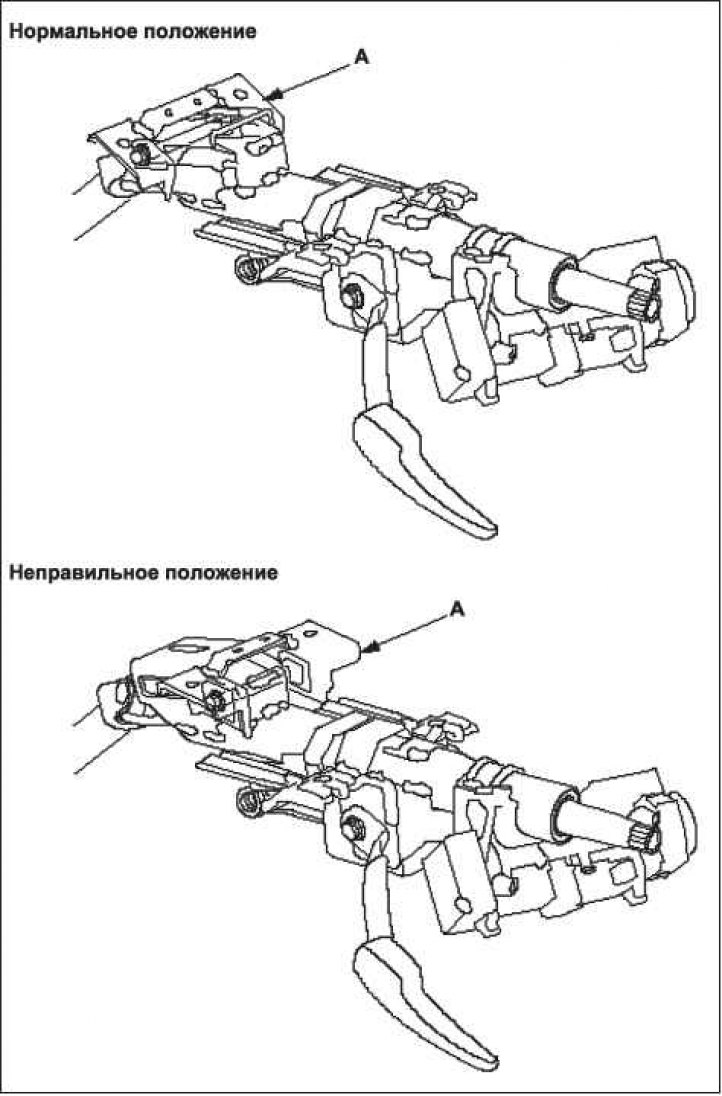
Note: Be careful not to move bracket A, located at the front of the steering column, from its normal position. If the bracket accidentally moves, replace the steering column assembly.


Removal


1. Make sure the ignition is off, then disconnect the negative cable from the battery.

2. Remove the driver's airbag unit and steering wheel.

3. Remove the lower instrument panel cover on the driver's side.

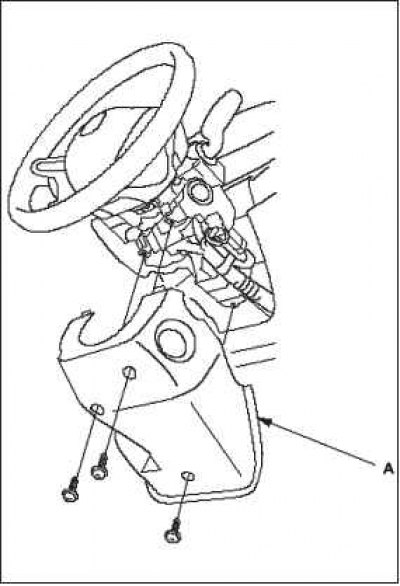
4. Remove the steering column covers.

5. Remove the steering joint cover A.

6. Release the steering wheel adjustment lever and set the steering column to its highest position, moving it away from you all the way.

7. Tighten the steering wheel adjustment lever.
Removal and installation the steering column


Removal and installation the steering column

8. Secure the lower sliding shaft A to the…


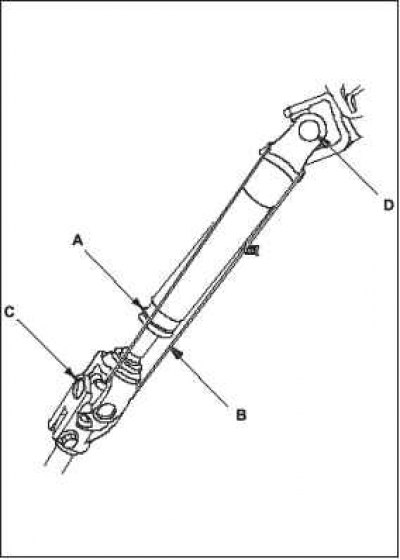
8. Secure the lower sliding shaft A to the steering column using a piece of wire B between the joint C of the lower sliding shaft and the joint D of the upper shaft, thereby preventing it from sliding out.


9. Release the steering wheel adjustment lever, set the steering wheel to the extreme extended position and tighten the lever again.

Note: Do not release the steering wheel adjustment lever when removing the steering column from the frame.


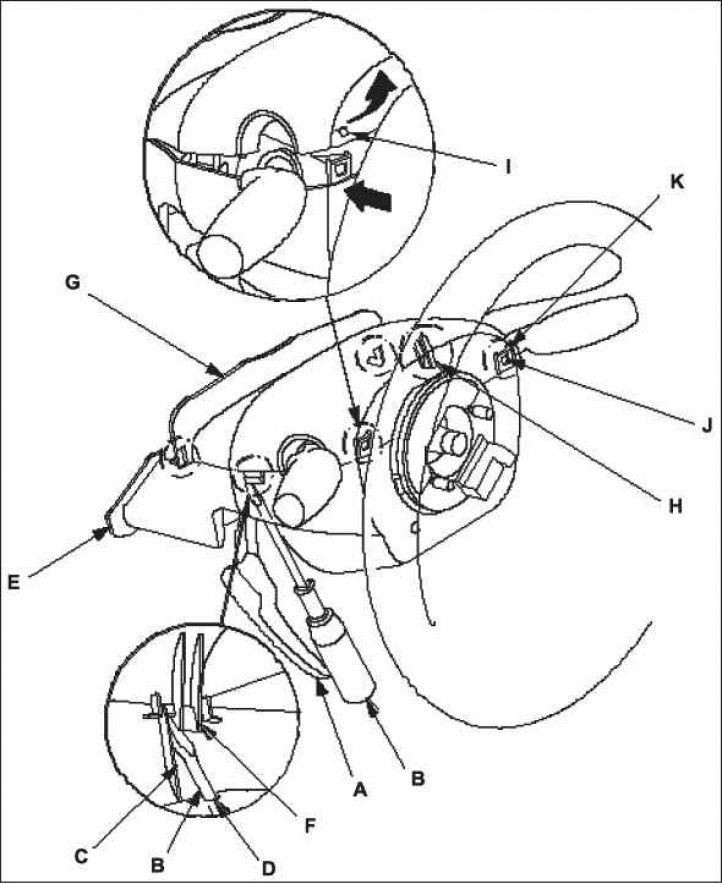
10. Disconnect the wiring harness connectors from the central switch assembly and rotary contactor A.

11. Remove the three screws B and remove the combination switch assembly from the steering column.

12. Disconnect the wiring harness from the ignition switch and release the clips securing the wiring harness to the steering column.

13. Remove bolt C of the steering shaft joint and disconnect joint D from the pinion shaft.

14. Remove the steering column E by disassembling the corresponding threaded connections. If the lower sliding shaft F is removed, insert it into the upper shaft G so that the stamped marks or painted marks H coincide.

15. Remove the center guide I (if equipped) and throw it away. The center guide is for factory assembly only.
Installation


Installation


1. Perform the steering column installation operations in reverse order of removal, and pay attention to the following things:


Make sure that the wires are not pinched anywhere.

Make sure that the sliding capsules do not fall out of place during installation of the steering column.

2. Center the steering rack in the middle of its travel.

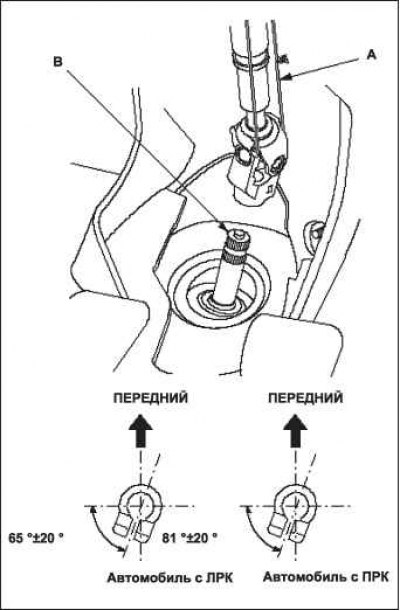
3. With the steering rack in the straight-ahead position, cut wire A and connect the lower end of the steering shaft joint to the pinion shaft B as shown in the figure.
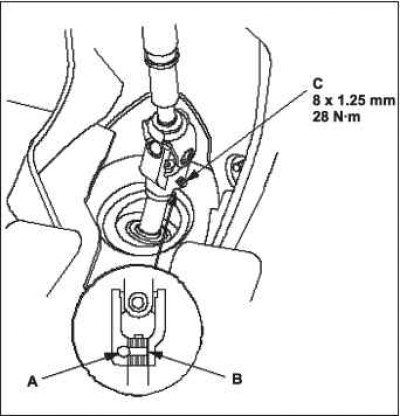
4. Align the bolt hole A on the joint with the…


4. Align the bolt hole A on the joint with the groove B on the pinion shaft and insert the joint bolt C loosely. Make sure the bolt fits into the groove on the pinion shaft. Pull the steering joint to make sure it is securely in place. Tighten the joint bolt to the recommended torque.
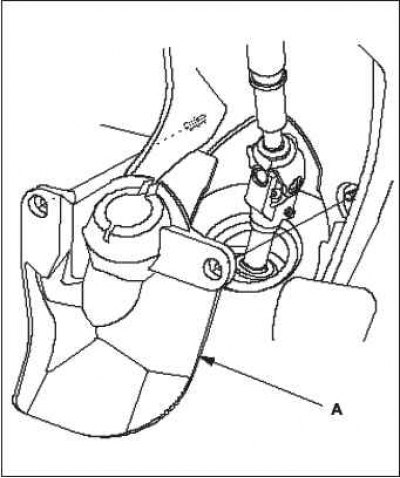
5. Install the steering joint cover A into place.


5. Install the steering joint cover A into place.


6. Install the steering wheel.

7. Install the steering column covers.

8. Install the driver's side instrument panel lower cover.

9. Connect the negative cable to the battery.

Turn the ignition switch to the "ON" (II) position. The SRS indicator should come on for approximately 6 seconds and then go out.
Set the correct time on the clock.


Set the correct time on the clock.

Check the cruise control system, remote control of the audio system, navigation system (if any) and turning off the turn signal.

Make sure the steering wheel is properly centered.
This article is available at: russian, bulgarian, belarusian, ukrainian, serbian, croatian, romanian, polish, slovak, hungarian
This information has been verified: Yaroslav Shiryaev
Share with friends:
◀ Previous
Civic 8: Steering
Next ▶

Removal/installing the steering column cover
Checking the power steering
Checking the steering wheel play
Checking the steering column and adjustment lever
Removal the steering wheel
Installing the steering wheel
Replacing the steering shaft protective cover
See also other articles from Honda manuals:
Steering column — removal and installation Honda Accord 3 (1985-1989)
Removal and installation the steering column Honda Fit 1 (2001-2008)
Adjusting the steering column and rear view mirrors Honda CR-V 2 (2002-2006, petrol)
Steering column — design description Honda HR-V 1 (1998-2006, petrol)
Adjusting the steering column and mirrors Honda Avancier 1 (1999-2003, petrol)
Link in different formats to this article
Comments and feedback from visitors
No comments yet


How much will 20 + 50 ?


Civic 8 (2005-2011) 
  • General information
  • Technical data
  • Governing bodies
  • Driving and maintenance
  • Power unit
  • Gasoline engines (L13A)
  • Gasoline engines (R18A)
  • Diesel engines (N22A)
  • Cooling and lubrication (L13A)
  • Cooling and lubrication (R18A)
  • Cooling and lubrication (N22A)
  • Injection system (gasoline)
  • Injection system (diesel)
  • Toxicity reduction system
  • Troubleshooting
  • Transmission
  • Clutch and drive shafts
  • Mechanical gearbox
  • Chassis and running gear
  • Suspension and wheels
  • Steering
  • Brake system
  • Body and interior
  • Exterior (external elements)
  • Doors, locks and windows
  • Electrical equipment
  • Equipment and devices
  • Headlights and lighting
  • Power devices
  • Electrical circuits
Civic 7 (2000-2005) 
  • General information
  • User manual
  • Maintenance
  • Power unit
  • Engines D15B and D17A
  • K20A Engines
  • Overhaul engine
  • Cooling system
  • Lubrication system
  • Fuel injection system
  • Toxicity reduction system
  • Engine electrical equipment
  • Transmission
  • Clutch
  • Manual gearbox
  • Automatic gearbox
  • Variator (CVT)
  • Drive shafts
  • Chassis and running gear
  • Car suspension
  • Steering
  • Brake system
  • Body and interior
  • Exterior (external elements)
  • Interior (internal elements)
  • Doors, locks and windows
  • Heater and air conditioner
  • Manual air conditioner
  • Automatic air conditioner
  • Security system
  • Electrical equipment
  • Equipment and devices
  • Headlights and lighting
  • Windscreen wipers
  • Audio system
  • Electrical diagrams
Civic 6 (1995-2000) 
  • General information
  • Introduction to guide
  • User manual
  • Maintenance
  • Power unit
  • Engine in car (Civic)
  • Engine in car (Integra)
  • Engine overhaul
  • Cooling and heating
  • Power and exhaust systems
  • Engine electrical equipment
  • Engine management systems
  • Transmission
  • Manual gearbox
  • Automatic transmission (AT/CVT)
  • Clutch and drive shafts
  • Chassis and running gear
  • Brake system
  • Car suspension
  • Steering
  • Body and interior
  • Exterior (external elements)
  • Interior (internal elements)
  • Doors, locks and windows
  • Electrical equipment
  • Equipment and devices
  • Electrical circuits
Civic 5 and 6 (1991-2000) 
  • Power unit
  • SOHC engines
  • DOHC engines
  • Engine overhaul
  • Cooling and lubrication system
  • Intake and exhaust system
  • Fuel injection system (SOHC)
  • Fuel injection system (DOHC)
  • Carburetor
  • Transmission
  • Clutch
  • Manual gearbox S4C
  • Manual gearbox S40
  • Automatic gearbox
  • Drive shafts
  • Chassis and running gear
  • Car suspension
  • Steering
  • Brake system
  • Body and interior
  • Body elements
  • Heater and air conditioner
  • Electrical equipment
  • Power devices
  • Equipment and instruments
  • Electrical circuits
Civic 3 and 4 (1983-1991) 
  • General information
  • Maintenance
  • Power unit
  • Engine in a car
  • Engine overhaul
  • Cooling system
  • Power and exhaust system
  • Engine electrical equipment
  • Emission control system
  • Transmission
  • Mechanical gearbox
  • Automatic gearbox
  • Clutch and drive shafts
  • Four-wheel drive
  • Chassis and running gear
  • Brake system
  • Car suspension
  • Steering
  • Body and interior
  • Body elements
  • Electrical equipment
  • Equipment and devices
  • Electrical circuits
HondaBook.ru © 2018–2026 • Mobile version • Sitemap: EN BG BY UA RS HR RO PL SK HU • Feedback • Driver Information • Search system • Bookmark
Accord 3 (1985-1989) • Accord 6 (1997-2002) • Civic 3 and 4 (1983-1991) • Civic 5 and 6 (1991-2000) • Civic 6 (1995-2000) • Civic 7 (2000-2005) • Civic 8 (2005-2011) • Fit 1 (2001-2008) • CR-V 1 (1995-2001) • CR-V 2 (2002-2006) • HR-V 1 (1998-2006) • Avancier 1 (1999-2003) •
 
This website uses cookies to ensure proper functioning. By clicking "OK," you agree.