HondaBook.ru
Auto companies Volkswagen Auto companies Ford Auto companies Lada Auto companies Skoda Auto companies BMW Auto companies Mazda Auto companies Peugeot
English Русский
Български
Беларускі
Український
Српски
Hrvatski
Română
Polski
Slovenský
Magyar
Bookmark Contacts Sitemap   


Accord Civic Fit / Jazz CR-V HR-V Others Articles
Civic 3 and 4 (1983-1991) Civic 5 and 6 (1991-2000) Civic 6 (1995-2000) Civic 7 (2000-2005) Civic 8 (2005-2011)

Engine oil and filter (Honda Civic 7)

  • Main
  • Honda Civic
  • 7 (2000-2005)
  • General information
  • Maintenance
  • Engine oil and filter
0
Contents: Precautions when working with oils ⇊ Checking the engine oil level ⇊ Selecting motor oil ⇊ Replacing the oil filter ⇊ Engine oil change ⇊

Precautions when working with oils


1. Long-term and repeated contact with motor oil removes the natural oil layer from the skin, causing dryness, irritation and dermatitis. In addition, the motor oils used contain potentially dangerous components that can cause skin cancer.

2. After working with oil, wash your hands thoroughly with soap or other cleanser. After cleaning the skin, apply a special cream to restore the skin's natural fat layer.

3. Do not use gasoline, kerosene, diesel fuel or solvent to clean the skin.

Checking the engine oil level


1. Place the car on a flat horizontal surface. After turning off the engine, wait a few minutes for the oil to drain into the crankcase.

2. Remove the dipstick and wipe it with a rag.

3. Reinstall the dipstick until it stops.

4. Remove the dipstick and check the oil level in the engine crankcase. The oil level should be between the two marks "A" and "B". If the oil level is low, check for leaks and add oil of the same type that was poured into the engine up to the "A" mark through the oil filler neck.
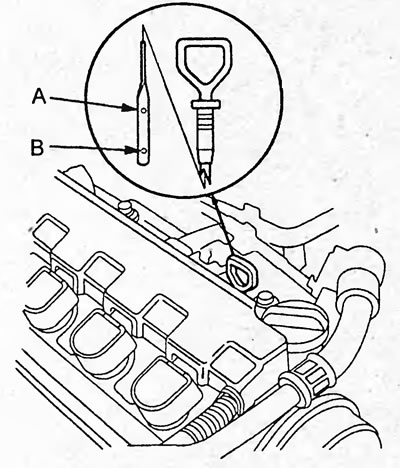
4. Remove the dipstick and check the oil level in…


Note:
  • In some cases, the actual oil level may differ from the standard volumes.
  • Avoid overfilling the oil, otherwise the engine may be damaged. - Always check the oil level after adding oil.

5. Install the oil filler cap.


Selecting motor oil


1. Use oil recommended by the manufacturer.

Oil quality according to API - SG, SJ

2. Select viscosity (SAE) according to the temperature range diagram corresponding to the vehicle operating conditions until the next oil change.
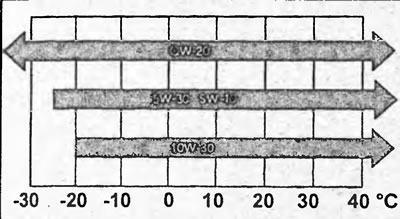
2. Select viscosity (SAE) according to the…


Replacing the oil filter


Note: There are 3 types of oil filters for this engine type.
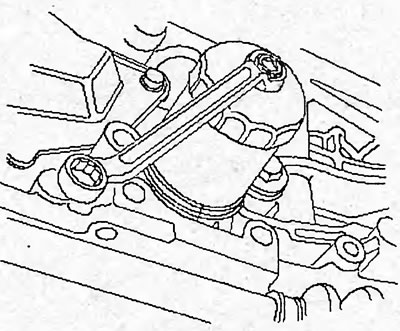

Type 1.
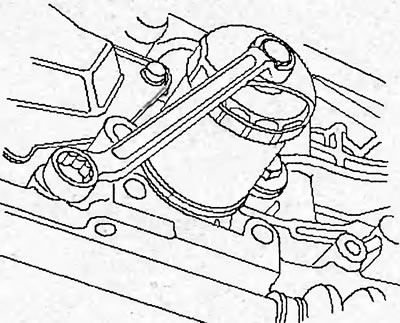
Type 1.


Type 2.

Type 2.


Type 3.

Type 3.


1. Using a special tool, remove the oil filter.

2. Wipe the mating surface of the oil filter housing with a clean cloth.

3. Apply a layer of engine oil to the seal (B) of the oil filter (A).
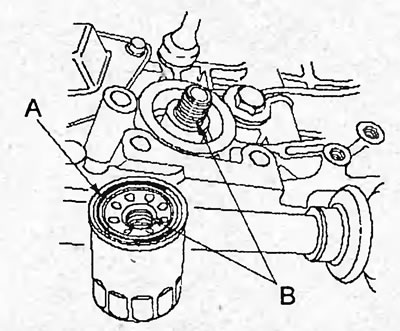
3. Apply a layer of engine oil to the seal (B) of…


4. Install the filter and tighten it by hand.

5. Using a special tool, tighten the filter further:
  • Type 1 and 3 3/4 turn
  • Type 2 7/8 turn

Type 2 7/8 turn


Tightening torque:


  • type 1 - 12 Nm
  • type 2 and 3 - 22 Nm

6. If the filter has numbers 1-4 or arrows, do the following.

a) Screw the filter until its contact surface touches the cylinder block and see what number or how many arrows are at the bottom of the oil filter.

b) Tighten the filter according to the arrow by 3 marks. For example, if before tightening the filter there was a number 2 at the bottom, then after tightening the filter there should be a number 1 at the bottom. If there are arrows on the filter, tighten it in the same way as described above.
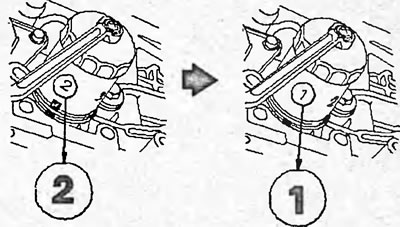
b) Tighten the filter according to the arrow by 3…


7. If the filter has numbers 1 - 8, do the following.

a) Screw the filter until its contact surface touches the cylinder block and look at the number at the bottom of the oil filter.

b) Tighten the filter clockwise by 7 marks. For example, if before tightening there was a number 2 at the bottom of the filter, then after tightening there should be a number 1 at the bottom. If there are arrows on the filter, tighten it in the same way as described above.
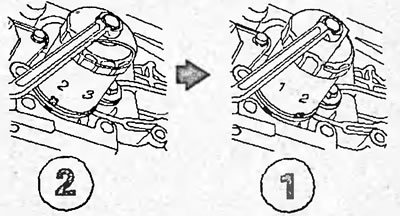
b) Tighten the filter clockwise by 7 marks. For…


8. Start the engine and check for oil leaks.


9. Check the oil level and top it up to normal if necessary.

Engine oil change


1. Place the vehicle on a flat, horizontal surface.

2. Warm up the engine for a few minutes to normal operating temperature, then turn off the engine.

3. Remove the drain plug (A) with the gasket (B) on the oil pan and drain the oil into a suitable container.
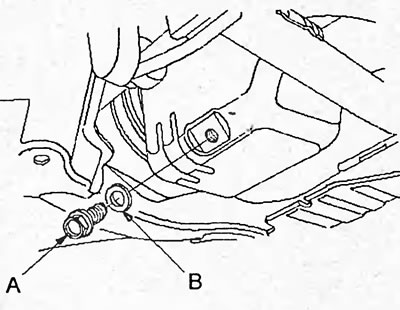
Type 1.
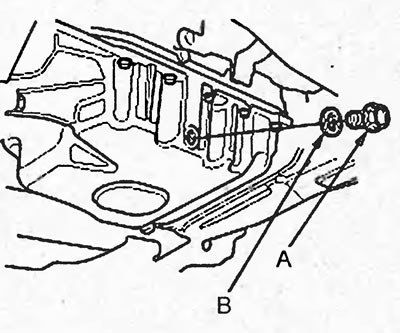
Type 1.


Type 2.

Type 2.


4. Install a new gasket and tighten the drain plug.

Tightening torque:
  • Type 1 - 44 Nm
  • Type 2 - 39 Nm


5. Fill the engine with new oil.

Note: For the type and recommended viscosity of oil, see the subsection "Choosing Engine Oil". For D15B, D17A engines, the filling capacities are given depending on the location of the drain plug (see pictures above).


Filling capacity:


D15B, D17A:

Type 1:
  • dry engine - 4.2 l
  • with filter replacement - 3.2 l
  • without filter replacement - 3.0 l

Type 2:
  • dry engine - 4.2 l
  • with filter replacement - 3.5 l
  • without filter replacement - 3.3 l

K20A:
  • dry engine - 5.8 l
  • with filter replacement - 4.7 l
  • without filter replacement - 4.5 l

6. Install the oil filler cap with a new gasket in place.

7. Check the oil level and ensure there are no leaks with the engine stopped and running.

The article is based on information from the website HONDABOOK.ru
This article is available at: russian, bulgarian, belarusian, ukrainian, serbian, croatian, romanian, polish, slovak, hungarian
This information has been verified: Yaroslav Shiryaev
Share with friends:
◀ Previous
Civic 7: Maintenance
Next ▶

Maintenance — Service Intervals
Cooling liquid
Checking and replacing the air filter
Replacing the cabin filter
Attachment drive belts
Checking spark plugs
See also other articles from Honda manuals:
Changing engine oil and filter Honda Accord 3 (1985-1989)
Engine oil and filter Honda Fit 1 (2001-2008)
Checking and replacing engine oil and filter Honda CR-V 1 (1995-2001, petrol)
Engine Starting Procedure Honda HR-V 1 (1998-2006, petrol)
Starting the engine Honda Avancier 1 (1999-2003, petrol)
Link in different formats to this article
Comments and feedback from visitors
No comments yet


How much will 46 + 30 ?


Civic 8 (2005-2011) 
  • General information
  • Technical data
  • Governing bodies
  • Driving and maintenance
  • Power unit
  • Gasoline engines (L13A)
  • Gasoline engines (R18A)
  • Diesel engines (N22A)
  • Cooling and lubrication (L13A)
  • Cooling and lubrication (R18A)
  • Cooling and lubrication (N22A)
  • Injection system (gasoline)
  • Injection system (diesel)
  • Toxicity reduction system
  • Troubleshooting
  • Transmission
  • Clutch and drive shafts
  • Mechanical gearbox
  • Chassis and running gear
  • Suspension and wheels
  • Steering
  • Brake system
  • Body and interior
  • Exterior (external elements)
  • Doors, locks and windows
  • Electrical equipment
  • Equipment and devices
  • Headlights and lighting
  • Power devices
  • Electrical circuits
Civic 7 (2000-2005) 
  • General information
  • User manual
  • Maintenance
  • Power unit
  • Engines D15B and D17A
  • K20A Engines
  • Overhaul engine
  • Cooling system
  • Lubrication system
  • Fuel injection system
  • Toxicity reduction system
  • Engine electrical equipment
  • Transmission
  • Clutch
  • Manual gearbox
  • Automatic gearbox
  • Variator (CVT)
  • Drive shafts
  • Chassis and running gear
  • Car suspension
  • Steering
  • Brake system
  • Body and interior
  • Exterior (external elements)
  • Interior (internal elements)
  • Doors, locks and windows
  • Heater and air conditioner
  • Manual air conditioner
  • Automatic air conditioner
  • Security system
  • Electrical equipment
  • Equipment and devices
  • Headlights and lighting
  • Windscreen wipers
  • Audio system
  • Electrical diagrams
Civic 6 (1995-2000) 
  • General information
  • Introduction to guide
  • User manual
  • Maintenance
  • Power unit
  • Engine in car (Civic)
  • Engine in car (Integra)
  • Engine overhaul
  • Cooling and heating
  • Power and exhaust systems
  • Engine electrical equipment
  • Engine management systems
  • Transmission
  • Manual gearbox
  • Automatic transmission (AT/CVT)
  • Clutch and drive shafts
  • Chassis and running gear
  • Brake system
  • Car suspension
  • Steering
  • Body and interior
  • Exterior (external elements)
  • Interior (internal elements)
  • Doors, locks and windows
  • Electrical equipment
  • Equipment and devices
  • Electrical circuits
Civic 5 and 6 (1991-2000) 
  • Power unit
  • SOHC engines
  • DOHC engines
  • Engine overhaul
  • Cooling and lubrication system
  • Intake and exhaust system
  • Fuel injection system (SOHC)
  • Fuel injection system (DOHC)
  • Carburetor
  • Transmission
  • Clutch
  • Manual gearbox S4C
  • Manual gearbox S40
  • Automatic gearbox
  • Drive shafts
  • Chassis and running gear
  • Car suspension
  • Steering
  • Brake system
  • Body and interior
  • Body elements
  • Heater and air conditioner
  • Electrical equipment
  • Power devices
  • Equipment and instruments
  • Electrical circuits
Civic 3 and 4 (1983-1991) 
  • General information
  • Maintenance
  • Power unit
  • Engine in a car
  • Engine overhaul
  • Cooling system
  • Power and exhaust system
  • Engine electrical equipment
  • Emission control system
  • Transmission
  • Mechanical gearbox
  • Automatic gearbox
  • Clutch and drive shafts
  • Four-wheel drive
  • Chassis and running gear
  • Brake system
  • Car suspension
  • Steering
  • Body and interior
  • Body elements
  • Electrical equipment
  • Equipment and devices
  • Electrical circuits
HondaBook.ru © 2018–2026 • Mobile version • Sitemap: EN BG BY UA RS HR RO PL SK HU • Feedback • Driver Information • Search system • Bookmark
Accord 3 (1985-1989) • Accord 6 (1997-2002) • Civic 3 and 4 (1983-1991) • Civic 5 and 6 (1991-2000) • Civic 6 (1995-2000) • Civic 7 (2000-2005) • Civic 8 (2005-2011) • Fit 1 (2001-2008) • CR-V 1 (1995-2001) • CR-V 2 (2002-2006) • HR-V 1 (1998-2006) • Avancier 1 (1999-2003) •
 
This website uses cookies to ensure proper functioning. By clicking "OK," you agree.