HondaBook.ru
Auto companies Volkswagen Auto companies Ford Auto companies Lada Auto companies Skoda Auto companies BMW Auto companies Mazda Auto companies Peugeot
English Русский
Български
Беларускі
Український
Српски
Hrvatski
Română
Polski
Slovenský
Magyar
Bookmark Contacts Sitemap   


Accord Civic Fit / Jazz CR-V HR-V Others Articles
Civic 3 and 4 (1983-1991) Civic 5 and 6 (1991-2000) Civic 6 (1995-2000) Civic 7 (2000-2005) Civic 8 (2005-2011)

Front suspension strut (Honda Civic 7)

  • Main
  • Honda Civic
  • 7 (2000-2005)
  • Chassis and running gear
  • Car suspension
  • Front suspension strut
0
Contents: Removal ⇊ Disassembly ⇊ Checking the shock absorber ⇊ Assembly ⇊ Installation ⇊

Removal


1. Jack up the front of the car.

2. Remove the front wheels.

3. Remove the cotter pin and unscrew the nut securing the tie rod end. Using a special tool, disconnect the tie rod end from the steering knuckle.
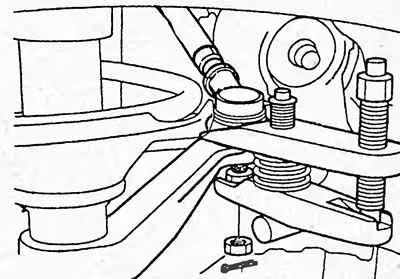
3. Remove the cotter pin and unscrew the nut…


4. Loosen the bolts and remove the wheel speed sensor wire bracket (B) and the brake hose bracket (A) from the shock absorber.
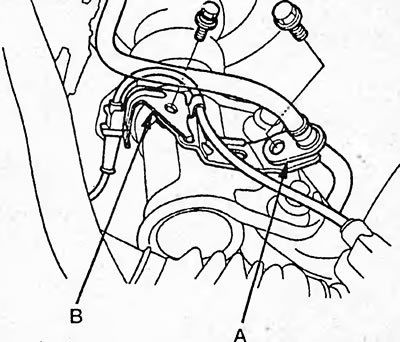
4. Loosen the bolts and remove the wheel speed…


5. Unscrew the bolts and nuts securing the lower part of the rack.
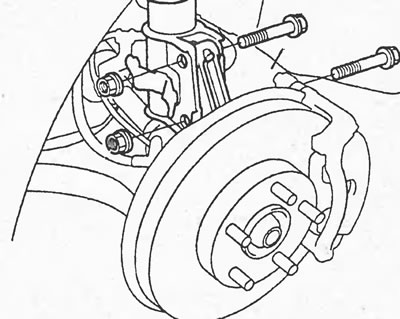
5. Unscrew the bolts and nuts securing the lower…


6. Loosen the nuts (A) securing the upper part of the rack and remove the rack (B).
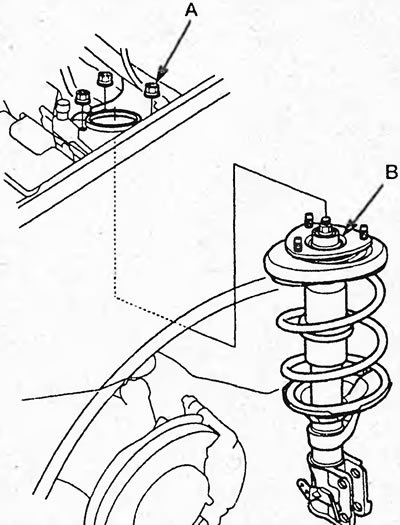


6. Loosen the nuts (A) securing the upper part of…


Disassembly


Warning: Removing the shock absorber rod nut is very dangerous. The shock absorber and suspension spring may fly out under the influence of great force during dismantling and cause serious injury to the worker, including death. Before unscrewing the nut, secure the suspension strut in a special device.


1. Install the front suspension strut (D) into the special tool (E) and compress the spring.

Caution: Do not compress the spring more than necessary to loosen the stem nut.
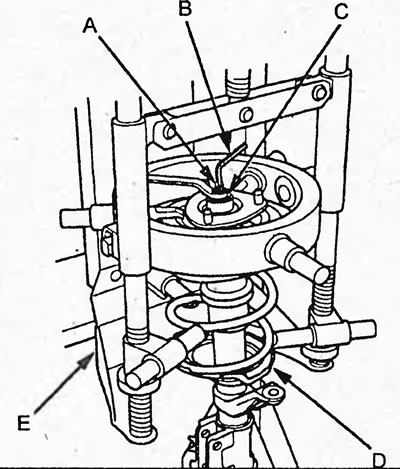

Caution: Do not compress the spring more than…


Removal and installation the front suspension…

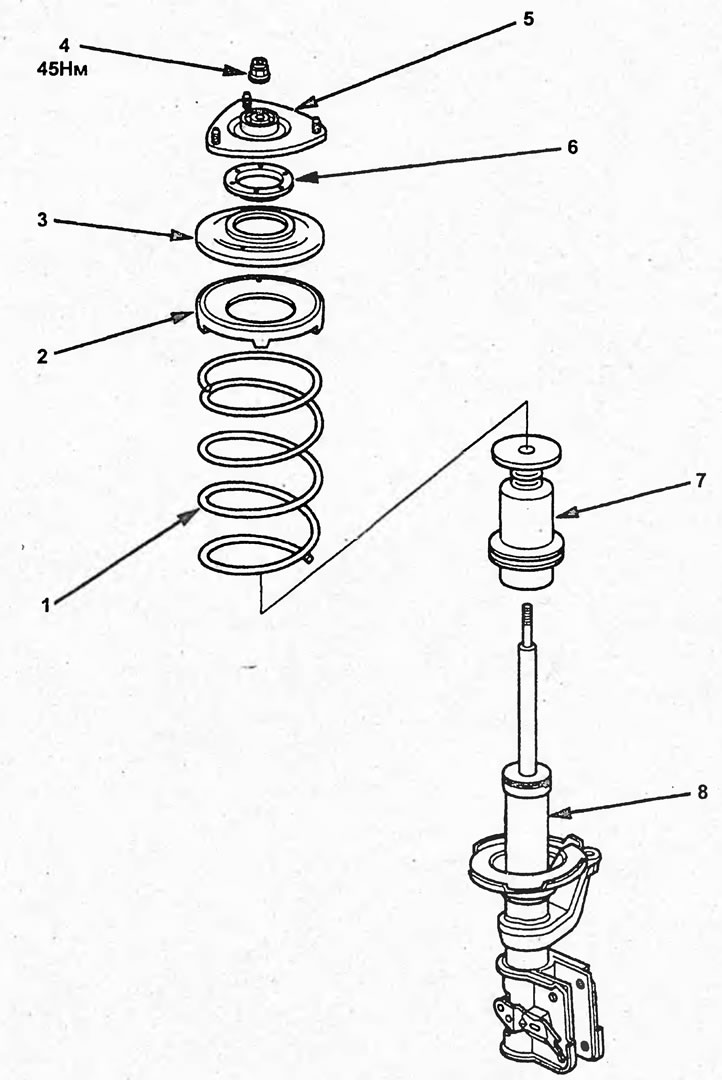
Removal and installation the front suspension strut. 1 - spring, 2 - rubber gasket of the upper spring seat, 3 - upper spring seat, 4 - nut, 5 - upper strut support, 6 - bearing, 7 - suspension travel limiter, 8 - shock absorber.


2. While holding the shock absorber rod (A) with the Allen key (B), loosen the shock absorber rod nut (C).

3. Disassemble the front suspension strut.

Checking the shock absorber


1. Remove the front shock absorber from the vehicle.

2. Check the shock absorber for damage and leaks.

3. Check the rubber bushing for damage and wear.

4. Compress and stretch the shock absorber at least three times. Make sure that the resistance to movement does not change and there are no extraneous sounds:

a) Compress the shock absorber and release it.
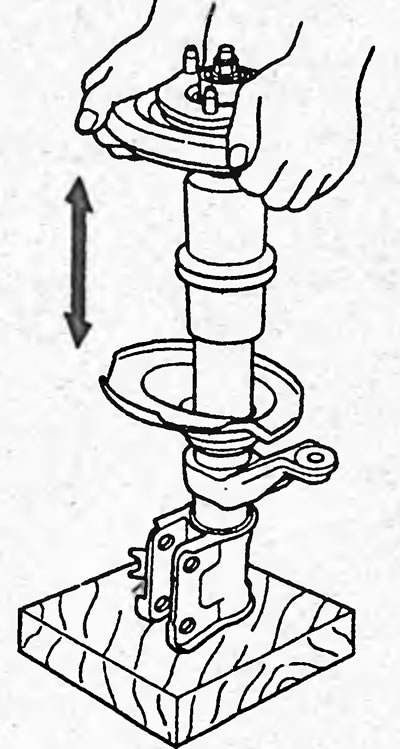
a) Compress the shock absorber and release it.


b) Make sure the plunger comes out completely at normal speed.

Replace the shock absorber if necessary.

Assembly


1. Assemble the front suspension strut. When assembling, install the lower end (B) of the spring into the recess (C) of the lower seat as shown in the figure.
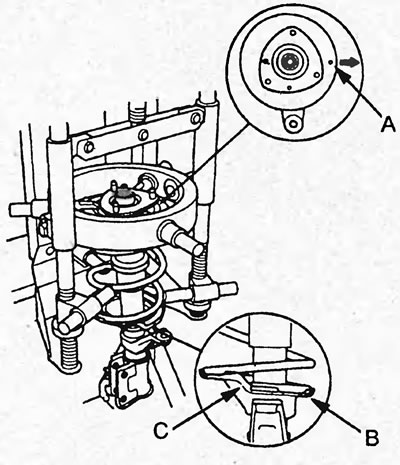
1. Assemble the front suspension strut. When…


2. Compress the spring and tighten the nut (B) of the shock absorber rod, holding the rod with an Allen key (A).


Tightening torque - 44 Nm
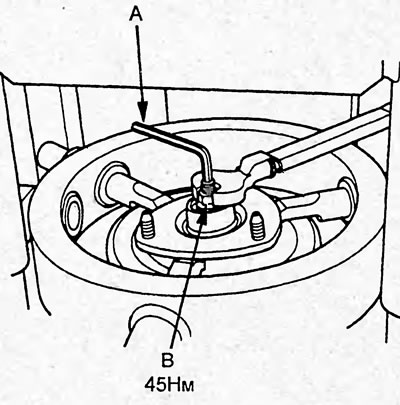
Tightening torque - 44 Nm


3. Remove the stand from the special device.

Installation


1. Using the illustrations as a guide, install the front suspension strut in accordance with the marks ("R" - right side, "L" - left side) so that the arrow (B) points towards the wing, and tighten the nuts (A).

Tightening torque - 44 Nm
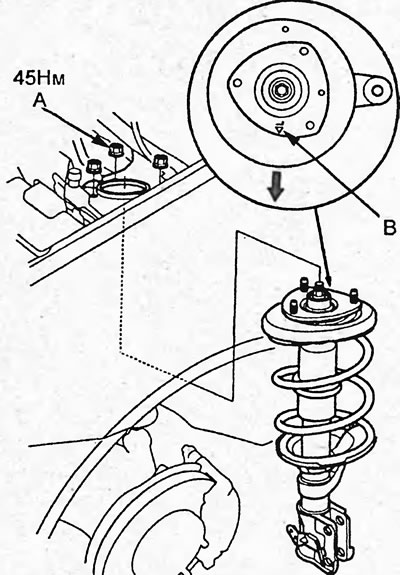
Tightening torque - 44 Nm


2. Align the holes in the strut and steering knuckle, install the bolts and tighten the nuts (A).

Tightening torque - 103 Nm
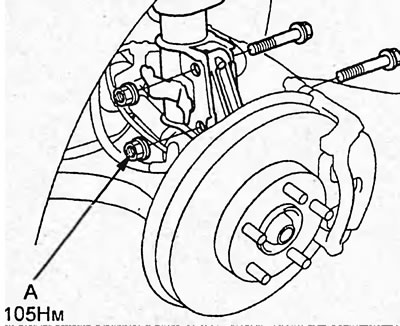
Tightening torque - 103 Nm


3. Install the bracket (B) of the wheel speed sensor wires and the bracket (A) of the brake hose from the shock absorber and tighten the bolts.
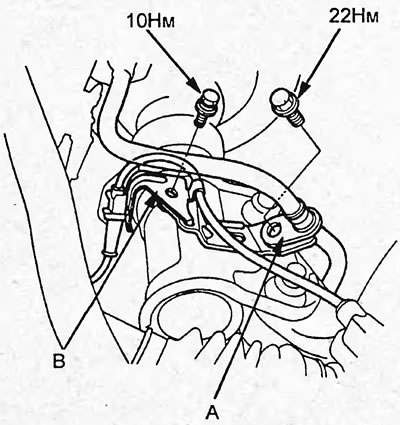


3. Install the bracket (B) of the wheel speed…


4. Connect the tie rod end to the steering knuckle, tighten the nut and install the cotter pin as shown in the figure.

Tightening torque - 43 Nm
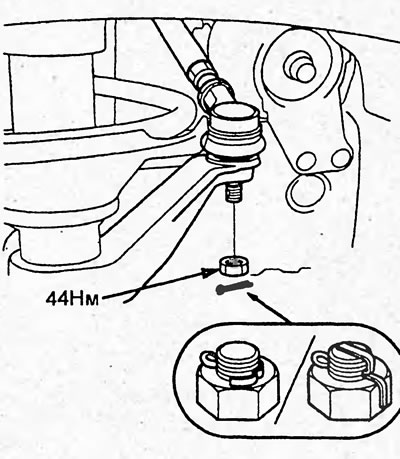
Tightening torque - 43 Nm


5. Install the wheels and remove the vehicle from the stands.

6. Check and, if necessary, adjust the front wheel alignment angles.
This article is available at: russian, bulgarian, belarusian, ukrainian, serbian, croatian, romanian, polish, slovak, hungarian
This information has been verified: Yaroslav Shiryaev
Share with friends:
◀ Previous
Civic 7: Car suspension
Next ▶

Front wheel steering knuckle and hub
Checking the rear wheel alignment angles
Checking and adjusting the front wheel alignment angles
Suspension — Preliminary Checks
Lower control arm of the front suspension
Front suspension anti-roll bar
Rear Wheel Hub (2WD models with rear drum brakes)
Rear Wheel Hub (2WD models with rear disc brakes)
Rear Wheel Hub (4WD Models)
See also other articles from Honda manuals:
General information about the front suspension Honda Accord 3 (1985-1989)
Front Suspension Strut — Removal Honda Fit 1 (2001-2008)
Front suspension parts Honda CR-V 1 (1995-2001, petrol)
Replacing the front suspension arms Honda HR-V 1 (1998-2006, petrol)
Front and rear suspension — component locations Honda Avancier 1 (1999-2003, petrol)
Link in different formats to this article
Comments and feedback from visitors
No comments yet


How much will 21 + 24 ?


Civic 8 (2005-2011) 
  • General information
  • Technical data
  • Governing bodies
  • Driving and maintenance
  • Power unit
  • Gasoline engines (L13A)
  • Gasoline engines (R18A)
  • Diesel engines (N22A)
  • Cooling and lubrication (L13A)
  • Cooling and lubrication (R18A)
  • Cooling and lubrication (N22A)
  • Injection system (gasoline)
  • Injection system (diesel)
  • Toxicity reduction system
  • Troubleshooting
  • Transmission
  • Clutch and drive shafts
  • Mechanical gearbox
  • Chassis and running gear
  • Suspension and wheels
  • Steering
  • Brake system
  • Body and interior
  • Exterior (external elements)
  • Doors, locks and windows
  • Electrical equipment
  • Equipment and devices
  • Headlights and lighting
  • Power devices
  • Electrical circuits
Civic 7 (2000-2005) 
  • General information
  • User manual
  • Maintenance
  • Power unit
  • Engines D15B and D17A
  • K20A Engines
  • Overhaul engine
  • Cooling system
  • Lubrication system
  • Fuel injection system
  • Toxicity reduction system
  • Engine electrical equipment
  • Transmission
  • Clutch
  • Manual gearbox
  • Automatic gearbox
  • Variator (CVT)
  • Drive shafts
  • Chassis and running gear
  • Car suspension
  • Steering
  • Brake system
  • Body and interior
  • Exterior (external elements)
  • Interior (internal elements)
  • Doors, locks and windows
  • Heater and air conditioner
  • Manual air conditioner
  • Automatic air conditioner
  • Security system
  • Electrical equipment
  • Equipment and devices
  • Headlights and lighting
  • Windscreen wipers
  • Audio system
  • Electrical diagrams
Civic 6 (1995-2000) 
  • General information
  • Introduction to guide
  • User manual
  • Maintenance
  • Power unit
  • Engine in car (Civic)
  • Engine in car (Integra)
  • Engine overhaul
  • Cooling and heating
  • Power and exhaust systems
  • Engine electrical equipment
  • Engine management systems
  • Transmission
  • Manual gearbox
  • Automatic transmission (AT/CVT)
  • Clutch and drive shafts
  • Chassis and running gear
  • Brake system
  • Car suspension
  • Steering
  • Body and interior
  • Exterior (external elements)
  • Interior (internal elements)
  • Doors, locks and windows
  • Electrical equipment
  • Equipment and devices
  • Electrical circuits
Civic 5 and 6 (1991-2000) 
  • Power unit
  • SOHC engines
  • DOHC engines
  • Engine overhaul
  • Cooling and lubrication system
  • Intake and exhaust system
  • Fuel injection system (SOHC)
  • Fuel injection system (DOHC)
  • Carburetor
  • Transmission
  • Clutch
  • Manual gearbox S4C
  • Manual gearbox S40
  • Automatic gearbox
  • Drive shafts
  • Chassis and running gear
  • Car suspension
  • Steering
  • Brake system
  • Body and interior
  • Body elements
  • Heater and air conditioner
  • Electrical equipment
  • Power devices
  • Equipment and instruments
  • Electrical circuits
Civic 3 and 4 (1983-1991) 
  • General information
  • Maintenance
  • Power unit
  • Engine in a car
  • Engine overhaul
  • Cooling system
  • Power and exhaust system
  • Engine electrical equipment
  • Emission control system
  • Transmission
  • Mechanical gearbox
  • Automatic gearbox
  • Clutch and drive shafts
  • Four-wheel drive
  • Chassis and running gear
  • Brake system
  • Car suspension
  • Steering
  • Body and interior
  • Body elements
  • Electrical equipment
  • Equipment and devices
  • Electrical circuits
HondaBook.ru © 2018–2026 • Mobile version • Sitemap: EN BG BY UA RS HR RO PL SK HU • Feedback • Driver Information • Search system • Bookmark
Accord 3 (1985-1989) • Accord 6 (1997-2002) • Civic 3 and 4 (1983-1991) • Civic 5 and 6 (1991-2000) • Civic 6 (1995-2000) • Civic 7 (2000-2005) • Civic 8 (2005-2011) • Fit 1 (2001-2008) • CR-V 1 (1995-2001) • CR-V 2 (2002-2006) • HR-V 1 (1998-2006) • Avancier 1 (1999-2003) •
 
This website uses cookies to ensure proper functioning. By clicking "OK," you agree.