
Cars with a 5-door hatchback body
The instrument panel and climate control panel are different from those shown in the illustration. All differences are described in detail below in the relevant Sections.
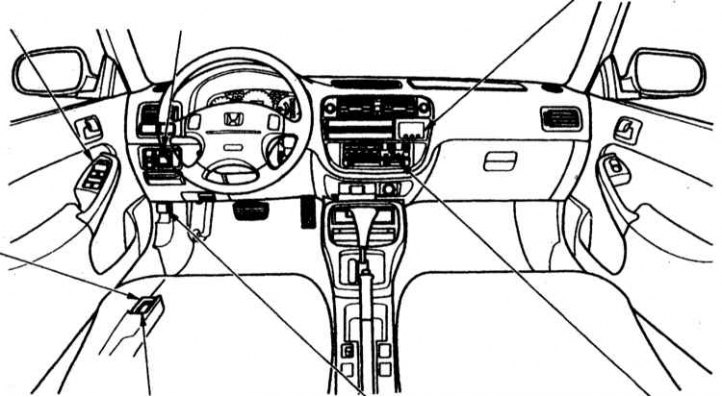
The power window switches are located in two places: in front of the driver's door armrest handle and on the center console near the parking brake lever.
There are many indicators and signaling devices on the dashboard, with the help of which the driver receives important information about the functioning of the vehicle's units and systems.
Check of serviceability of light signaling devices and indicators
Most of the signaling devices and indicators should light up for a short time when the ignition is turned on (the ignition key is turned to position III. This is provided for monitoring the serviceability of signaling devices and indicators. If any signaling device or indicator does not light up when the ignition is turned on, then you will not be able to receive a signal about the failure or abnormal functioning of the corresponding unit or vehicle system in a timely manner. If a malfunction of the annunciator or indicator is detected, the lamp should be replaced or the necessary repairs should be carried out.
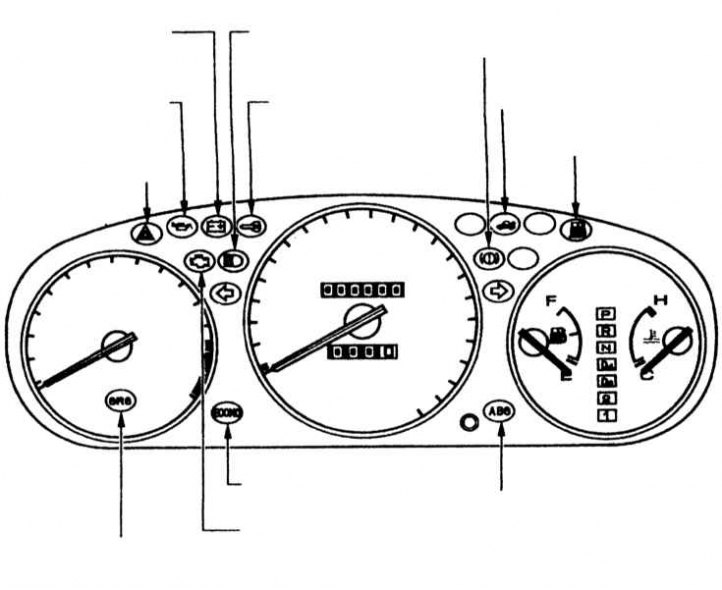
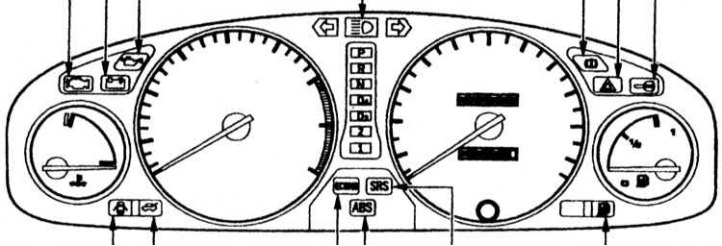
Engine oil pressure drop indicator
This indicator should come on when the ignition is turned on (key turned to position II) and go out after starting the engine. The indicator should not light up when the engine is running. If the indicator starts flashing, this indicates a short-term sharp drop in pressure in the engine lubrication system, after which the oil pressure is restored to normal. If the indicator is constantly on during engine operation, this indicates an emergency decrease in oil pressure to a dangerous level. Serious damage and engine failure are possible. In both cases (when the indicator flashes or stays on) urgent action should be taken as described below.
Attention! The operation of the engine at low pressure in the lubrication system leads almost immediately to engine failure due to serious mechanical damage to critical parts. Therefore, when the emergency oil pressure drop indicator is turned on, it is necessary to urgently stop and quickly turn off the engine.
1. Pull over to the side of the road, stop the vehicle, and turn off the engine.
2. After waiting one minute, open the hood and check the engine oil level. Although the engine oil level and lubrication system pressure are not directly related to each other, a short-term pressure drop during vehicle cornering or other sudden maneuvers may be due to a very low oil level in the engine sump.
3. If necessary, add oil to the engine and bring the oil level to normal, guided by the marks on the oil dipstick, see Chapter Current service.
4. Start the engine and observe the emergency oil pressure drop indicator. If the warning light does not go out within 10 seconds of starting the engine, turn off the engine. This indicates the presence of serious engine malfunctions, without the elimination of which it is impossible to continue driving the car on its own. (Refer to Section Jacking and towing)
Battery discharge indicator
This indicator should come on when the ignition is turned on (key turned to position II) and go out after starting the engine. If the signaling device turns on when the engine is running, this indicates the termination of the battery charge from the generator.
When the indicator lights up, immediately turn off all consumers of electrical energy: car radio, heater, rear window heater, air conditioner, tempostat, etc. Do not turn on power windows, or other drives or devices that consume electricity. Try to keep the engine running steadily so that it does not stall. Subsequent starting of the engine with a starter will lead to a strong additional discharge of the battery.
By reducing the electrical load on the battery as much as possible, you will be able to drive a few more kilometers before the battery is so depleted that it cannot keep the engine running properly. When the low battery warning light comes on, immediately go to a service station or workshop where they will help you fix the problem.
Tailgate open signaling device
The signaling device turns on at open or loosely closed trunk lid.
High beam indicator
The indicator lights up at the same time as the high beam headlights are switched on. A description of the light switch and headlight switch is provided later in this Section.
Engine system malfunction indicator
This warning light comes on for a few seconds when the ignition is turned on (the key is turned in the ignition switch to position II). If the indicator turns on at any other time, this indicates a possible malfunction of one of the emission control systems. Even if you do not notice any changes in engine performance and deterioration in vehicle dynamics, malfunctions of these systems can cause increased fuel consumption and engine toxicity. Continuing to operate the vehicle with the warning light on may result in severe engine damage and engine failure.
If the engine warning light comes on while the vehicle is moving, stop in a safe place on the side of the road or at the edge of the carriageway and turn off the engine. Then start the engine again and watch the warning light. If the indicator continues to burn, it is necessary to urgently contact a service station to check and repair engine systems. Drive the vehicle at a moderate speed until troubleshooting engine systems. Avoid sudden acceleration of the car when you fully depress the accelerator pedal and do not drive at high speed.
Even if the engine warning lamp goes out after turning off and restarting the engine. You should contact a service station in the event that the signaling device turns on while driving the car happens quite often.
Attention! Continuing to operate the vehicle with the engine warning light on could cause serious damage to the catalytic converter or engine. Defects that have arisen due to the operation of the car with the engine system malfunction indicator turned on are not covered by the warranty.
Parking brake indicator/brake fluid level warning light
The indicator performs two functions.
1. The indicator is on when the parking brake is applied. On some modifications of the car, the indicator also lights up when the starter is turned on (ignition key turned to position III) and the parking brake off. Driving with the parking brake applied will cause overheating and failure of the rear wheel brakes, tire wear, and may cause the anti-lock brake system to disengage.
2. If the indicator stays on after the parking brake is released or lights up while the vehicle is moving, this may indicate a drop in the level of working fluid in the reservoir of the main brake cylinder. One of the reasons for the gradual decrease in the level of brake fluid in the reservoir is the normal operational wear of the brake pads. When the indicator is turned on, you should check the condition of the brake pads and the tightness of the hydraulic brake drive.
Turn indicators and hazard warning lights
Turn signal indicators operate simultaneously with the corresponding turn signal lights. The direction of the indicator arrows shows the direction of the turn or lane change. If the indicators do not flash or flash at an increased frequency, this usually indicates a burnt out lamp in one of the direction indicator lights. Replace a burnt out bulb as soon as possible, as other road users cannot see your direction change signals. Turn signals that are not working can cause a traffic accident. There are two types of alarm systems. Your vehicle is equipped with an alarm system that complies with the standards in force in your country. One type of system involves the simultaneous activation of turn signal indicators (located on the dashboard) and all direction indicator lights. The second type of alarm system additionally includes an alarm indicator, which is located on the dashboard.
Seat belt indicator (for some car modifications)
The indicator lights up when the ignition is turned on (ignition key turned to position II). It reminds the driver and passengers to fasten their seat belts. In addition, if you have not fastened your seat belt, the buzzer will additionally turn on. The seat belt warning buzzer will turn off after a few seconds and the warning light will remain on until you fasten your seat belt. The warning lights do not come on if you fasten your seat belt before turning on the ignition.
Anti-lock brake system malfunction indicator (ABS) (individual models)
The indicator should light up for a few seconds when the ignition or starter is turned on (the ignition key is turned to position II or III respectively). Turning on the warning lamp in any other conditions indicates a malfunction in the anti-lock system. If the warning light comes on while the vehicle is moving, stop in a safe place and turn off the engine. Try to clear a possible system failure by restarting the engine.
After starting the engine, check the condition of the signaling device. If it does not turn off or lights up again while the car is moving, you must contact the service station for ABS diagnostics and repair. When the ABS malfunction indicator is on, the vehicle's service brake system remains fully functional, but the ABS will not work.
Additional security system malfunction indicator
SRS
The indicator is designed to warn the driver about a possible failure of the additional security system.
If:
- The indicator does not light up when the ignition is turned on (ignition key turned to position II);
- The signaling device continues to burn after engine start;
- The signaling device has turned on and is lit in a constant or flashing mode while the vehicle is moving - diagnostics and repair of the system are required.
ECONO indicator for economical engine operation modes (individual models)
ECONO
The ECONO indicator helps the driver improve the vehicle's fuel economy. The indicator turns on if the car engine is running at the most favorable modes in terms of fuel consumption.
The indicator should light up for a few seconds when the ignition is turned on (ignition key turned to position II). The indicator stays on as long as the engine continues to run economically. When the engine deviates from the most economical mode and the fuel consumption increases, the indicator turns off. If the gear lever is in the first or second position, the ECONO indicator does not turn on at all (the exception is car modifications with a stepless variator). On vehicles with a continuously variable variator, the indicator does not work when the ranges are turned on 2 or L (6-speed transmission option) or if dynamic mode is selected with D-band on (S) transmission control (5-speed transmission option).
In addition, the ECONO indicator does not work when the vehicle speed is less than 20 km/h and the engine is not warmed up to normal operating temperature.
Fuel reserve indicator (individual models)
Turning on the indicator means that less than 6.5 liters of gasoline is left in the tank. You need to fill the fuel tank urgently.
Anti-theft indicator (immobilizer) (for some car modification)
The indicator should light up for a few seconds when the ignition is turned on (ignition key turned to position II). After removing the key from the ignition, the immobilizer indicator flashes for a few seconds and then goes out. If the wrong key is inserted into the ignition lock, the immobilizer indicator will flash. In this case, the anti-theft device blocks the engine from starting. If the immobilizer indicator flashes, the engine cannot be started.
Speedometer
The speedometer shows the speed of the vehicle. The speedometer scale can be calibrated in km/h or both in km/h and mph, depending on the version of the device. On some vehicle modifications, an audible warning signal is provided if the speed exceeds 120 km / h.
Tachometer (individual models)
The tachometer shows the engine speed. The tachometer scale is graduated in units of rpm. To avoid engine failure, do not exceed the maximum permissible crankshaft speed (the tachometer needle should not enter the red zone of the scale).
Total mileage counter
The meter shows the total mileage of the car (in kilometers or miles depending on instrument version).
Odometer since reset
The device reflects the mileage of the car since the last reset (in kilometers or miles depending on the version). To reset the mileage meter to zero and start counting the mileage again, press the reset button.
Engine temperature gauge
The device displays the temperature of the engine coolant. The normal operating temperature of the engine during normal operation of the vehicle corresponds to the middle position of the pointer. In very hot weather or when driving on a long hill, the pointer may rise to the blue mark on the scale. If the engine temperature has increased so much that the pointer is on the red mark (H) scale, you should immediately stop the car and find out the cause of the engine overheating.
Tank gauge
The device shows the relative amount of fuel in the tank. The pointer works with a minimum error if the car is on a flat horizontal area. When driving on winding or hilly roads, the error of the instrument increases.
If you turn off the ignition, the needle of the fuel gauge will remain in place. After filling the fuel tank and turning on the ignition, the pointer will gradually move to a new position corresponding to the actual amount of fuel in the tank. As soon as the pointer arrow drops to the mark "E" (empty tank), need to fill the fuel tank immediately.
Cars with a 3-door hatchback body
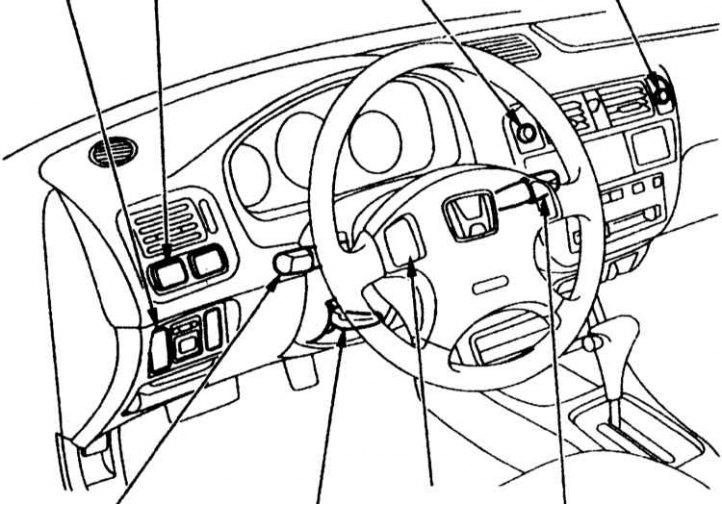
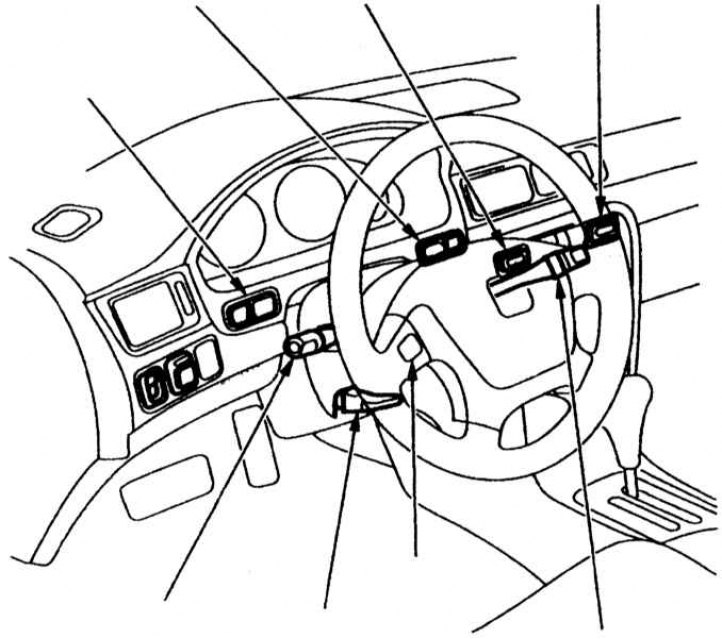
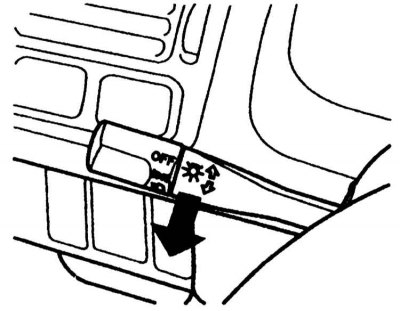
Light switch
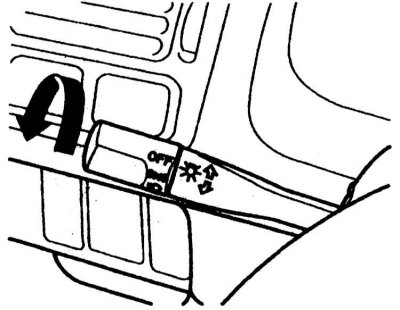
The light switch is made in the form of a rotary handle, which is located at the end of the turn signal control lever. To turn on the car's exterior lighting devices, turn the switch handle to the first fixed position. This will turn on the front and rear marker lights, license plate lights and control panel lights. To turn on the headlights, turn the light switch handle to the second fixed position.
On some modifications of the car, it is possible to turn on a warning sound when you open the driver's door if you left the exterior lights on and turned the ignition key to position I (ACCESSORY-Auxiliary electricity consumers) or to position 0 (LOCK).
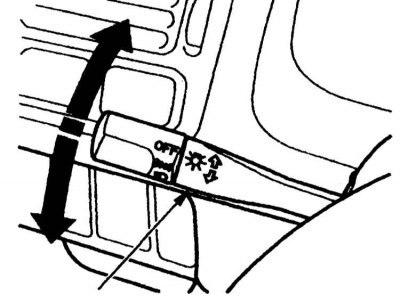
Switching the headlights from low beam to high beam and back is done by pressing the direction indicator control lever towards you. Press the lever until it clicks and then release it. At inclusion of a high beam of headlights on a dashboard the blue indicator will light up, see above in this Section. To signal high beam headlights, press and hold the turn signal control lever towards you. The high beam will stay on as long as the lever is held down. When the lever is released, the high beam headlights will turn off.
The high beam headlights turn on when the turn signal control lever is pressed, regardless of the position of the light switch rotary knob.
Traffic lighting during the day (individual models)
The traffic light switches on and off automatically during the day. Switching on occurs when the ignition key is turned to position II (Ignition on), and off - when the light switch handle is turned to the first or second position.
Control panel backlight brightness control (individual models)

The rotary control for backlight brightness is located on the control panel to the left of the steering column. Turn the knob to set the desired brightness of the control panel backlight.
Cars with a 5-door hatchback body
The location of the control panel backlight brightness control is different from that shown in the illustration.
Turn signal switch
The lever mounted on the left of the steering column is designed to turn on the direction indicators when changing the direction of movement or changing lanes of the car (lane change). Left or right direction indicators are activated by pressing the lever down or up respectively. In the extreme upper and lower positions, the lever is fixed, so the direction indicator lights continue to flash even after the lever is released. The direction indicators turn off automatically when the steering wheel is returned to the neutral position.
To signal with the direction indicators that the vehicle is changing lanes, lightly press the lever up or down and hold it while maneuvering. When released, the lever automatically returns to its original position and the direction indicators turn off.
Windshield wiper switch
The wiper switch rotary knob is located at the end of the windshield washer control lever. (The lever is mounted on the right side of the steering column.) The wiper switch can have two or three fixed positions:
- first position INT: intermittent wiper operation;
- second position -: continuous wiper operation at low speed;
- third position ===: continuous wiper operation at high speed.
Intermittent operation (switch turned to INT position) there are small pauses of a few seconds between wiper cycles. In the second and third positions of the switch, the wiper operates continuously.
In addition, you can quickly turn on the wiper for several work cycles by pushing the lever down. In this case, the wiper will operate at high speed until you release the lever. This mode is convenient because it allows you to quickly restore visibility through the windshield, for example, after overtaking or passing with an oncoming vehicle on a muddy and wet road after rain.p
Windshield washer switch
To turn on the windshield washer, push the lever located on the right side of the steering column towards you. The pump through the nozzles will continuously spray the windshield with fluid from the washer reservoir until you release the lever.
On some modifications of the car, the windscreen wiper is switched on simultaneously with the windshield washer, which at the same time operates in continuous mode at low speed. After releasing the washer control lever, the wiper blades perform one more additional cycle and stop in their original position.
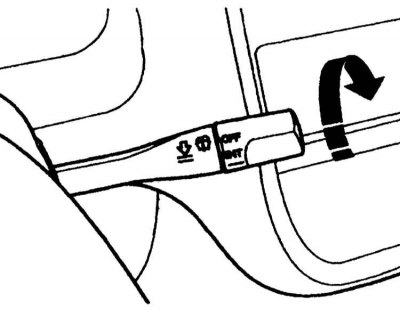
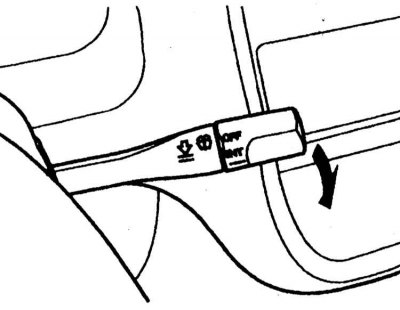
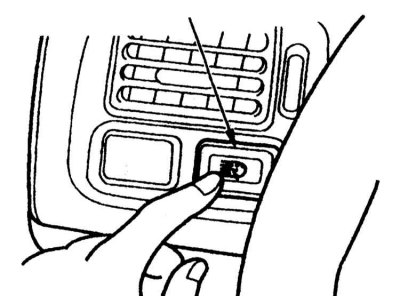
Rear window defroster switch

The electric heater is designed to remove condensed moisture, frost or a thin layer of ice from the surface of the rear window. The rear window defroster is turned on and off with a single button located on the control panel. Press the button to turn on the electric heater. Simultaneously with the inclusion of the electric heater, the indicator light on the button will light up. Pressing the button again will turn off the electric heater.
Cars with a 3-door hatchback body
The location of the rear window defroster switch is different from that shown in the illustration.
Before driving, check visibility through the rear window. The electrically conductive defroster grid located on the inner surface of the rear window may be accidentally damaged by careless handling, such as improper cleaning of the rear window surface. Wipe the rear window only along the wires of the electrically conductive heater grid.
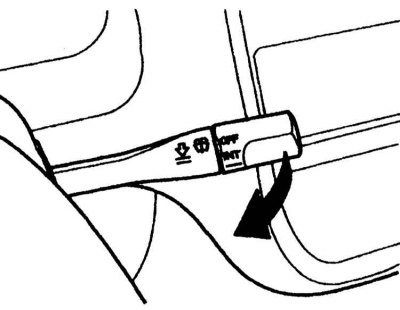
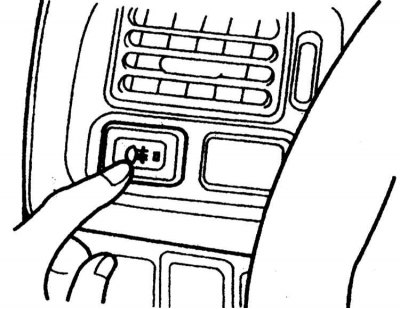
Hazard switch
To turn on the hazard warning lights, press the red button with the triangular symbol located in the center of the control panel. In this case, the front and rear direction indicators, as well as the arrow indicators located on the dashboard, will flash simultaneously. Use the hazard warning lights to warn other road users about an accident, a forced stop of the car and in other dangerous situations, guided by the current Rules of the Road.
Cars with a 5-door hatchback body
The location of the hazard warning light switch is different from that shown in the illustration.
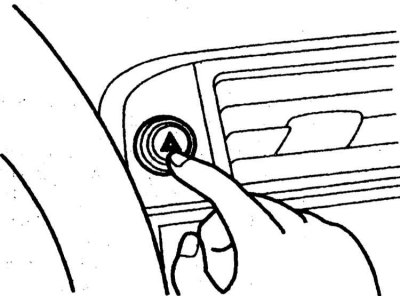
Wiper and headlight washer switch (individual models)
Each time the button is pressed, the headlight wipers perform several working cycles. The headlight washers are connected to the same reservoir as the windshield washer.
Cars with a 5-door hatchback body
The headlight washer switch is located next to the control panel backlight control, see illustration with a general view of the front panel.
Rear fog light switch (individual models)
The rear fog lights can only be used when the headlights are on. To turn on the fog lights, press the switch button. Simultaneously with the inclusion of the rear fog lamps, the indicator located on the button will light up. The indicator reminds you that the fog lights are on.
Cars with a 3-door hatchback body
The location of the rear fog light switch is different from that shown in the illustration.
Adjustable steering column release lever (individual models)
You can adjust the height of the steering wheel as you wish. Before driving a car, set the steering wheel to the most comfortable position for you.
Warning! Adjusting the steering wheel while the vehicle is moving could result in loss of vehicle control and a serious accident. Adjust the steering wheel only when the vehicle is stationary.
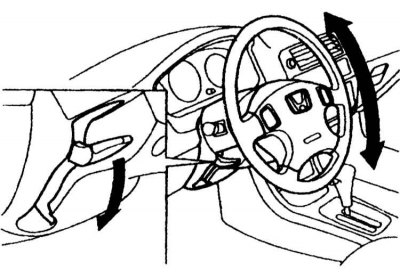
1. Adjust the seat so that you can comfortably operate the pedals.
2. The adjustable steering column release lever is located on the left under the steering wheel. Lower the lever all the way down.
3. Adjust the steering wheel in height by moving it up or down to the desired position. A properly adjusted steering wheel should not obstruct your view of the arrow indicators, signaling devices and indicators located on the dashboard. After adjustment, lock the steering wheel by fully raising the lever to its original position.
4. Check up reliability of fixing of a steering wheel, having tried to move it up.