
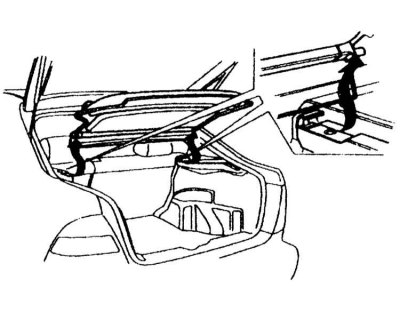
Cars with a 3-door hatchback body
In order to increase the usable volume of the luggage compartment, you can remove the rear shelf.
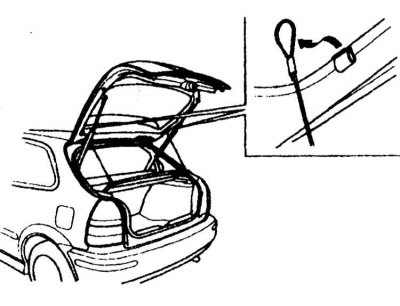
On some modifications of the car, it is necessary to first disconnect the flexible rods from the hooks on the rear door.
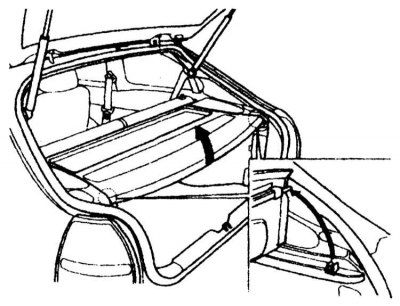
Fold the back of the shelf onto the front first.
Then lift the folded shelf up and release it from the latches. To install the rear shelf in place, position it so that the tabs on the tabs are over the corresponding slots, then press the shelf from above.
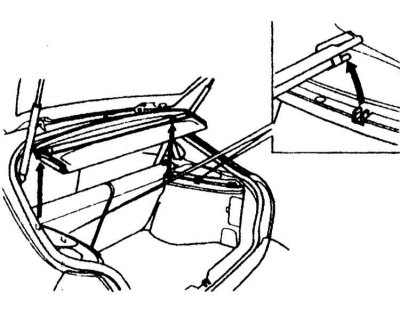
The spikes should go in and lock into place. Check the reliability of the assembly of the clamps so that the shelf does not move while the vehicle is moving. If you have flexible rods, attach them to the corresponding hooks on the tailgate. To do this, you must first partially close the door.
Cars with a 5-door hatchback body
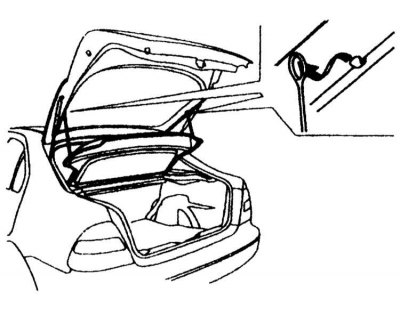
In order to dismantle the rear shelf from the car, remove the flexible rod rings from the hooks on the rear door and, pulling the shelf towards you, release it from the latches.
Seat heating (individual models)
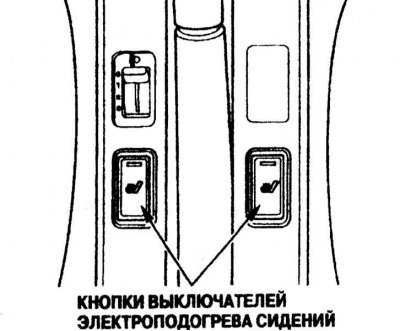
Both front seats are equipped with electric heaters that can only be operated when the ignition is on (ignition key turned to position II). Press the switch button to warm up the seat. At the same time, the electric heating on indicator will light up on the pressed button. Pressing the same button again will turn off the heated seat. The illuminated indicator reminds you that the electric seat heating is on.
Do not turn on the electric seat heating when the engine is not running, and do not use the electric heating for a long time when the engine is idling. This can lead to severe battery discharge and difficulty starting the engine.
Headlight optical axes direction controller (individual models)
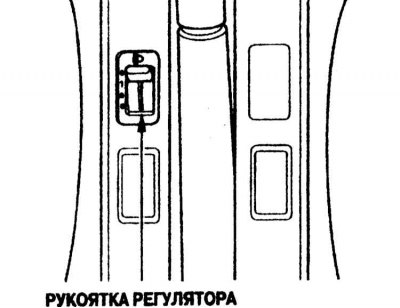
The car has the ability to adjust the direction of the headlights (dipped beam) in the vertical plane. Depending on the number of passengers and the load in the trunk, you can adjust the position of the headlights to provide the best road lighting conditions and not dazzle oncoming drivers.
Switch the headlight control knob to one of the four positions that matches the vehicle's load case.
- Position 0: One driver or driver and passenger in the front seat.
- Position 1: Driver and four passengers.
- Position 2: Driver and four passengers, cargo in the trunk (within the limits of the gross vehicle weight).
- Position 3: Driver and cargo in the trunk (within the maximum allowable axle load and the gross vehicle weight).
Electric windows (individual models)
Your vehicle is equipped with power windows that can only operate when the ignition is on (ignition key turned to position II).
Each door has a switch that controls the power window for that door. To open the window, press down on the switch button and keep it pressed while the window is lowered. You can stop the glass at the desired position by releasing the button. The glass is raised by sliding the button back and holding it in this position.
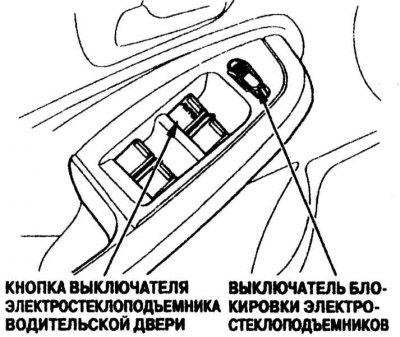
On the armrest of the driver's door is a central control panel for all power windows. To open the window of any passenger door, press down on the button of the corresponding switch and keep it pressed while lowering the window to the desired position. To raise the glass, slide the corresponding button back and hold it in this position. Release the button when the glass is in the desired position.
The power window central control panel also contains the driver's door power window switch, which can operate in AUTO mode, and the passenger door power window lock switch.
AUTO mode (Auto)
The driver's door glass can be fully lowered and raised (on some vehicle modifications) with a single actuation of the switch button. To lower or raise the window in automatic mode, press down or slide the power window switch button all the way back. This will open or close the window completely. You can stop the window at any time by sliding the button back while lowering and pressing the button down while the window is raising. To partially lower or raise the driver's door glass, lightly press down or move back the power window switch button and keep it pressed while the window is moving. The glass will stop as soon as you release the switch button.
The lockout switch allows the driver to turn off power to the passenger door power windows and disable power window control using the switches located on the passenger doors. The lock does not affect the driver's door window regulator. Engage passenger door power window locks if children are in the vehicle. This will help prevent accidental injury to children.
Cars with a 3-door hatchback body
On the armrest of the driver's door are the main switch and two power window switches for the left and right doors.
Cars with a 5-door hatchback body
The driver's door power window switch is located in front of the door release handle. The main switch and power window switches for the other doors are located on the center console near the parking brake lever.
Warning! The power window can severely pinch and injure a child's hand or fingers caught in the window opening. Before turning on the power window to close the window, make sure that the children remove their hands from the opening.
Sunroof (individual models)
The sunroof panel power switch is located on the control panel. The sunroof panel drive can only function when the ignition is on (ignition key turned to position II). To raise the rear edge of the sunroof panel to provide interior ventilation, press the button with the
Note. The electric drive of the sunroof panel can severely pinch and injure a hand or fingers caught in the sunroof opening. Before pressing the button and closing the sunroof, make sure that the opening in the roof is completely free and there is no danger of pinching the hand or fingers of any of the passengers.
Attention! Attempting to open the sunroof when the ambient temperature is below zero, or if the sunroof is covered with a layer of snow or ice, may damage the sunroof or its electric drive.
Rear view mirrors
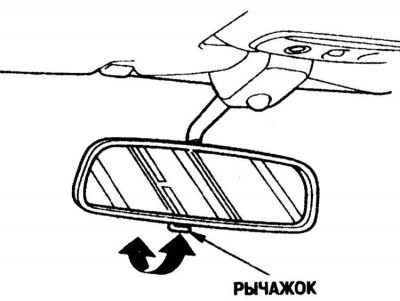
To ensure a good view of the area behind the vehicle, keep it clean and check that the interior and exterior mirrors are correctly adjusted. If necessary, adjust the rear-view mirrors before driving. The interior rear-view mirror can be in two positions: for driving in the daytime and at night. In the second position, the reflectivity of the mirror decreases. This helps to reduce the blinding effect of the headlights of cars traveling behind. To move the mirror from one position to another, a lever is located under the mirror.
Electric adjustment of rear-view mirrors (individual models)
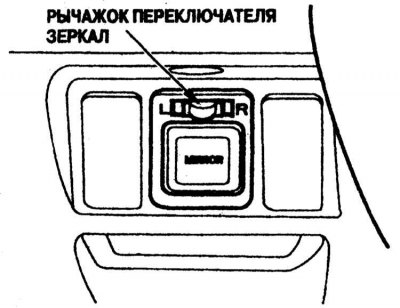
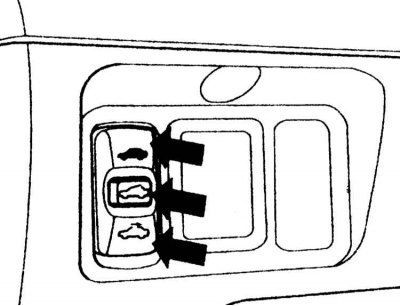
Adjust the position of the exterior mirrors using the switch and rocker button located on the control panel to the left of the steering column as follows.
1. Switch on the ignition by turning the key in the ignition switch to position II.
2. Move the switch lever to the left (L) or right (R) to adjust the left or right mirror accordingly.
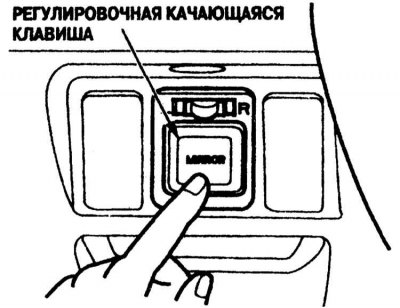
3. Press the top, bottom, left or right end of the rocker to adjust the selected outside mirror. In this case, the mirror will rotate relative to the horizontal and vertical axes in the corresponding direction.
4. After completing the adjustment of both mirrors, move the lever to the middle position, in which the adjustment key does not work. This is necessary so that if you accidentally press the rocker button, the set adjustment of the outside mirror will not be disturbed.
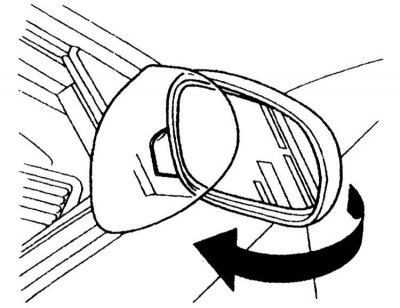
Folding door mirrors (individual models)
For convenient parking in tight spaces, you can fold the outside rear-view mirrors. Folding mirrors are controlled by a switch located next to the adjusting button.
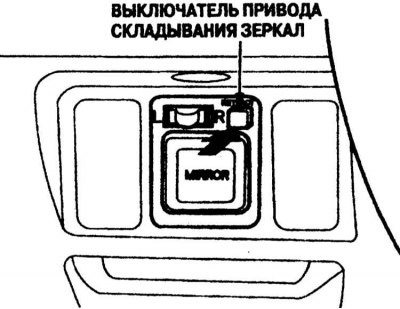
Before driving, check that the outside mirrors have been returned to their working position. The electrically operated folding exterior mirrors only operate when the ignition is switched on (the key is turned in the ignition switch to position II). Press the button to fold both rear view mirrors at the same time. To return the mirrors to their working position, press the same button again.
Never drive with the outside rear-view mirrors folded in.
Clock with digital display
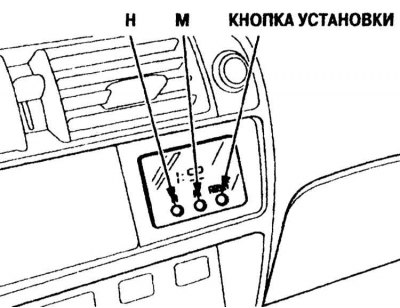
Clock with digital display shows the current time only when the ignition is on. To set the clock to the current time, do the following.
1. Switch on the ignition by turning the key in the ignition switch to position II. The hours and minutes will appear on the display.
2. Press and hold button H until the first two digits on the display (watch) will not take the correct value corresponding to the current time.
3. Press and hold the M button until the last two digits on the display (minutes) will not take the correct value corresponding to the current time.
The RESET button is intended for quick correction of the clock readings according to the exact time signals. Pressing the RESET button resets the minute digits and sets the clock to the beginning of the current or next hour. If more than 30 minutes have passed since the beginning of the current hour, the clock is set to the time corresponding to the beginning of the next hour.
Example:
| Starting clock | Clock display after pressing the RESET button |
| 1: 06 | 1: 00 |
| 1: 52 | 2: 00 |
Glove box
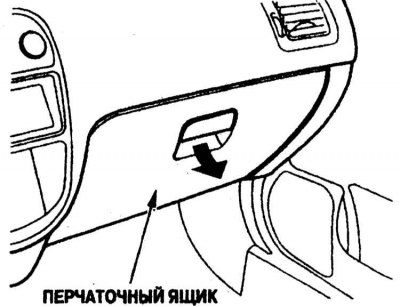
Open the glove box lid by pulling the handle towards you. To close the glove box, simply slam the lid.
Cars with a 5-door hatchback body
The cover of a ware box is locked on the lock. To open the glove box, insert the key into the lock cylinder and turn it counterclockwise. The glove box is locked by turning the key in the opposite direction.
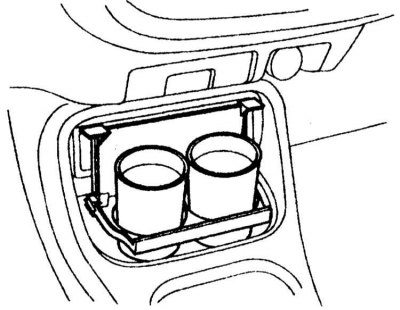
Cup holder (individual models)

To pull out the cup holder, press the front bar as shown by the arrow in the illustration. The holder will come out, after which the cover will automatically flip up. To return the holder to its place, slide it back into the panel until the latch clicks.
Only use the cup holder at stops. Drinks may spill while the vehicle is moving, for example when driving over bumps in the road or when cornering.
Be careful when using the cup holder.
Splashes of hot drink poured into glasses can burn you or passengers. In addition, spilled liquid may damage seat upholstery, floor mats, or nearby electrical equipment.
Coin tray (for left hand drive vehicles)
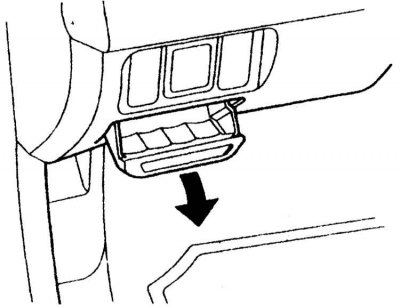
To open the coin tray, press the top edge of the tray cover as shown by the arrow in the illustration. The tray is closed by pressing the lid until the latch clicks.
Compartment for personal belongings of the driver (individual models)
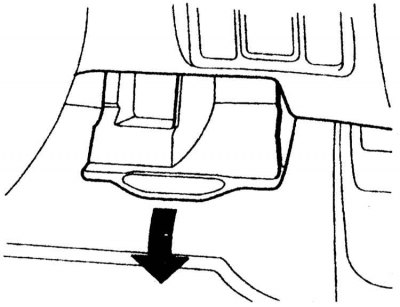
To open the compartment for small personal items, press the top edge of the cover as shown by the arrow in the illustration. The compartment is closed by pressing the lid until the latch clicks.
Cars with a 5-door hatchback body
There is a small storage compartment in the center console armrest. The compartment is closed with a flip-back lid. Under the driver's seat is a retractable tray.
Parking brake lever
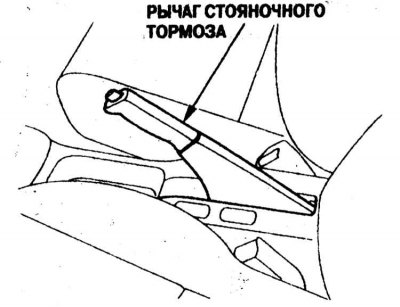
To apply the parking brake, fully lift up the lever located between the front seats. The parking brake is released as follows: slightly lift the lever up and press the release button located on the end of the handle, then lower the lever down. When the parking brake is released, the indicator located on the dashboard should go out, see Fig. Location and functions of controls. If you pull away without fully releasing the parking brake, the anti-lock braking system (if present on the vehicle) will not be able to function normally.
Attention! Driving with the parking brake applied will damage the brakes and rear wheel bearings.
Cigarette lighter
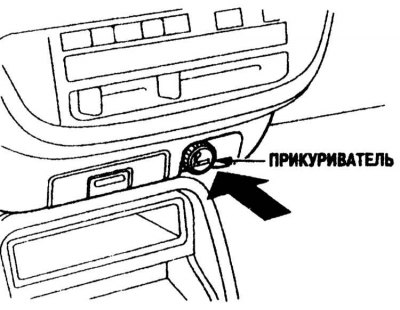
The cigarette lighter works with two key positions in the ignition lock: ACCESSORY (I) and ON (II). To turn on the cigarette lighter, press the handle and push it down until the latch clicks. After heating the cigarette lighter coil, the handle will automatically return to its original position. Do not hold the cigarette lighter handle while heating the coil. This can lead to overheating and failure of the cigarette lighter.

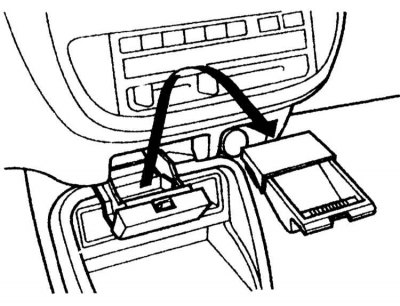
Open the front ashtray by pushing its cover as shown by the arrow in the illustration. After use, close the ashtray by pushing it into the control panel until it clicks into place. To empty the ashtray of cigarette butts, grasp the front edges of the inner tray, lift it up and out.
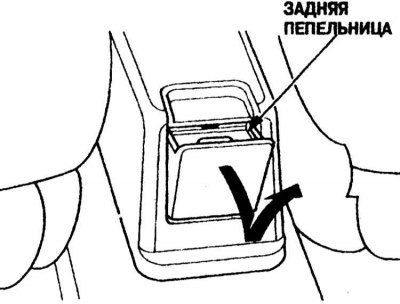
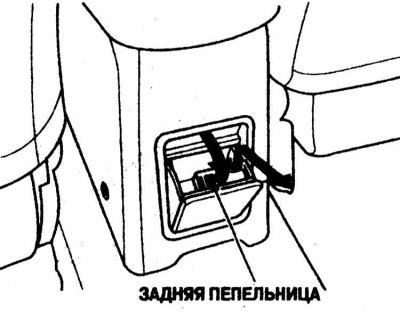
The rear ashtray is located at the end of the center console between the backs of the front seats. Open the ashtray by pressing on the top edge of the lid as shown in the illustration. To empty the ashtray of cigarette butts, open it, then lift it up and out of the console slot.
For vehicles equipped with a storage compartment in the center console.
Interior lighting devices
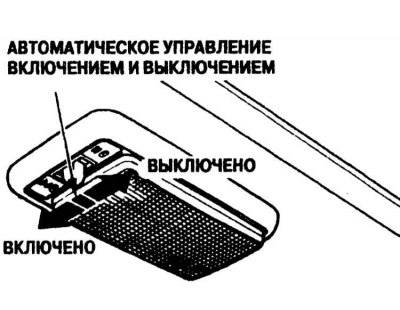
Plafond of general interior lighting

The switch for the ceiling lamp for general interior lighting has three positions. In the OFF position (Turned off) the lamp is not lit. In the middle position of the switch, the dome light automatically lights up and goes out when any car door is opened and closed. In the ON position (Included) the lamp stays on all the time.
Vehicles equipped with a sunroof
Plafonds of local lighting (individual models)
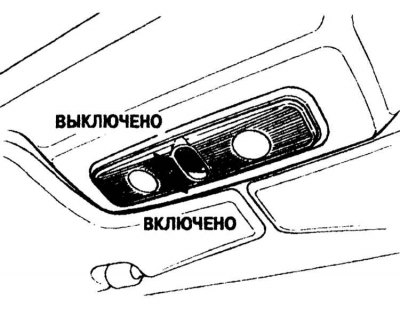
The local lighting switches have two positions. In the OFF position (Turned off) the lamp is not lit. In the ON position (Included) the light is on all the time.
Cars with a 3-door hatchback body
The luggage compartment light switch can be in one of two positions: in the upper (Included) or lower (Turned off).
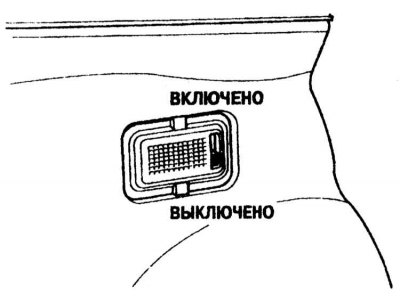
If the switch button is moved to the up position, the dome will automatically turn on when the rear door is opened. If the switch is in the down position, the luggage compartment light does not work (stays permanently off).