
HondaBook.ru
Auto companies Volkswagen Auto companies Ford Auto companies Lada Auto companies Skoda Auto companies BMW Auto companies Mazda Auto companies Peugeot
English Русский
Български
Беларускі
Український
Српски
Hrvatski
Română
Polski
Slovenský
Magyar
Bookmark Contacts Sitemap   


Accord Civic Fit / Jazz CR-V HR-V Others Articles
Civic 3 and 4 (1983-1991) Civic 5 and 6 (1991-2000) Civic 6 (1995-2000) Civic 7 (2000-2005) Civic 8 (2005-2011)

Cylinder head — installation (Honda Civic 5)

  • Main
  • Honda Civic
  • 5 (1991-2000)
  • Power unit
  • DOHC engines
  • Cylinder head — installation
0
Install the cylinder head in the reverse order of removal:

Attention.
  • Always use a new cylinder head and manifold gasket.
  • The cylinder head gasket is a metal gasket. Be careful not to bend it.
  • Rotate the crankshaft to set the piston of the first cylinder to TDC.
  • Do not use the middle cover and bottom cover to store removed parts.
  • Clean the middle cover and bottom cover before installation.


1. Install the cylinder head gasket, dowel pins and oil adjustment hole into the cylinder head.

2. Tighten the cylinder head bolts in two stages. In the first stage, tighten all the bolts in the sequence shown in the figure to 29 Nm. In the final stage, tighten in the same sequence to 83 Nm.

Caution: Apply clean engine oil to the bolt threads and under the bolt head.
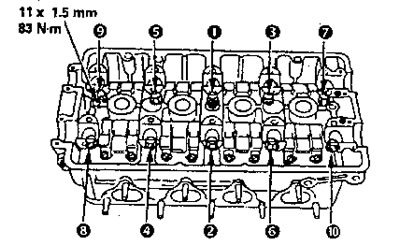

Caution: Apply clean engine oil to the bolt…


3. Install the intake manifold and tighten the nuts in a diagonal sequence in two or three steps, starting from the center.
  • Always use a new intake manifold gasket.

4. Install the exhaust manifold and tighten the new self-locking nut in a diagonal sequence in two or three steps, starting from the center.
  • Always use a new exhaust manifold gasket.

5. Install the camshaft and camshaft seals.


Attention.
  • install the camshafts with the keyways facing up.
  • the surface of the seal body must be dry.
  • installed O-ring seal and locating pin in the lubrication channel of the camshaft holder No.3.


6. Apply the "liquid" gasket (P/N 0V740 - 99986 or 0BC70 - X0134S) to the main contact surfaces of holders No.1 and No.5 of both camshafts,

Caution: Clean and dry the cylinder head contact surfaces before applying the "liquid" gasket.


Apply "liquid" liner to shaded areas.
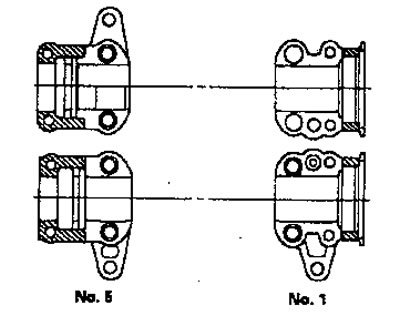
Apply «liquid» liner to shaded areas.


7. Install the camshaft holders and camshaft holder plate.

Note: The arrows marked on the camshaft holders must point towards the timing belt.


8. Tighten each bolt two turns at a time in the sequence shown in the illustration.

Caution: Remove excess "liquid" gasket from camshaft holders #1 and #5.


no.1 - No.10: 8x1.25 mm 27 Nm

Apply a coat of motor oil to the threads.

#11 - #14: 6x1.0 mm 9.8 Nm
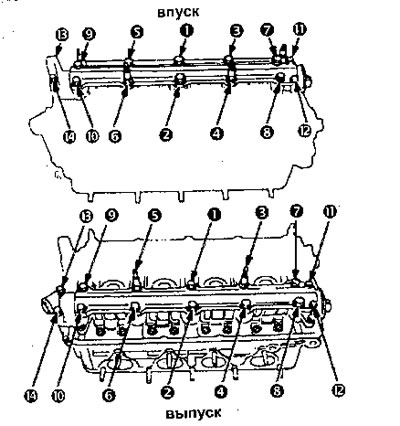
#11 - #14: 6x1.0 mm 9.8 Nm


9. Install the rear cover and camshaft pulleys,


10. Align the marks on the hole plug and the cylinder head, then install the plug into the cylinder head hole.
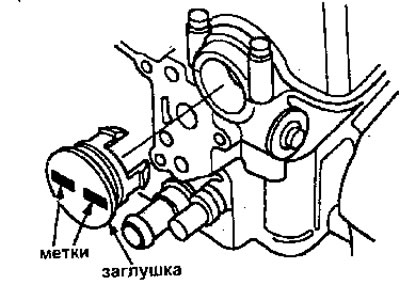
10. Align the marks on the hole plug and the…


11. Install the timing belt.

12. Adjust the valve clearance.

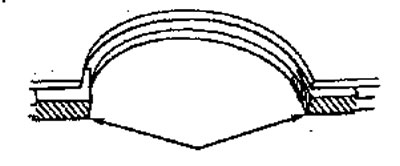
13. Install the cylinder head cover gasket into the groove of the cylinder head cover.

Attention.
  • Before installing the cylinder head cover gasket, completely clean the cylinder head cover gasket and groove.
  • When installing, make sure the cylinder head cover gasket is placed securely without breaks.


14. Apply "liquid" gasket to the cylinder head cover gasket.

Attention.
  • Use "liquid" gasket No.0Y740 - 99986 or 08C70-X0134S.
  • Make sure the contact surfaces are clean and dry before applying the liquid gasket.
  • Perform installation no later than 5 minutes after applying the "liquid" gasket.
  • After assembly, wait at least 20 minutes before filling the engine with oil.

After assembly, wait at least 20 minutes before…


15. When installing the cylinder head cover, support the cylinder head cover gasket in the groove.


Once the cylinder head cover is seated on the cylinder head, move the cover back and forth slightly until it is fully seated.

Attention.
  • Before installing the cylinder head cover, clean the contact surfaces of the cylinder head.
  • Do not touch parts where the "liquid" gasket was applied.


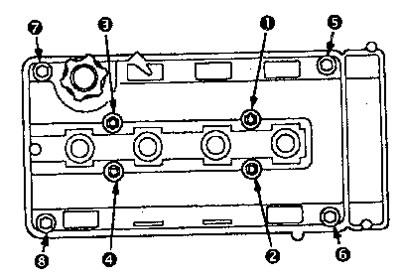
16. Tighten the nuts in two or three stages. In the final stage, tighten all nuts in sequence to 9.8 Nm.

Caution: After assembly, wait at least 20 minutes before filling the engine with oil.

Caution: After assembly, wait at least 20 minutes…


17. After installation, check that all tubes, hoses and connectors are installed correctly.
This article is available at: russian, bulgarian, belarusian, ukrainian, serbian, croatian, romanian, polish, slovak, hungarian
This information has been verified: Mikhail Kopasov
Share with friends:
◀ Previous
Civic 5 and 6: DOHC engines
Next ▶

Rocker arms — installation
Cylinder head
Valves, valve springs and valve stem seals
Camshafts
Rocker arms and free running units
 
See also other articles from Honda manuals:
Cleaning and inspection of the cylinder head Honda Accord 3 (1985-1989)
Removal the cylinder head Honda Fit 1 (2001-2008)
Checking the general condition of the cylinder head Honda CR-V 1 (1995-2001, petrol)
Cylinder head — design description Honda HR-V 1 (1998-2006, petrol)
Cylinder head component arrangement Honda Avancier 1 (1999-2003, petrol)
Link in different formats to this article
Comments and feedback from visitors
No comments yet


How much will 27 + 36 ?


Civic 8 (2005-2011) 
  • General information
  • Technical data
  • Governing bodies
  • Driving and maintenance
  • Power unit
  • Gasoline engines (L13A)
  • Gasoline engines (R18A)
  • Diesel engines (N22A)
  • Cooling and lubrication (L13A)
  • Cooling and lubrication (R18A)
  • Cooling and lubrication (N22A)
  • Injection system (gasoline)
  • Injection system (diesel)
  • Toxicity reduction system
  • Troubleshooting
  • Transmission
  • Clutch and drive shafts
  • Mechanical gearbox
  • Chassis and running gear
  • Suspension and wheels
  • Steering
  • Brake system
  • Body and interior
  • Exterior (external elements)
  • Doors, locks and windows
  • Electrical equipment
  • Equipment and devices
  • Headlights and lighting
  • Power devices
  • Electrical circuits
Civic 7 (2000-2005) 
  • General information
  • User manual
  • Maintenance
  • Power unit
  • Engines D15B and D17A
  • K20A Engines
  • Overhaul engine
  • Cooling system
  • Lubrication system
  • Fuel injection system
  • Toxicity reduction system
  • Engine electrical equipment
  • Transmission
  • Clutch
  • Manual gearbox
  • Automatic gearbox
  • Variator (CVT)
  • Drive shafts
  • Chassis and running gear
  • Car suspension
  • Steering
  • Brake system
  • Body and interior
  • Exterior (external elements)
  • Interior (internal elements)
  • Doors, locks and windows
  • Heater and air conditioner
  • Manual air conditioner
  • Automatic air conditioner
  • Security system
  • Electrical equipment
  • Equipment and devices
  • Headlights and lighting
  • Windscreen wipers
  • Audio system
  • Electrical diagrams
Civic 6 (1995-2000) 
  • General information
  • Introduction to guide
  • User manual
  • Maintenance
  • Power unit
  • Engine in car (Civic)
  • Engine in car (Integra)
  • Engine overhaul
  • Cooling and heating
  • Power and exhaust systems
  • Engine electrical equipment
  • Engine management systems
  • Transmission
  • Manual gearbox
  • Automatic transmission (AT/CVT)
  • Clutch and drive shafts
  • Chassis and running gear
  • Brake system
  • Car suspension
  • Steering
  • Body and interior
  • Exterior (external elements)
  • Interior (internal elements)
  • Doors, locks and windows
  • Electrical equipment
  • Equipment and devices
  • Electrical circuits
Civic 5 and 6 (1991-2000) 
  • Power unit
  • SOHC engines
  • DOHC engines
  • Engine overhaul
  • Cooling and lubrication system
  • Intake and exhaust system
  • Fuel injection system (SOHC)
  • Fuel injection system (DOHC)
  • Carburetor
  • Transmission
  • Clutch
  • Manual gearbox S4C
  • Manual gearbox S40
  • Automatic gearbox
  • Drive shafts
  • Chassis and running gear
  • Car suspension
  • Steering
  • Brake system
  • Body and interior
  • Body elements
  • Heater and air conditioner
  • Electrical equipment
  • Power devices
  • Equipment and instruments
  • Electrical circuits
Civic 3 and 4 (1983-1991) 
  • General information
  • Maintenance
  • Power unit
  • Engine in a car
  • Engine overhaul
  • Cooling system
  • Power and exhaust system
  • Engine electrical equipment
  • Emission control system
  • Transmission
  • Mechanical gearbox
  • Automatic gearbox
  • Clutch and drive shafts
  • Four-wheel drive
  • Chassis and running gear
  • Brake system
  • Car suspension
  • Steering
  • Body and interior
  • Body elements
  • Electrical equipment
  • Equipment and devices
  • Electrical circuits
HondaBook.ru © 2018–2026 • Mobile version • Sitemap: EN BG BY UA RS HR RO PL SK HU • Feedback • Driver Information • Search system • Bookmark
Accord 3 (1985-1989) • Accord 6 (1997-2002) • Civic 3 and 4 (1983-1991) • Civic 5 and 6 (1991-2000) • Civic 6 (1995-2000) • Civic 7 (2000-2005) • Civic 8 (2005-2011) • Fit 1 (2001-2008) • CR-V 1 (1995-2001) • CR-V 2 (2002-2006) • HR-V 1 (1998-2006) • Avancier 1 (1999-2003) •
 
This website uses cookies to ensure proper functioning. By clicking "OK," you agree.