
Contents: Control ⇊ Replacement ⇊
Caution: Be careful when handling antifreeze. Avoid contact with skin: it is toxic.
Do not start work until the engine has cooled down completely.
Control
1. Before looking at the thermostat as the source of your engine problems, check the coolant level (see Chapter 1) and the operation of the temperature sensor (or light indication).
2. If the engine has a long warm-up time, the thermostat is probably in the fully open position. Replace the thermostat.
3. If the engine overheats, check the temperature of the upper radiator tank, for example, with your hands. If the engine is hot and the tank is cold, the thermostat is closed. Replace the thermostat.
Warning: Do not operate the engine without a thermostat. This will lead to errors in the computer's control of the engine systems and, as a result, to increased fuel consumption and emissions of toxic components.
4. In difficult cases of diagnostics of the cooling system operation, see Section "Malfunction" at the beginning of this guide.
Replacement
5. Disconnect the negative cable from the battery.
6. Drain the cooling system (see Chapter 1). If the coolant is in relatively good condition, it can be reused (see Chapter 1).
7. The lower radiator hose will take you to the thermostat housing.
8. Cut the wire clamp and remove the hose from the thermostat housing. If the hose is damaged, replace it.
9. If the outer surface of the housing pipe is damaged by corrosion or other reasons, replace the housing cover with this pipe.
10. Loosen the mounting bolts and remove the thermostat cover (see fig. 3.10). If the cap is stuck, knock it off with a hammer. Be prepared for some coolant to spill out.
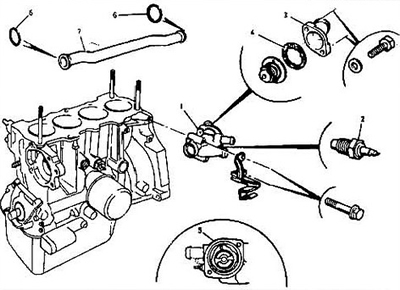
Fig. 3.10 Thermostat and connecting parts: 1 - body; 2 - temperature sensor; 3 - housing cover; 4 - gasket; 5 - thermostat; 6 - rubber ring; 7 - water pump inlet pipe.
11. Remember the installation position of the thermostat and remove it.
12. Cover the engine inlet openings with a rag, clean the connecting surfaces from the remains of the gasket and seal. Wipe the surfaces with solvent or gasoline.
13. Install the new thermostat. The correct orientation of the thermostat is with the spring side facing the engine and the vent facing up.
14. Apply a thin layer of sealant to both sides of the gasket and install it on the body.
15. Install the cover, tighten the bolts to the torque specified in the specification.
16. Connect the lower radiator hose. Install the band clamp and tighten it.
17. Fill the cooling system (see Chapter 1).
18. Start the engine, check for leaks and thermostat operation (steps 2, 3, 4 of this section).
[Material obtained from the website: hondabook.ru]