HondaBook.ru
Auto companies Volkswagen Auto companies Ford Auto companies Lada Auto companies Skoda Auto companies BMW Auto companies Mazda Auto companies Peugeot
English Русский
Български
Беларускі
Український
Српски
Hrvatski
Română
Polski
Slovenský
Magyar
Bookmark Contacts Sitemap   


Accord Civic Fit / Jazz CR-V HR-V Others Articles
Avancier 1 (1999-2003, petrol)

Checking the operation of the brake booster (Honda Avancier 1)

  • Main
  • Honda
  • Avancier 1 (1999-2003, petrol)
  • Chassis and running gear
  • Brake system
  • Checking the operation of the brake booster
0
Contents: Checking for leaks using a special…⇊ Functional check ⇊ Check valve ⇊
1. Start the engine and warm it up until the fan runs twice.

2. Turn off the engine.

3. Press the brake pedal as hard as you would during normal braking.

4. If the pedal travel is large when pressed for the first time, and decreases with subsequent presses, the brake booster is working properly.
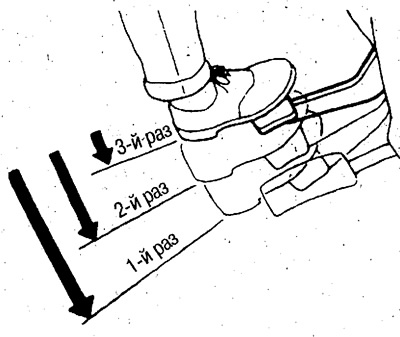
4. If the pedal travel is large when pressed for…


If the seal is broken, check the seal of the following components:
  • Check valve (built into the vacuum hose).
  • Vacuum tubes and hoses.
  • Brake booster.
  • Primary and secondary piston seals of the master cylinder.

5. Start the engine again.

6. Press the brake pedal as hard as you would during normal braking.

7. In this state, turn off the engine.

8. Keep the brake pedal depressed for approximately 30 seconds. If the brake pedal height does not change, the system is sealed.
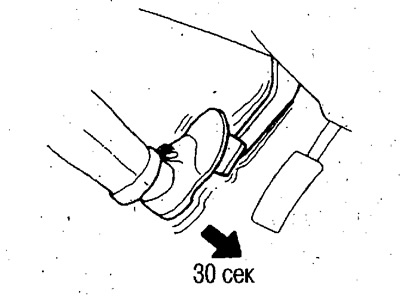
8. Keep the brake pedal depressed for…


Checking for leaks using a special tool


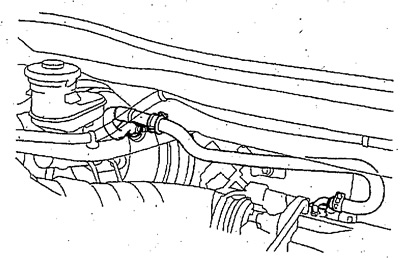
1. Using a suitable hose, connect a vacuum gauge (special tool) between the brake booster and the check valve.
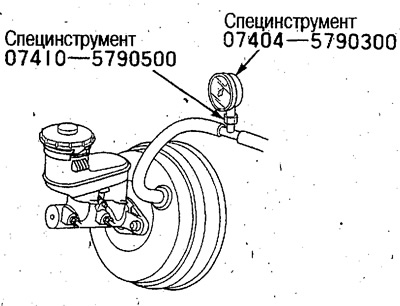
1. Using a suitable hose, connect a vacuum gauge…


2. Start the engine and warm it up until the fan runs twice. Press the accelerator pedal until a vacuum of 66.7 kPa (500 mm Hg) is created and stop the engine.

3. Read the vacuum gauge reading.
  • Standard vacuum loss in 15 sec: 3.3 kPa (25 mmHg)

4. If the seal is broken, check the seal of the following components.
  • Check valve (built into the vacuum hose)
  • Vacuum tubes and hoses
  • Brake booster
  • Primary and secondary piston seals of the master cylinder

Functional check


1. Install the special tools on the master cylinder as shown in the figure.
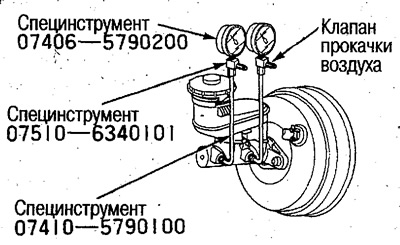
1. Install the special tools on the master…


2. Remove air through the bleed valves of the special tools.


3. Start the engine and warm it up until the fan runs twice.

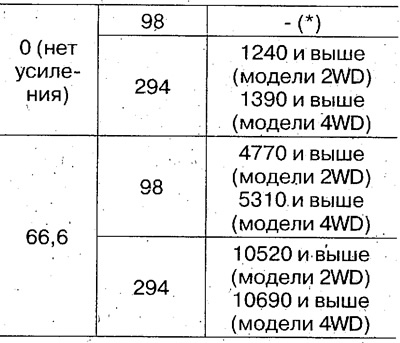
4. Depress the brake pedal with the force given below and measure the brake fluid pressure at the outlets when the vacuum gauge reads 0 kPa (0 mmHg) (does not increase) and 66.7 kPa (500 mmHg).
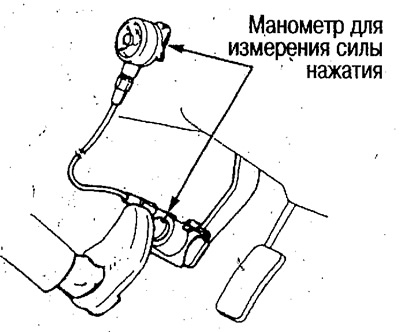
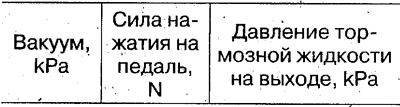
4. Depress the brake pedal with the force given…


4. Depress the brake pedal with the force given…

Check valve


Check valve


The check valve is built into the brake booster vacuum hose. If the hose lets air in when blowing from the brake booster side and does not let air in when blowing from the opposite side, then the valve is working properly.
This article is available at: russian, bulgarian, belarusian, ukrainian, serbian, croatian, romanian, polish, slovak, hungarian
This information has been verified: Emil Safonov
Share with friends:
◀ Previous
Avancier 1: Brake system
Next ▶

Checking and adjusting the clearance of the push rod
Assembling the master cylinder
Disassembling the master cylinder
Master Cylinder and Brake Booster — Removal and Installation
Front Brake Caliper — Assembly
Adjusting the length of the push rod with an earring
Rear Brake Pads — Checking and Replacing
Rear Brake Discs — Checking Runout
Rear brake discs — thickness and parallelism check
Rear Brake Discs — Brake Disc Grinding
See also other articles from Honda manuals:
Checking the serviceability and tightness, removing and installing… Honda Accord 6 (1997-2002)
Checking the serviceability/tightness, removing and installing the… Honda Civic 6 (1995-2000)
Vacuum Brake Booster — Checking and Adjusting the Rod Clearance Honda Fit 1 (2001-2008)
Brake Booster — Checking the Check Valve Honda CR-V 2 (2002-2006, petrol)
Checking the starter operation Honda HR-V 1 (1998-2006, petrol)
Link in different formats to this article
Comments and feedback from visitors
No comments yet


How much will 29 + 29 ?


Avancier 1 (1999-2003, petrol) 
  • General information
  • Controls and instruments
  • User manual
  • Power unit
  • Engine maintenance
  • Engine repair
  • Cooling system
  • Engine management
  • Power and exhaust system
  • Transmission
  • Automatic gearbox
  • Drive shafts and differential
  • Chassis and running gear
  • Steering
  • Car suspension
  • Brake system
  • Body and interior
  • Doors, locks and windows
  • Interior (internal elements)
  • Exterior (external elements)
  • Air conditioner
  • Electrical equipment
  • Power devices
  • Equipment and devices
  • Headlights and lighting
  • Electrical circuits
HondaBook.ru © 2018–2026 • Mobile version • Sitemap: EN BG BY UA RS HR RO PL SK HU • Feedback • Driver Information • Search system • Bookmark
Accord 3 (1985-1989) • Accord 6 (1997-2002) • Civic 3 and 4 (1983-1991) • Civic 5 and 6 (1991-2000) • Civic 6 (1995-2000) • Civic 7 (2000-2005) • Civic 8 (2005-2011) • Fit 1 (2001-2008) • CR-V 1 (1995-2001) • CR-V 2 (2002-2006) • HR-V 1 (1998-2006) • Avancier 1 (1999-2003) •
 
This website uses cookies to ensure proper functioning. By clicking "OK," you agree.