
HondaBook.ru
Auto companies Volkswagen Auto companies Ford Auto companies Lada Auto companies Skoda Auto companies BMW Auto companies Mazda Auto companies Peugeot
English Русский
Български
Беларускі
Український
Српски
Hrvatski
Română
Polski
Slovenský
Magyar
Bookmark Contacts Sitemap   


Accord Civic Fit / Jazz CR-V HR-V Others Articles
Civic 3 and 4 (1983-1991) Civic 5 and 6 (1991-2000) Civic 6 (1995-2000) Civic 7 (2000-2005) Civic 8 (2005-2011)

Gearbox SLXA (2WD) (Honda Civic 7)

  • Main
  • Honda Civic
  • 7 (2000-2005)
  • Transmission
  • Automatic gearbox
  • Gearbox SLXA (2WD)
0
Contents: Removal ⇊ Installation ⇊

Removal


1. Jack up the car and remove the front wheels and mudguards.

2. Unscrew the drain plug (A) and drain the working fluid.
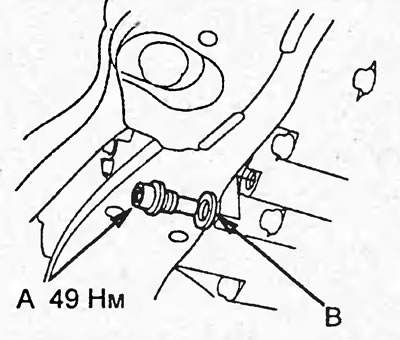
2. Unscrew the drain plug (A) and drain the…


3. Remove the gasket (B) from the drain plug.

4. Disconnect the cable from the negative terminal of the battery, and then from the positive terminal.

5. Remove the inlet manifold.

6. Remove the battery and battery tray.

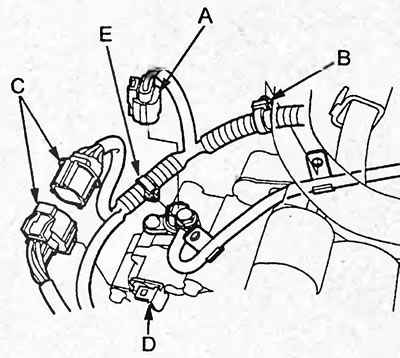
7. Disconnect the wires (A) from the starter and detach the wire retainer (B).
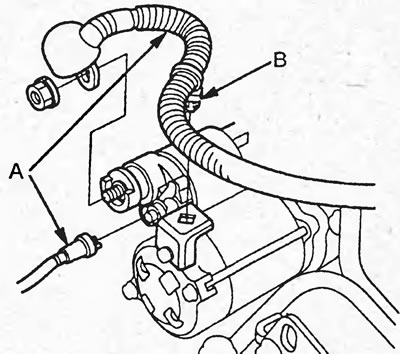
7. Disconnect the wires (A) from the starter and…


8. Loosen the bolt and disconnect the ground wire (A). Disconnect the torque converter lock-up solenoid valve connector (B). Disconnect the wire retainer (D) from the bracket (C).
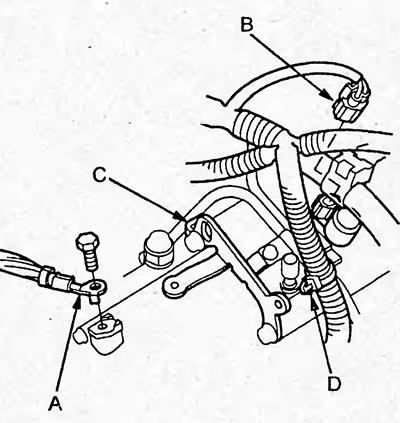
8. Loosen the bolt and disconnect the ground wire…


9. Disconnect the transmission output shaft speed sensor connector (A) and the sensor wire retainer (B).
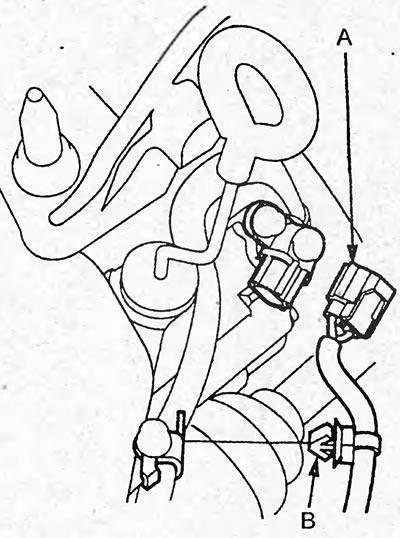


9. Disconnect the transmission output shaft speed…


10. Disconnect the vehicle speed sensor connector (A) and the wire retainer (B).
10. Disconnect the vehicle speed sensor connector…


11. Remove the start inhibit switch connector (C) from the bracket (D) and disconnect the connector. Disconnect the wire retainer (E) from the bracket.

12. Disconnect the cooler hoses (A) from the tubes (B).
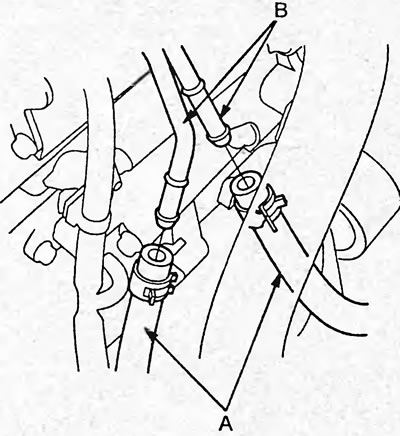
12. Disconnect the cooler hoses (A) from the…


13. Disconnect the connectors (A) of the pressure control solenoid valves "A" and "B", the connector (B) of the gear shift solenoid valves "A" and "B", the connector (C) of the transmission input shaft speed sensor. Disconnect the retainer (D) from the bracket.
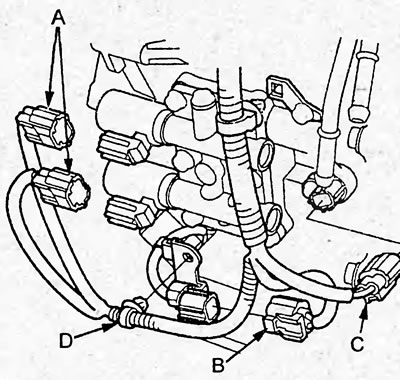


13. Disconnect the connectors (A) of the pressure…


14. Disconnect the oxygen sensor connector (A) and remove the connector from the bracket (B). Disconnect the wire from the retainer (C).
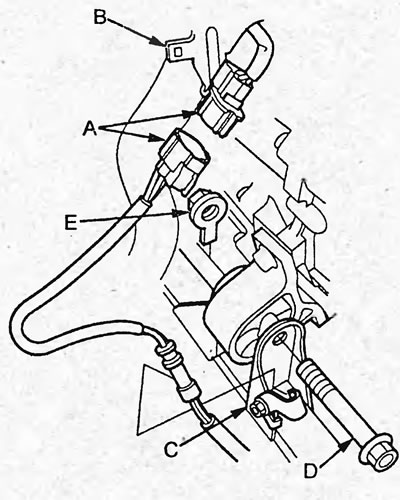
14. Disconnect the oxygen sensor connector (A)…


15. Remove the bolt (D) and nut (E) of the front support.

16. Fasten the earring (B) to the stud (A) and hang up the engine.
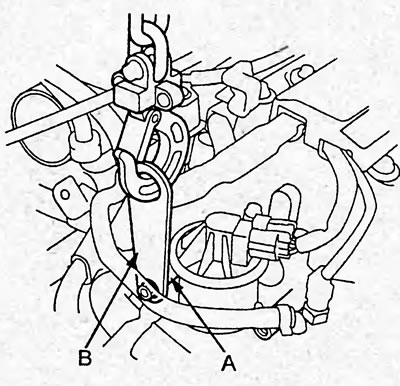
16. Fasten the earring (B) to the stud (A) and…


17. Using a hex key (A) (5 mm) to hold the pin (C) of the ball joint (B) of the stabilizer link, loosen the nut. Disconnect the front suspension stabilizer link from the front suspension lower arm (D).
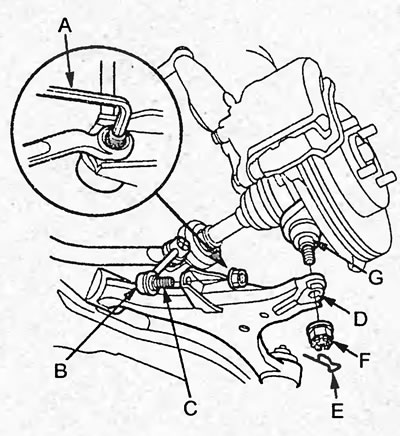


17. Using a hex key (A) (5 mm) to hold the pin…


18. Remove the cotter pin (E) and nut (F). Disconnect the lower arm (D) of the front suspension from the steering knuckle (G).

19. Remove pipe "A" (intake pipe) exhaust systems and catalytic converter.
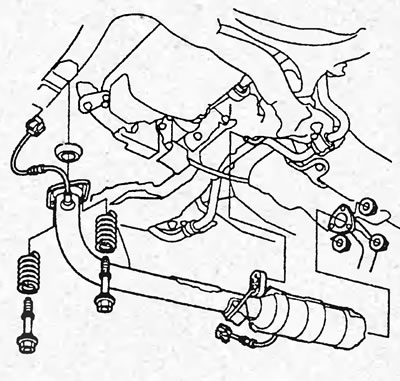
19. Remove pipe «A» (intake pipe) exhaust systems…


20. Remove the protective cover (A) of the gearbox control cable and unscrew the bolts securing the cable bracket (B).

21. Disconnect the cable lever (D) from the transmission control shaft (C) and remove the cable (E).
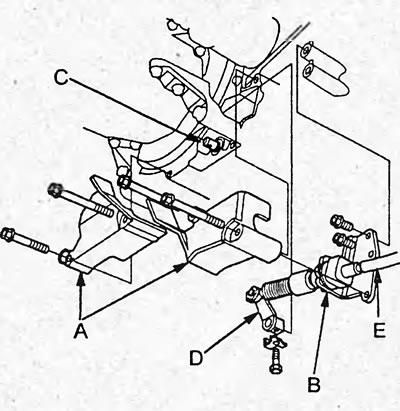
21. Disconnect the cable lever (D) from the…


22. Loosen the bolts and remove the brackets (A) and casing (B).
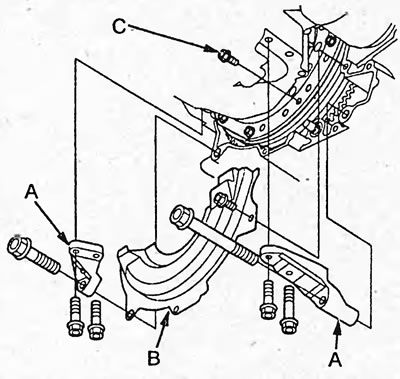


22. Loosen the bolts and remove the brackets (A)…


23. Rotate the crankshaft pulley and unscrew the 8 bolts (C).

24. Tighten the rear support bracket bolts.
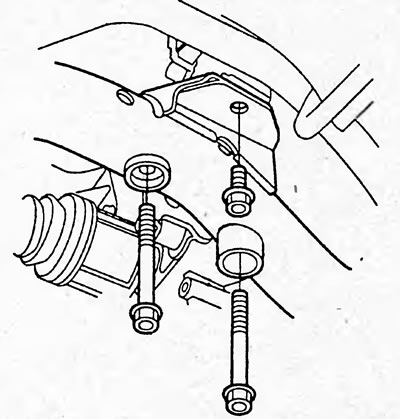
24. Tighten the rear support bracket bolts.


25. Apply marks (A) as shown in the figure on the center of the bolt (10 mm).
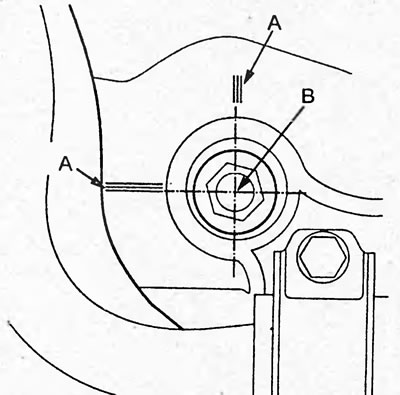
25. Apply marks (A) as shown in the figure on the…


26. Install the wooden block as shown in the figure.
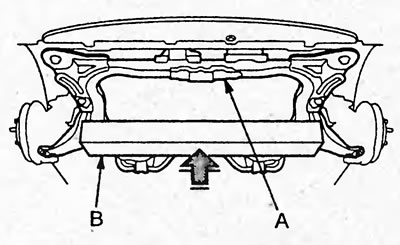
26. Install the wooden block as shown in the…


27. Remove the bolts (A), then remove the mounting bolts (B) and remove the subframe (C).
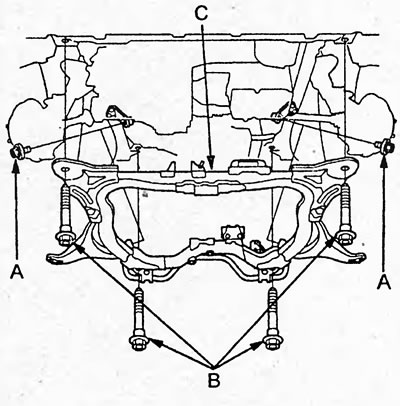


27. Remove the bolts (A), then remove the…


28. Remove the drive shaft (A) from the gearbox.
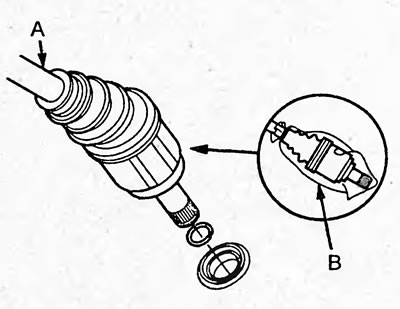
28. Remove the drive shaft (A) from the gearbox.


29. Wrap the drive shaft with a rag (B) as shown in the figure.

30. Jack up the gearbox.

31. Remove the gearbox mounting bolts shown in the figure.
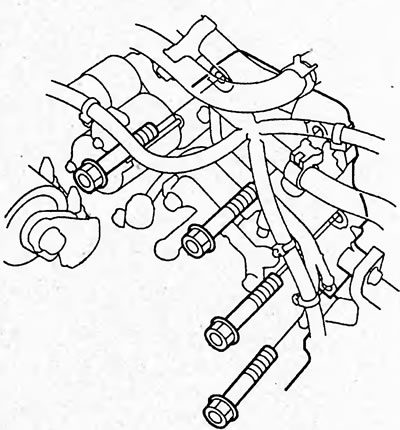
31. Remove the gearbox mounting bolts shown in…


32. Loosen the bolt and nuts and remove the gearbox support bracket (A).
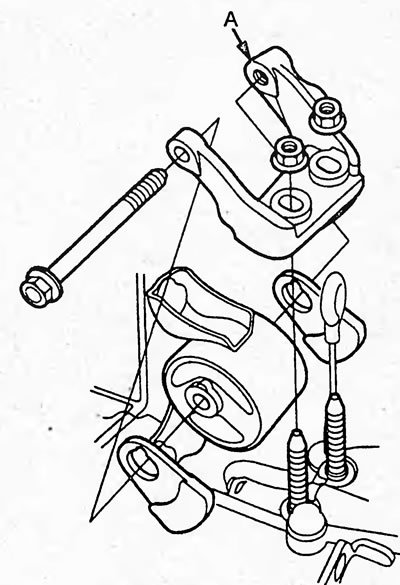
32. Loosen the bolt and nuts and remove the…


33. Loosen the bolts (A) and remove the rear support bracket (B).
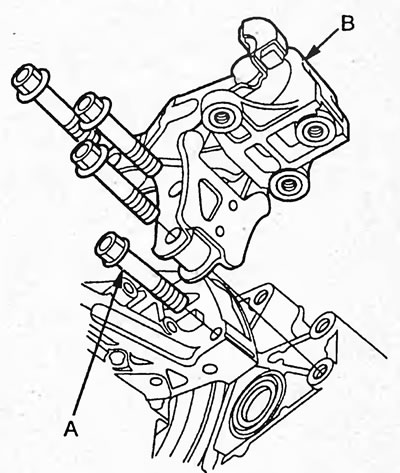
33. Loosen the bolts (A) and remove the rear…


34. Make sure all wires, tubes and cables are disconnected from the transmission.

35. Disconnect the gearbox from the engine so that the pins are removed from the mounting holes. Then remove the gearbox.

36. Remove the torque converter (B) and starter (C) from the gearbox (A).
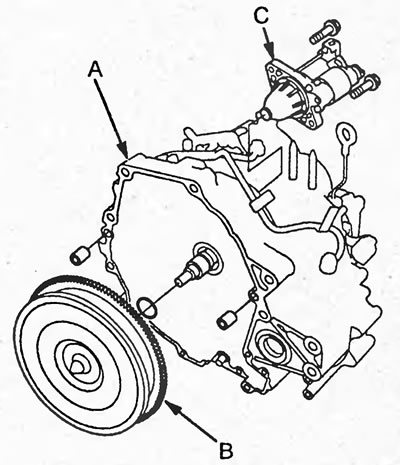
36. Remove the torque converter (B) and starter…


37. Loosen the bolts and remove the front support.
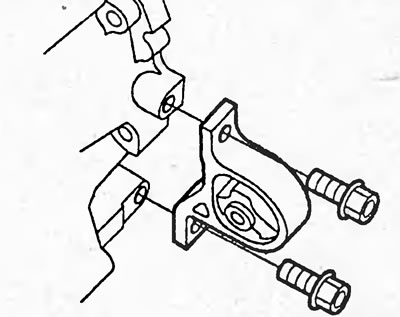
37. Loosen the bolts and remove the front support.


38. Loosen the bolts and remove the torque converter drive plate (A).
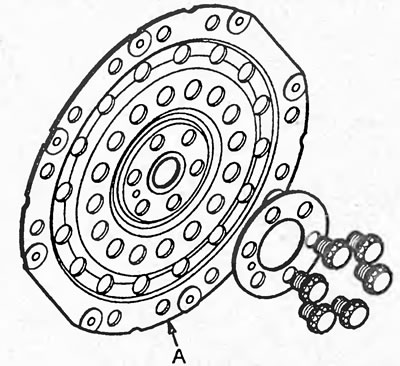
38. Loosen the bolts and remove the torque…


Installation


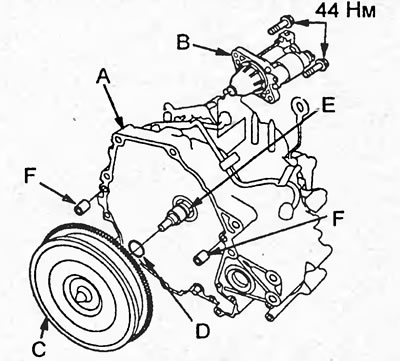
1. Install the starter (B) onto the gearbox (A).

Tightening torque - 44 Nm
Tightening torque - 44 Nm


2. Install a new O-ring (D) and torque converter (C) onto the transmission input shaft (E).

3. Install the pins (F).

4. Jack up the gearbox and connect it to the engine.

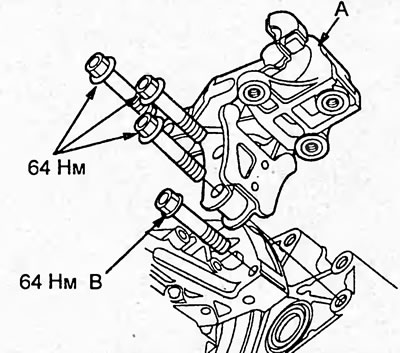
5. Install the rear support bracket (A) and tighten the bolts (B).

Tightening torque - 64 Nm
Tightening torque - 64 Nm


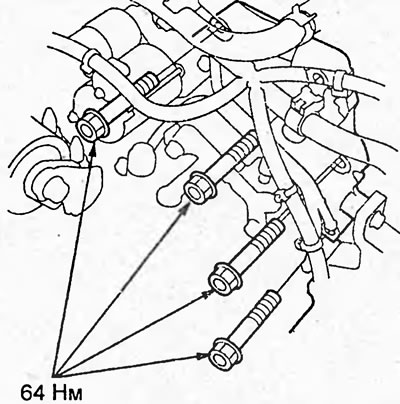
6. Tighten the gearbox mounting bolts shown in the figure.

Tightening torque - 64 Nm
Tightening torque - 64 Nm


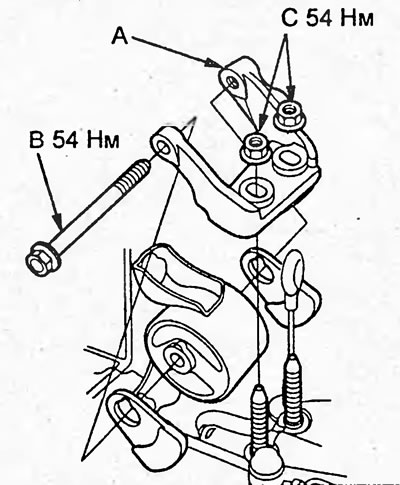
7. Install the support bracket (A) and temporarily tighten the bolt (B). Tighten the nuts (C) and then tighten the bolt (B).

Tightening torque - 54 Nm
Tightening torque - 54 Nm


8. Install a new snap ring (B) onto the drive shaft. Install the drive shaft (A) into the gearbox.

Note: Be careful when installing the drive shaft, the splines of the drive shaft can easily damage the seals.
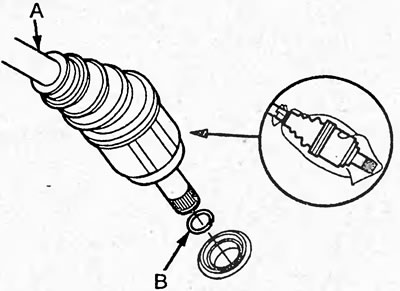

Note: Be careful when installing the drive shaft,…


9. Install the subframe (A) and jack up the subframe using a wooden block (B).
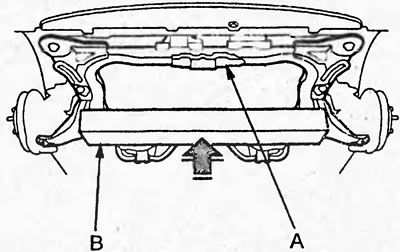
9. Install the subframe (A) and jack up the…


10. Install the subframe (A) and temporarily tighten the subframe mounting bolts (B).
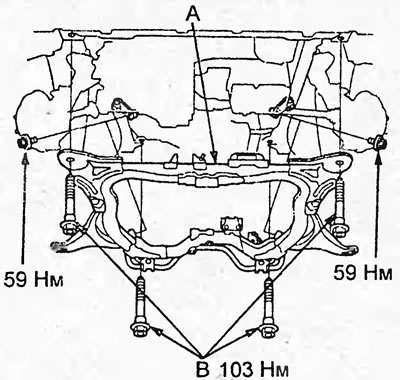
10. Install the subframe (A) and temporarily…


11. Align the marks (B) as shown in the figure with the center of the bolt (10 mm) and tighten the bolts. Finally tighten the subframe mounting bolts.
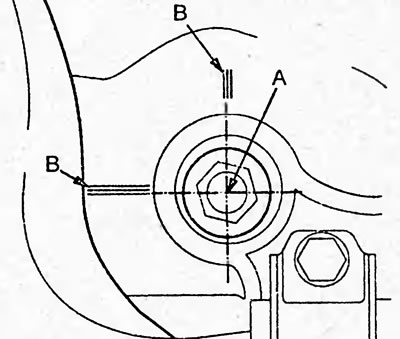
11. Align the marks (B) as shown in the figure…


12. Tighten the rear support bracket bolts.

Tightening torque - 59 Nm
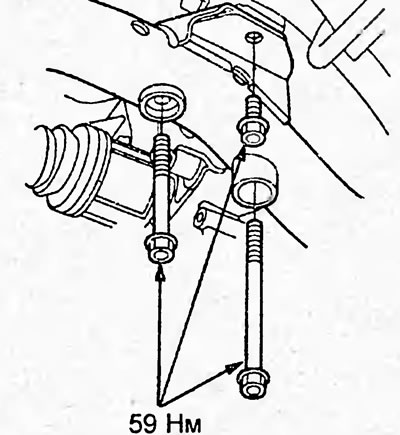
Tightening torque - 59 Nm


13. Remove the jack.

14. While rotating the crankshaft pulley, tighten the 8 bolts (A).

Tightening torque - 12 Nm
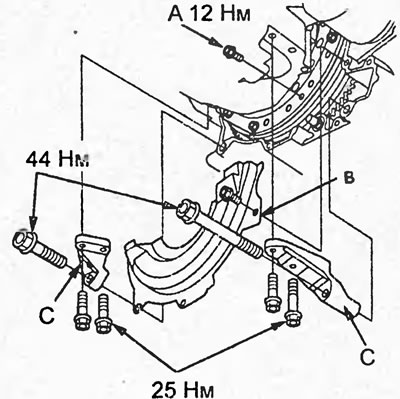
Tightening torque - 12 Nm


15. Install the casing (B) and brackets (C) and tighten the bolts.

16. Install the retaining plate (C) onto the transmission control cable lever (B). Connect the transmission control cable lever to the shaft (A).

17. Install the cable bracket (D) and protective cover (E).
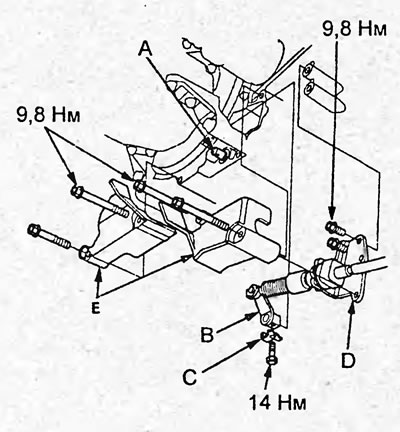
17. Install the cable bracket (D) and protective…


18. Connect the lower arm (B) of the front suspension to the steering knuckle (A), tighten the nut (C) and install the cotter pin (D).
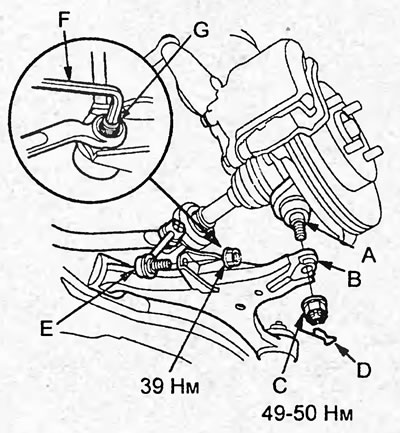
18. Connect the lower arm (B) of the front…


19. Connect the front stabilizer bar link (E) to the front suspension lower arm (B). Using the Allen key (F) (5 mm) to hold the stabilizer bar ball joint pin (G), tighten the nut.

20. Install pipe "A" (intake pipe) exhaust systems and catalytic converter.
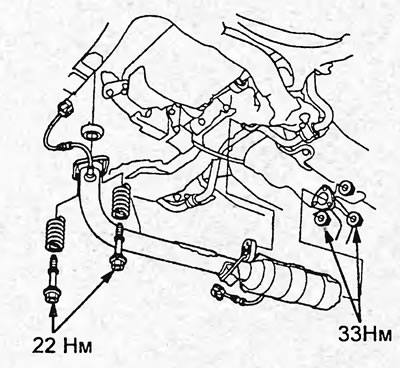
20. Install pipe «A» (intake pipe) exhaust…


21. Install the front support (A) and temporarily tighten the support bolt. Tighten the front support mounting bolts, and then finally tighten the support bolt.
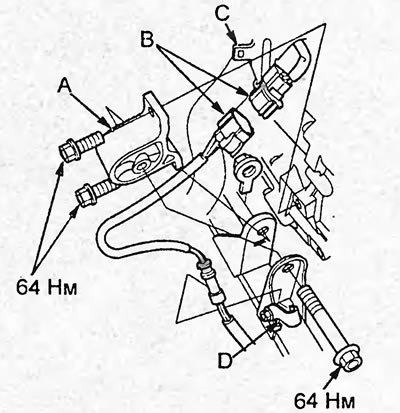
21. Install the front support (A) and temporarily…


22. Connect the oxygen sensor connector (B) and install the connector on the bracket (C). Place the sensor wire in the retainer (D).

23. Install the dirt protection.

24. Lower the engine and remove the engine suspension cleat.

25. Connect the connector (A) of the shift solenoid valves "A" and "B", the connector (B) of the transmission input shaft speed sensor, the connectors (C) of the pressure control solenoid valves "A" and "B". Install the harness clamp as shown in the figure.
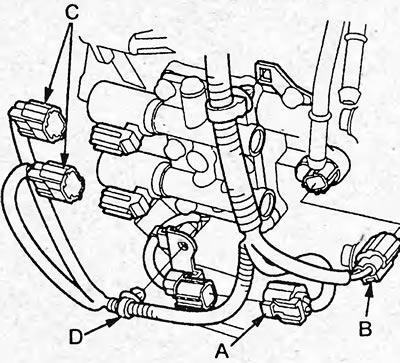
25. Connect the connector (A) of the shift…


26. Connect the automatic transmission fluid cooler hoses (A) to the tubes (B).
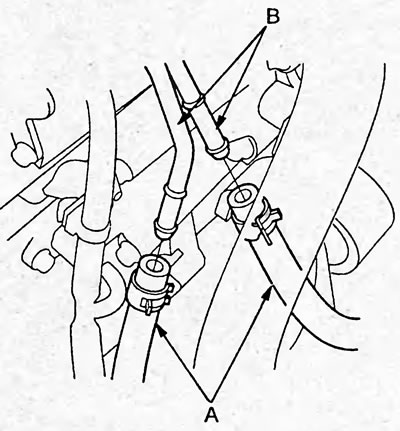
26. Connect the automatic transmission fluid…


27. Connect the connector (A) of the starter inhibit switch and install the connector to the bracket. Install the harness retainer as shown in the figure.
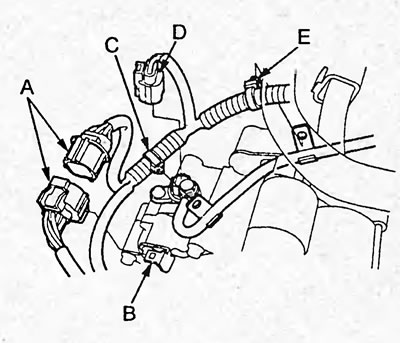
27. Connect the connector (A) of the starter…


28. Connect the vehicle speed sensor connector (D) and the retainer (E).

29. Connect the transmission output shaft speed sensor connector (A) and install the wiring harness clamp as shown in the figure.
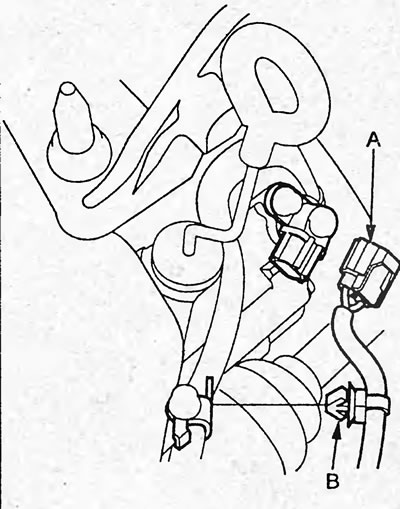
29. Connect the transmission output shaft speed…


30. Connect the torque converter lock-up solenoid valve connector (A) and install the harness retainer (B) to the bracket (C).
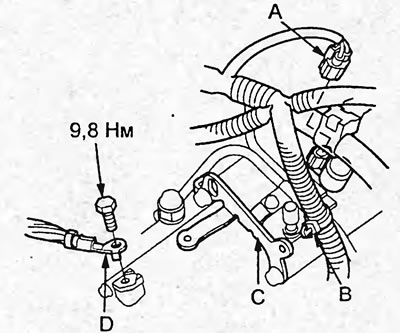
30. Connect the torque converter lock-up solenoid…


31. Connect the ground wire (D).

32. Connect the wires (A) to the starter and secure the wire harness clamp (B).
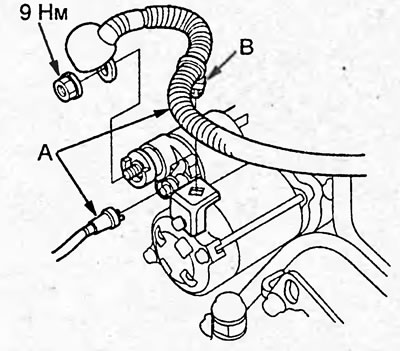
32. Connect the wires (A) to the starter and…


33. Install the battery and battery tray.

34. Install the inlet manifold.

35. Connect the wires to the battery.

36. Fill the gearbox with working fluid (see chapter "Maintenance and general check and adjustment procedures").

37. Pull the parking brake lever and start the engine. Move the selector lever to each position and make sure that the indication on the selector position indicator corresponds to the selector position. If necessary, adjust the gearbox control cable (see section "Gearbox control cable").

38. Install the mudguards and front wheels.

39. Warm up the gearbox and check the level of the working fluid (see chapter "Maintenance and general check and adjustment procedures").

40. Carry out a check of the mechanical systems (see section "Checking mechanical systems of the gearbox").
This article is available at: russian, bulgarian, belarusian, ukrainian, serbian, croatian, romanian, polish, slovak, hungarian
This information has been verified: Yaroslav Shiryaev
Share with friends:
◀ Previous
Civic 7: Automatic gearbox
Next ▶

Gearbox control cable
Selector — removal, installation
Output shaft speed sensor
Input shaft speed sensor
Pressure control solenoid valves
SSTA Transmission (4WD)
Transfer case
See also other articles from Honda manuals:
Gearbox — Accord 1990-91 Honda Accord 3 (1985-1989)
Checking the level and replacing the oil in the rear gearbox Honda Fit 1 (2001-2008)
Rear Axle Gearbox Oil (CR-V 4WD models only) Honda CR-V 1 (1995-2001, petrol)
Removal the gearbox Honda HR-V 1 (1998-2006, petrol)
Link in different formats to this article
Comments and feedback from visitors
No comments yet


How much will 32 + 50 ?


Civic 8 (2005-2011) 
  • General information
  • Technical data
  • Governing bodies
  • Driving and maintenance
  • Power unit
  • Gasoline engines (L13A)
  • Gasoline engines (R18A)
  • Diesel engines (N22A)
  • Cooling and lubrication (L13A)
  • Cooling and lubrication (R18A)
  • Cooling and lubrication (N22A)
  • Injection system (gasoline)
  • Injection system (diesel)
  • Toxicity reduction system
  • Troubleshooting
  • Transmission
  • Clutch and drive shafts
  • Mechanical gearbox
  • Chassis and running gear
  • Suspension and wheels
  • Steering
  • Brake system
  • Body and interior
  • Exterior (external elements)
  • Doors, locks and windows
  • Electrical equipment
  • Equipment and devices
  • Headlights and lighting
  • Power devices
  • Electrical circuits
Civic 7 (2000-2005) 
  • General information
  • User manual
  • Maintenance
  • Power unit
  • Engines D15B and D17A
  • K20A Engines
  • Overhaul engine
  • Cooling system
  • Lubrication system
  • Fuel injection system
  • Toxicity reduction system
  • Engine electrical equipment
  • Transmission
  • Clutch
  • Manual gearbox
  • Automatic gearbox
  • Variator (CVT)
  • Drive shafts
  • Chassis and running gear
  • Car suspension
  • Steering
  • Brake system
  • Body and interior
  • Exterior (external elements)
  • Interior (internal elements)
  • Doors, locks and windows
  • Heater and air conditioner
  • Manual air conditioner
  • Automatic air conditioner
  • Security system
  • Electrical equipment
  • Equipment and devices
  • Headlights and lighting
  • Windscreen wipers
  • Audio system
  • Electrical diagrams
Civic 6 (1995-2000) 
  • General information
  • Introduction to guide
  • User manual
  • Maintenance
  • Power unit
  • Engine in car (Civic)
  • Engine in car (Integra)
  • Engine overhaul
  • Cooling and heating
  • Power and exhaust systems
  • Engine electrical equipment
  • Engine management systems
  • Transmission
  • Manual gearbox
  • Automatic transmission (AT/CVT)
  • Clutch and drive shafts
  • Chassis and running gear
  • Brake system
  • Car suspension
  • Steering
  • Body and interior
  • Exterior (external elements)
  • Interior (internal elements)
  • Doors, locks and windows
  • Electrical equipment
  • Equipment and devices
  • Electrical circuits
Civic 5 and 6 (1991-2000) 
  • Power unit
  • SOHC engines
  • DOHC engines
  • Engine overhaul
  • Cooling and lubrication system
  • Intake and exhaust system
  • Fuel injection system (SOHC)
  • Fuel injection system (DOHC)
  • Carburetor
  • Transmission
  • Clutch
  • Manual gearbox S4C
  • Manual gearbox S40
  • Automatic gearbox
  • Drive shafts
  • Chassis and running gear
  • Car suspension
  • Steering
  • Brake system
  • Body and interior
  • Body elements
  • Heater and air conditioner
  • Electrical equipment
  • Power devices
  • Equipment and instruments
  • Electrical circuits
Civic 3 and 4 (1983-1991) 
  • General information
  • Maintenance
  • Power unit
  • Engine in a car
  • Engine overhaul
  • Cooling system
  • Power and exhaust system
  • Engine electrical equipment
  • Emission control system
  • Transmission
  • Mechanical gearbox
  • Automatic gearbox
  • Clutch and drive shafts
  • Four-wheel drive
  • Chassis and running gear
  • Brake system
  • Car suspension
  • Steering
  • Body and interior
  • Body elements
  • Electrical equipment
  • Equipment and devices
  • Electrical circuits
HondaBook.ru © 2018–2026 • Mobile version • Sitemap: EN BG BY UA RS HR RO PL SK HU • Feedback • Driver Information • Search system • Bookmark
Accord 3 (1985-1989) • Accord 6 (1997-2002) • Civic 3 and 4 (1983-1991) • Civic 5 and 6 (1991-2000) • Civic 6 (1995-2000) • Civic 7 (2000-2005) • Civic 8 (2005-2011) • Fit 1 (2001-2008) • CR-V 1 (1995-2001) • CR-V 2 (2002-2006) • HR-V 1 (1998-2006) • Avancier 1 (1999-2003) •
 
This website uses cookies to ensure proper functioning. By clicking "OK," you agree.