HondaBook.ru
Auto companies Volkswagen Auto companies Ford Auto companies Lada Auto companies Skoda Auto companies BMW Auto companies Mazda Auto companies Peugeot
English Русский
Български
Беларускі
Український
Српски
Hrvatski
Română
Polski
Slovenský
Magyar
Bookmark Contacts Sitemap   


Accord Civic Fit / Jazz CR-V HR-V Others Articles
HR-V 1 (1998-2006, petrol)

Removal the gearbox (Honda HR-V 1)

  • Main
  • Honda HR-V
  • 1 (1998-2006, petrol)
  • Transmission
  • Mechanical gearbox
  • Removal the gearbox
0
Warning!
  • Make sure the jacks and safety stands are securely installed (see chapter 1).
  • Set the parking brake and block the rear wheels so that the vehicle does not roll off the stands and fall on you while you are working underneath it.


Caution: To avoid damage to the paintwork, cover the fenders with protective cloth.


1. First disconnect the negative (-) cable, then the positive (+) cable from the battery. Remove the battery.

2. Carefully remove the slave cylinder and clutch tube clamp so as not to bend the tube.

Caution: After removing the slave cylinder, do not press the clutch pedal.
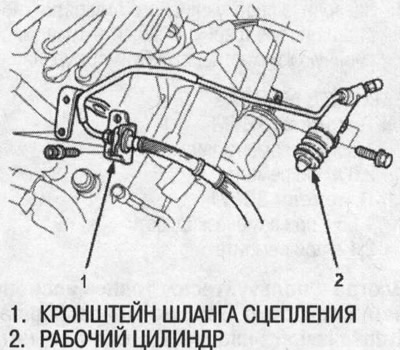

Caution: After removing the slave cylinder, do…


3. Disconnect the starter cable and the transmission ground cable.
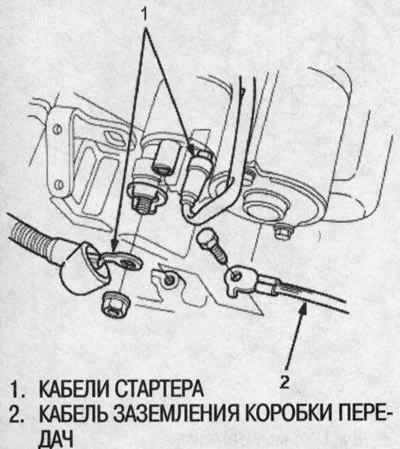
3. Disconnect the starter cable and the…


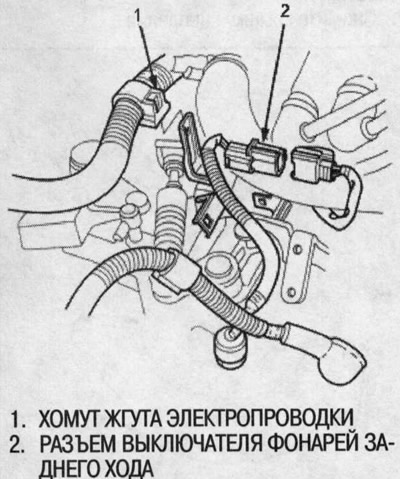
4. Remove the wiring harness clamp.

5. Disconnect the reversing light switch connector.


5. Disconnect the reversing light switch…


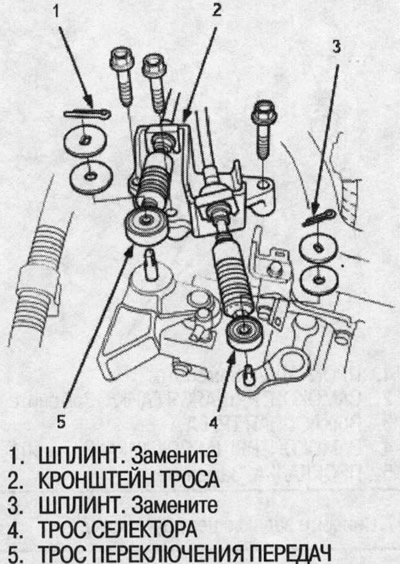
6. Remove the cotter pins, then remove the steel washers, plastic washers, disconnect the shift cables and the gear selector cable from the levers.

7. Remove the cable bracket from the clutch housing.
7. Remove the cable bracket from the clutch…


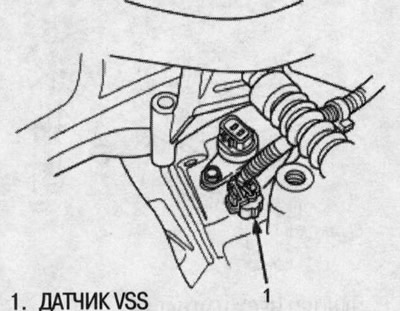
8. Disconnect the vehicle speed sensor (VSS) connector.
8. Disconnect the vehicle speed sensor (VSS)…


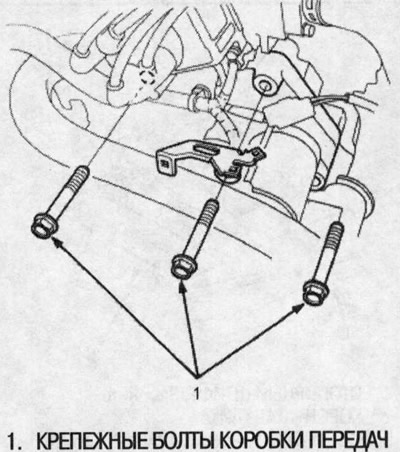
9. Remove the three upper gearbox mounting bolts.


9. Remove the three upper gearbox mounting bolts.


10. Drain the MTF transmission fluid (see above).

11. Remove the mudguard.
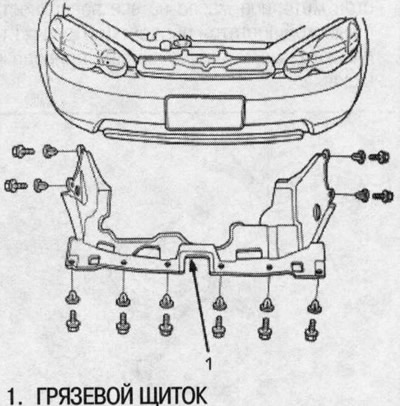
11. Remove the mudguard.


12. Secure the stabilizer link ball joint pin with a hex key and loosen the flange nut, then separate the front stabilizer link and the front stabilizer.
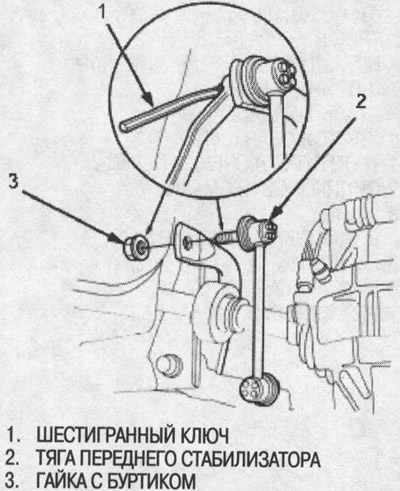
12. Secure the stabilizer link ball joint pin…


13. Remove the lock pins and loosen the castle nuts, then separate the steering knuckle and lower control arms.
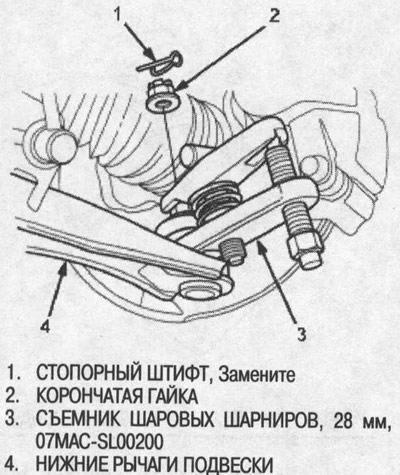


13. Remove the lock pins and loosen the castle…


14. Remove the drive shafts from the intermediate shaft and differential. Apply clean engine oil to all high-cleanliness surfaces. Tie plastic bags to the ends of the drive shafts.
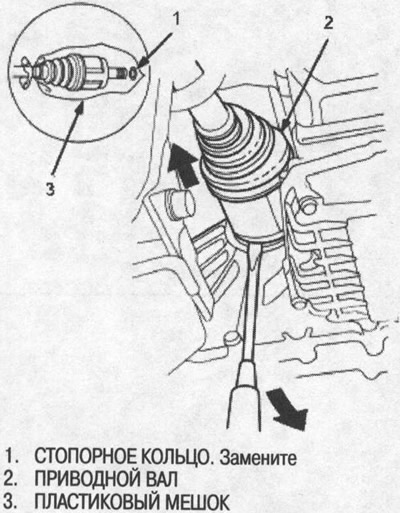
14. Remove the drive shafts from the intermediate…


15. Remove the intermediate shaft. Apply clean engine oil to all high-cleanliness surfaces. Tie plastic bags to the ends of the drive shafts.
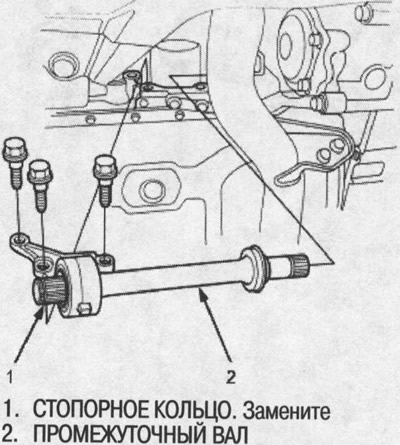
15. Remove the intermediate shaft. Apply clean…


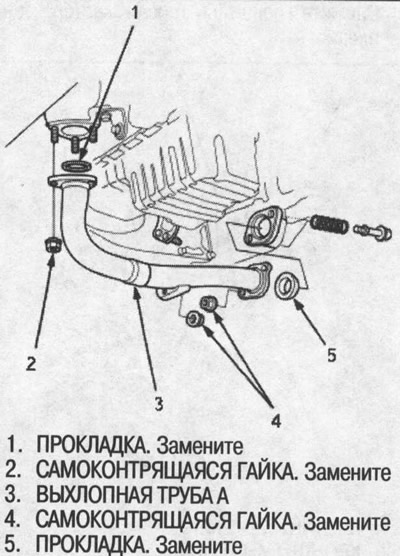
16. Remove the exhaust pipe A.


16. Remove the exhaust pipe A.


17. Remove the rear support beam.
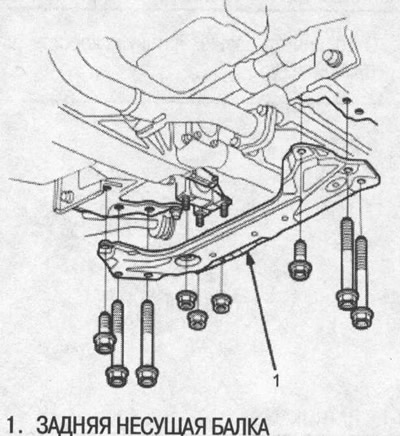
17. Remove the rear support beam.


18. Remove the rear engine mount bracket/rubber cushion assembly.
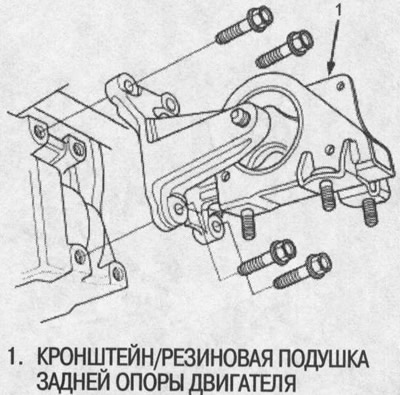
18. Remove the rear engine mount bracket/rubber…


19. Apply marks to the flanges of the propeller shaft and transfer case assembly (only on the SEPM model manual transmission).

20. Separate the propeller shaft from the transfer case assembly (only on the SEPM model manual transmission).
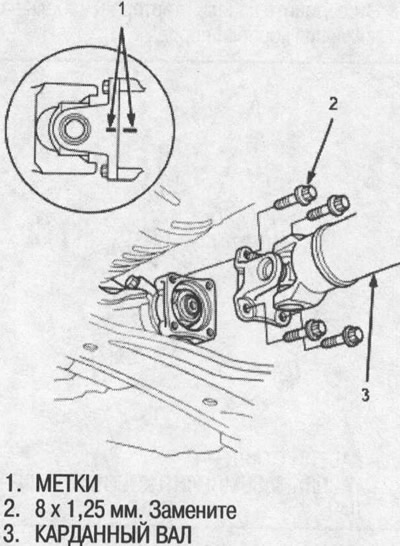


20. Separate the propeller shaft from the…


21. Remove the engine stiffeners.

21. Remove the engine stiffeners.


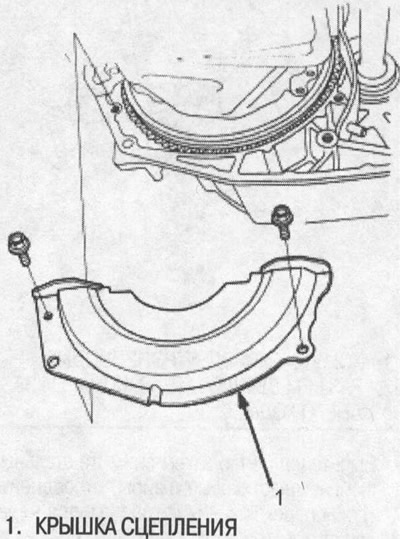
22. Remove the clutch cover.
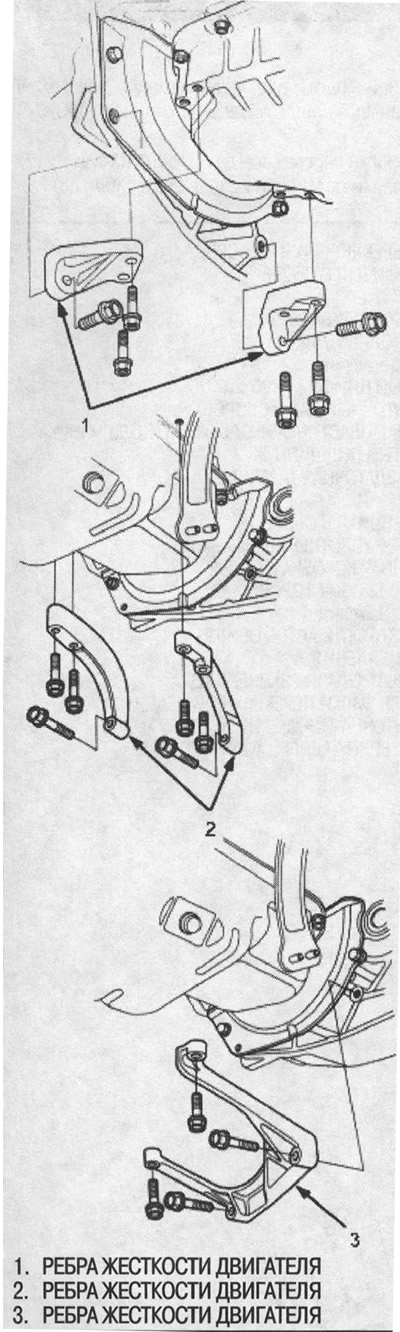
22. Remove the clutch cover.


23. Remove the right front stop rubber pad/bracket.
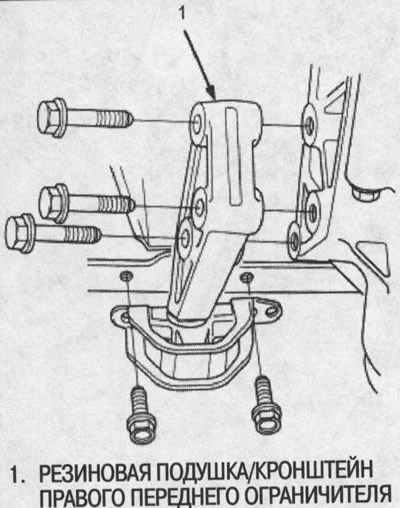
23. Remove the right front stop rubber…


24. Support the transmission with a floor jack and raise it just enough to take the load off the mounts.

25. Remove the support bracket and the rubber cushion of the gearbox support.
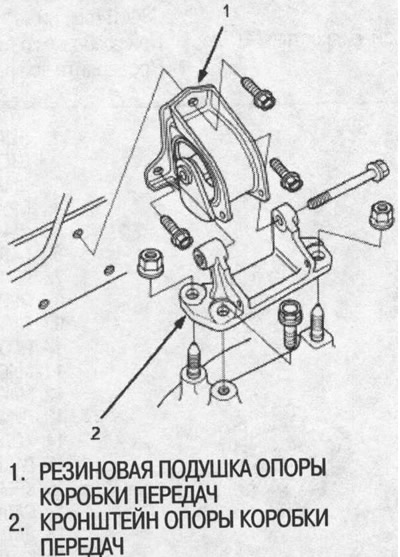
25. Remove the support bracket and the rubber…


26. Remove the two lower gearbox mounting bolts.
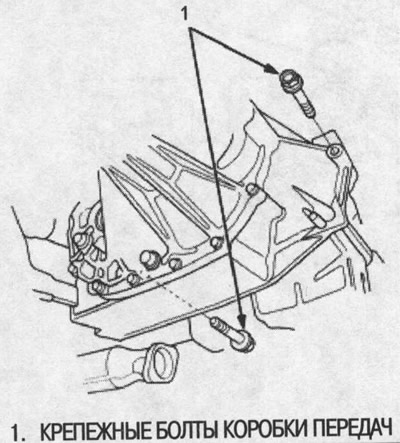
26. Remove the two lower gearbox mounting bolts.


27. Move the gearbox away from the engine until the secondary shaft touches the engine, then lower the gearbox on the jack. Do not bend the clutch pipe.

28. Remove the starter and hose clamp from the gearbox housing.
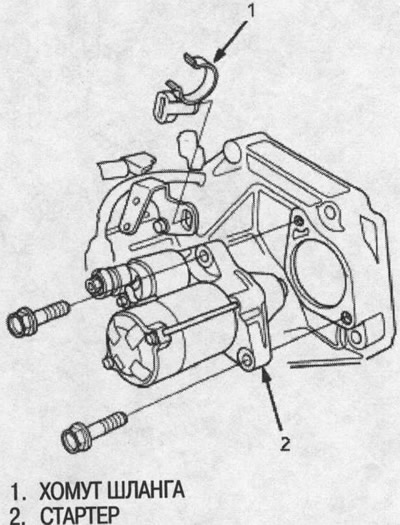
28. Remove the starter and hose clamp from the…


29. Remove the release fork boot, release bearing and release fork from the clutch housing.
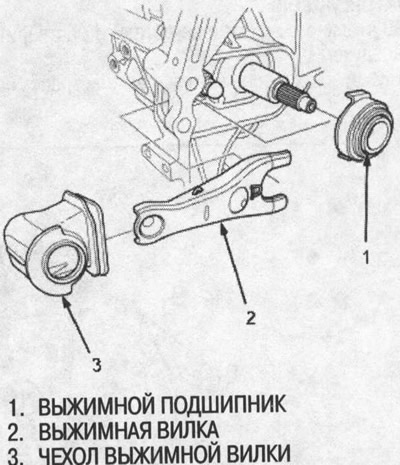
29. Remove the release fork boot, release bearing…
This article is available at: russian, bulgarian, belarusian, ukrainian, serbian, croatian, romanian, polish, slovak, hungarian
This information has been verified: Emil Safonov
Share with friends:
◀ Previous
HR-V 1: Mechanical gearbox
Next ▶

Gear Shift Mechanism — Repair
Transfer case — installation
Transfer case — removal
Transfer case — check on the car
Reverse light switch
Gearbox — design description
Gearbox housing — disassembly
Gearshift Linkage Cover and Shaft — Disassembly and Assembly
Reverse Shift Fork Holder
Shift forks assembly — disassembly, assembly and inspection
See also other articles from Honda manuals:
Gearbox — Accord 1990-91 Honda Accord 3 (1985-1989)
Gearbox support — inspection and replacement Honda Civic 3 and 4 (1983-1991)
Checking the level and replacing the oil in the rear gearbox Honda Fit 1 (2001-2008)
Rear Axle Gearbox Oil (CR-V 4WD models only) Honda CR-V 1 (1995-2001, petrol)
Link in different formats to this article
Comments and feedback from visitors
No comments yet


How much will 38 + 47 ?


HR-V 1 (1998-2006, petrol) 
  • General information
  • User manual
  • Maintenance
  • Power unit
  • Engine repair
  • Lubrication system
  • Cooling system
  • Fuel injection and control
  • Power and exhaust system
  • Engine electrical equipment
  • Transmission
  • Clutch
  • Mechanical gearbox
  • Automatic gearbox
  • Rear differential
  • Drive shafts and cardan
  • Chassis and running gear
  • Steering
  • Car suspension
  • Brake system
  • Body and interior
  • Exterior (external elements)
  • Interior (internal elements)
  • Doors, locks and windows
  • Electrical equipment
  • Equipment and devices
  • Lighting system
  • Electrical circuits
HondaBook.ru © 2018–2026 • Mobile version • Sitemap: EN BG BY UA RS HR RO PL SK HU • Feedback • Driver Information • Search system • Bookmark
Accord 3 (1985-1989) • Accord 6 (1997-2002) • Civic 3 and 4 (1983-1991) • Civic 5 and 6 (1991-2000) • Civic 6 (1995-2000) • Civic 7 (2000-2005) • Civic 8 (2005-2011) • Fit 1 (2001-2008) • CR-V 1 (1995-2001) • CR-V 2 (2002-2006) • HR-V 1 (1998-2006) • Avancier 1 (1999-2003) •
 
This website uses cookies to ensure proper functioning. By clicking "OK," you agree.