HondaBook.ru
Auto companies Volkswagen Auto companies Ford Auto companies Lada Auto companies Skoda Auto companies BMW Auto companies Mazda Auto companies Peugeot
English Русский
Български
Беларускі
Український
Српски
Hrvatski
Română
Polski
Slovenský
Magyar
Bookmark Contacts Sitemap   


Accord Civic Fit / Jazz CR-V HR-V Others Articles
Civic 3 and 4 (1983-1991) Civic 5 and 6 (1991-2000) Civic 6 (1995-2000) Civic 7 (2000-2005) Civic 8 (2005-2011)

Windshield (Honda Civic 7)

  • Main
  • Honda Civic
  • 7 (2000-2005)
  • Body and interior
  • Doors, locks and windows
  • Windshield
0
Contents: Removal ⇊ Installation ⇊
Note: When removing and installing the windshield, refer to the assembly drawing "Windshield".


Removal


1. Remove the interior rearview mirror.

2. Remove the windshield wipers.

3. Pull up the side outer windshield trim, release the clips. Then release the lower part of the trim.
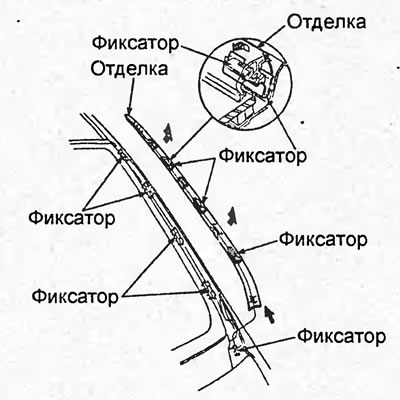
Hatchback.
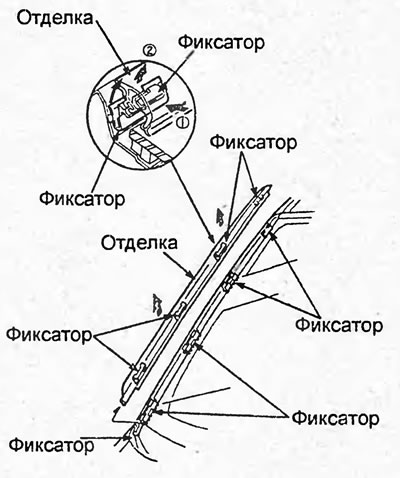
Hatchback.


Sedan.

Sedan.


4. Remove the ventilation grille (see section "Ventilation grille").

5. Remove the windshield molding as shown in the figure.
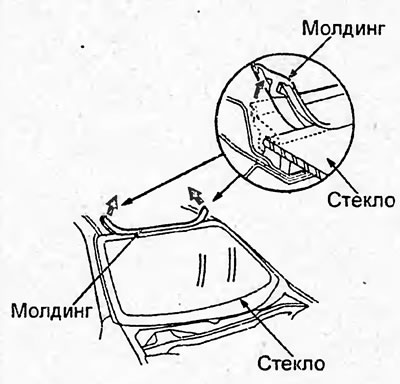
5. Remove the windshield molding as shown in the…


6. If the old molding is to be installed, make alignment marks on the molding and glass.


7. Fold the front edge of the roof trim under.

Note: To avoid damaging the painted surfaces of the body and the surface of the instrument panel, stick adhesive tape on them.
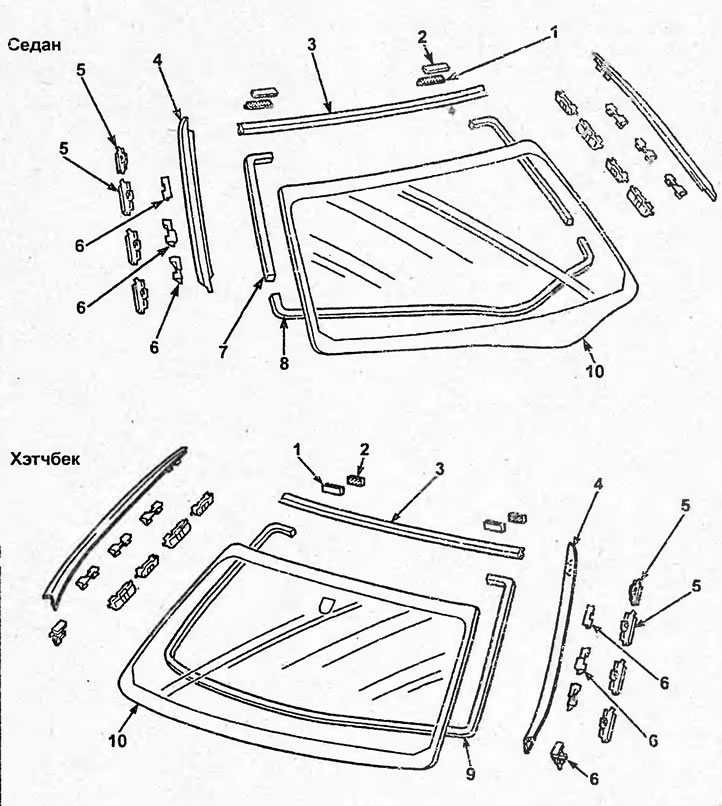

Windshield (sedan). 1,2 - piston. 3 - molding, 4…

Windshield (sedan). 1,2 - piston. 3 - molding, 4 - side outer trim of the windshield, 5, 6 - retainer, 7 - side seal (sedan), 8 - lower seal (sedan), 9 - seal (hatchback) 10 - windshield.


Caution: To avoid damaging your hands on sharp edges, wear gloves.


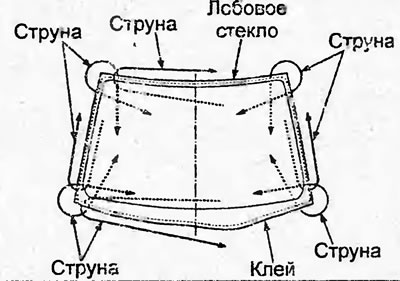
8. From the inside of the body, using an awl, make holes in the glue layer, trying not to touch the pins. Pull the string through the hole from the interior.

Warning: The string may cut your hands, wear gloves when working.


9. Secure the ends of the string to the wooden blocks.

Note: To avoid breaking the string, use its entire length while working.


10. Cut off the layer of glue around the entire perimeter of the glass.
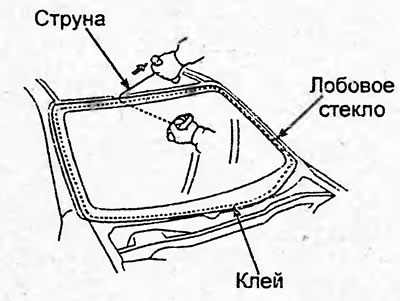
10. Cut off the layer of glue around the entire…


10. Cut off the layer of glue around the entire…


11. Carefully remove the windshield.


12. Remove the windshield seal and pins from the body.

Installation


Caution: To avoid damaging your hands on sharp edges, wear gloves.


1. Clean the contact surface of the body from glue, leaving 1-2 mm of glue on the surface.

Note: If all the glue was removed during cutting, clean the body surface with a piece of cloth soaked in solvent and wait 30 minutes. Then cover the body surface with a new layer of glue 2 mm thick.


2. Clean and degrease the glass surface approximately 50 mm wide from the edge and the glass mating surface on the body along the entire perimeter.

3. Stick the new side and bottom seals and clips to the inside of the windshield as shown in the picture.
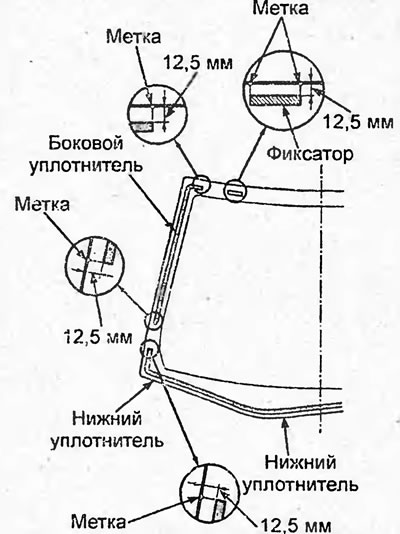
3. Stick the new side and bottom seals and clips…


4. Install the molding on the windshield according to the marks as shown in the figure.
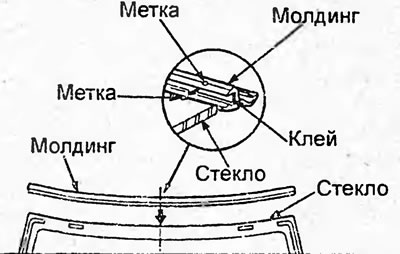
4. Install the molding on the windshield…


5. Install the pins "A" and the clamps "B", "C", "D" on the body as shown in the figure.
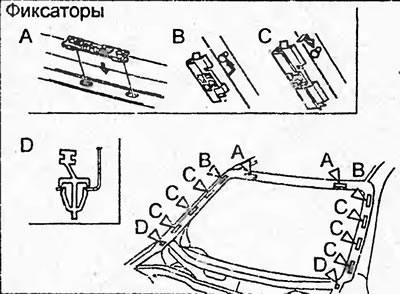


Hatchback.
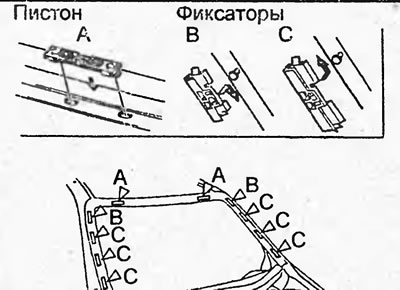
Hatchback.


Sedan.

Sedan.


6. Install the windshield onto the body. Apply alignment marks to the glass and body as shown in the figure.

Note: Do not damage glass or painted surfaces of the car body.
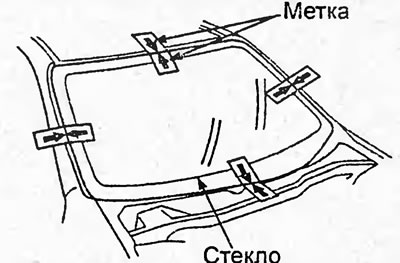

Note: Do not damage glass or painted surfaces of…


7. Remove the windshield.

8. Using a brush, apply primer to the glass between the seal and the molding as shown in the picture.


Caution: Clean the surface from dirt and grease, do not touch the surface after applying the primer, otherwise the connection will not be airtight.


Note: Use a primer designed for glass installation. The drying time of the primer is specified in the instructions for use.
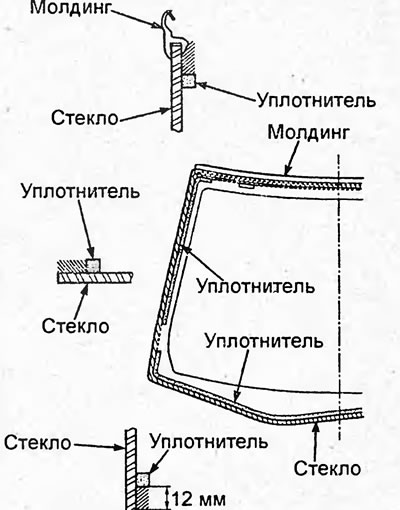

Note: Use a primer designed for glass…


9. Using a brush, apply the primer to the body as shown in the picture. Wait 10 minutes.

Caution: Clean the surface from dirt and grease, do not touch the surface after applying the primer, otherwise the connection will not be airtight.
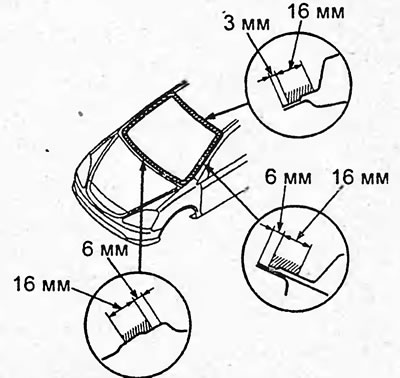

Hatchback.
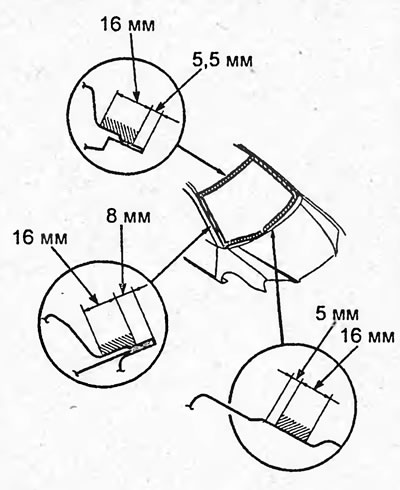
Hatchback.


Sedan.

Sedan.


10. Apply adhesive to the contact surface of the windshield between the seal and the molding as shown in the figure. Wait for 30 minutes.
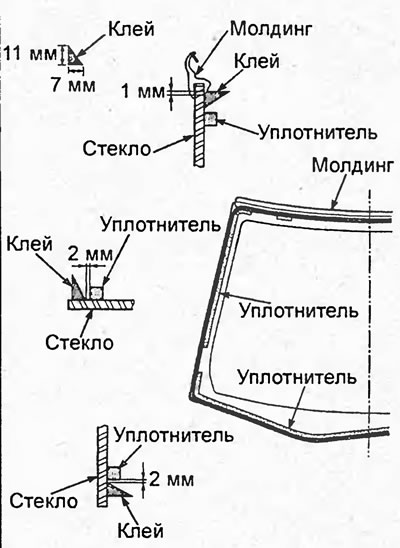
10. Apply adhesive to the contact surface of the…


11. Install the windshield on the body according to the marks. Press lightly on the glass first at the corners, then on the entire contact surface. Do not open or close the car doors until the glue dries.

12. Remove excess adhesive from the windshield and painted surfaces of the body.

13. Wait 1 hour. Check and eliminate leaks in the connection.

a) After the curing time has elapsed, check the connection for leaks.

b) Seal any loose connections with automotive glass sealant.

14. Install the ventilation grille (see section "Ventilation grille").

15. Install the windshield side outer trim.

16. Install the windshield wipers.

17. Install the interior rearview mirror.
This article is available at: russian, bulgarian, belarusian, ukrainian, serbian, croatian, romanian, polish, slovak, hungarian
This information has been verified: Yaroslav Shiryaev
Share with friends:
◀ Previous
Civic 7: Doors, locks and windows
Next ▶

Side rear view mirror
Fuel filler neck hatch
Back door
Trunk lid
Rear side door
Rear window (sedan)
Rear door glass
Rear fixed side glass
Hatch — adjustment, disassembly and assembly
Hatch — Removing and installing hatch glass
See also other articles from Honda manuals:
Windshield wiper motor and its connections Honda Accord 3 (1985-1989)
Windshield — Removal Honda Fit 1 (2001-2008)
Windshield and fixed glass — replacement Honda CR-V 1 (1995-2001, petrol)
Windshield replacement Honda HR-V 1 (1998-2006, petrol)
Windshield removal and installation procedure Honda Avancier 1 (1999-2003, petrol)
Link in different formats to this article
Comments and feedback from visitors
No comments yet


How much will 36 + 16 ?


Civic 8 (2005-2011) 
  • General information
  • Technical data
  • Governing bodies
  • Driving and maintenance
  • Power unit
  • Gasoline engines (L13A)
  • Gasoline engines (R18A)
  • Diesel engines (N22A)
  • Cooling and lubrication (L13A)
  • Cooling and lubrication (R18A)
  • Cooling and lubrication (N22A)
  • Injection system (gasoline)
  • Injection system (diesel)
  • Toxicity reduction system
  • Troubleshooting
  • Transmission
  • Clutch and drive shafts
  • Mechanical gearbox
  • Chassis and running gear
  • Suspension and wheels
  • Steering
  • Brake system
  • Body and interior
  • Exterior (external elements)
  • Doors, locks and windows
  • Electrical equipment
  • Equipment and devices
  • Headlights and lighting
  • Power devices
  • Electrical circuits
Civic 7 (2000-2005) 
  • General information
  • User manual
  • Maintenance
  • Power unit
  • Engines D15B and D17A
  • K20A Engines
  • Overhaul engine
  • Cooling system
  • Lubrication system
  • Fuel injection system
  • Toxicity reduction system
  • Engine electrical equipment
  • Transmission
  • Clutch
  • Manual gearbox
  • Automatic gearbox
  • Variator (CVT)
  • Drive shafts
  • Chassis and running gear
  • Car suspension
  • Steering
  • Brake system
  • Body and interior
  • Exterior (external elements)
  • Interior (internal elements)
  • Doors, locks and windows
  • Heater and air conditioner
  • Manual air conditioner
  • Automatic air conditioner
  • Security system
  • Electrical equipment
  • Equipment and devices
  • Headlights and lighting
  • Windscreen wipers
  • Audio system
  • Electrical diagrams
Civic 6 (1995-2000) 
  • General information
  • Introduction to guide
  • User manual
  • Maintenance
  • Power unit
  • Engine in car (Civic)
  • Engine in car (Integra)
  • Engine overhaul
  • Cooling and heating
  • Power and exhaust systems
  • Engine electrical equipment
  • Engine management systems
  • Transmission
  • Manual gearbox
  • Automatic transmission (AT/CVT)
  • Clutch and drive shafts
  • Chassis and running gear
  • Brake system
  • Car suspension
  • Steering
  • Body and interior
  • Exterior (external elements)
  • Interior (internal elements)
  • Doors, locks and windows
  • Electrical equipment
  • Equipment and devices
  • Electrical circuits
Civic 5 and 6 (1991-2000) 
  • Power unit
  • SOHC engines
  • DOHC engines
  • Engine overhaul
  • Cooling and lubrication system
  • Intake and exhaust system
  • Fuel injection system (SOHC)
  • Fuel injection system (DOHC)
  • Carburetor
  • Transmission
  • Clutch
  • Manual gearbox S4C
  • Manual gearbox S40
  • Automatic gearbox
  • Drive shafts
  • Chassis and running gear
  • Car suspension
  • Steering
  • Brake system
  • Body and interior
  • Body elements
  • Heater and air conditioner
  • Electrical equipment
  • Power devices
  • Equipment and instruments
  • Electrical circuits
Civic 3 and 4 (1983-1991) 
  • General information
  • Maintenance
  • Power unit
  • Engine in a car
  • Engine overhaul
  • Cooling system
  • Power and exhaust system
  • Engine electrical equipment
  • Emission control system
  • Transmission
  • Mechanical gearbox
  • Automatic gearbox
  • Clutch and drive shafts
  • Four-wheel drive
  • Chassis and running gear
  • Brake system
  • Car suspension
  • Steering
  • Body and interior
  • Body elements
  • Electrical equipment
  • Equipment and devices
  • Electrical circuits
HondaBook.ru © 2018–2026 • Mobile version • Sitemap: EN BG BY UA RS HR RO PL SK HU • Feedback • Driver Information • Search system • Bookmark
Accord 3 (1985-1989) • Accord 6 (1997-2002) • Civic 3 and 4 (1983-1991) • Civic 5 and 6 (1991-2000) • Civic 6 (1995-2000) • Civic 7 (2000-2005) • Civic 8 (2005-2011) • Fit 1 (2001-2008) • CR-V 1 (1995-2001) • CR-V 2 (2002-2006) • HR-V 1 (1998-2006) • Avancier 1 (1999-2003) •
 
This website uses cookies to ensure proper functioning. By clicking "OK," you agree.