
Install the various components on the glass according to the installation order description for each component.
Attention.
- Do not work at an ambient temperature below 0°C.
- Do not work outdoors during rain or snow.
- Wear safety goggles and gloves when using piano wire.
- Be careful not to damage the dashboard, trim components, bodywork, or parts to be removed during work.
1. Remove the components needed to remove the glass.
2. If necessary, remove the components from the glass (replacement moldings, side moldings, side molding clips and holders, defroster connector, antenna connector, etc.).

In cold weather, use a hair dryer to remove the hardened molding. If the molding is stuck, cut it off with a knife.
3. If the glass is reused, mark the body and glass for later installation.
4. Apply body protection tape.
5. Cut off the adhesive in a straight line.
1) From the salon side, pass the piano wire through the area shown in the picture and tie wooden handles to both ends of the wire.
2) While holding the interior wood handle in the position shown in the illustration, pull the outside handle and cut off the adhesive.
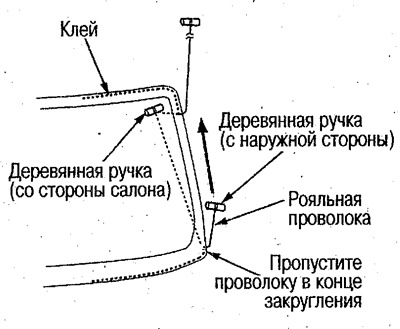
6. Cut off the glue at the corners.
1) Untie the handles from the wire.
2) From the salon side, pass the piano wire through the areas shown in the picture and tie wooden handles to both ends of the wire.
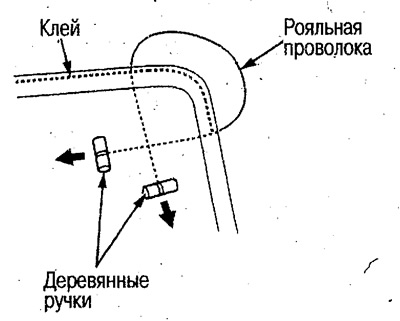
3) Pull both ends of the wire and cut off the glue.
7. Repeat the above procedure and cut off the adhesive around the entire perimeter.
Attention.
- Places where the piano wire touches the body or components, protect with a plastic plate.
- Pull the wire up while cutting the adhesive on the posts.
8. Use rubber suction cups to remove the glass.
9. If the seals and other components on the body side are damaged, replace them. Also replace trim damaged during removal.
10. Remove any remaining adhesive, fasteners, rubber pads, clips, etc. from the body.
11. Cut off the remaining adhesive on the body with a knife so that its thickness around the entire perimeter is approx. 2 mm.
If the adhesive surface on the bodywork is damaged, apply acrylic urethane sealant to the damaged area.
12. If the glass is reused, remove any remaining adhesive, primer, fasteners, rubber seals, etc. from it. with a spatula.
13. Wipe the glued surfaces of the glass and molding with clean gasoline or alcohol.
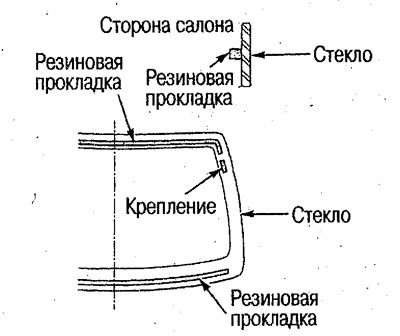
14. Install new trims, rubber gaskets, mounting clips and other components on the glass.
15. On models on which the molding is installed first, install a new molding on the glass.
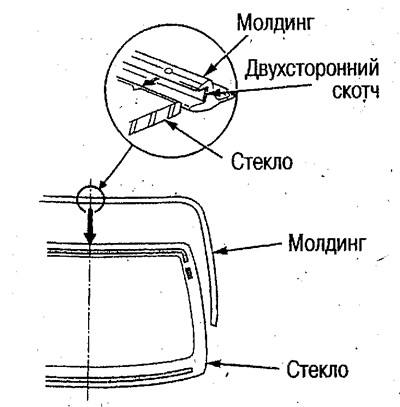
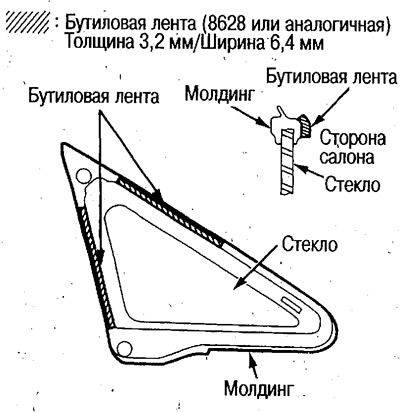
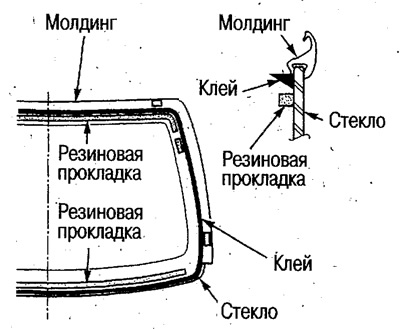
16. If glass is reused on which the molding and clips are not replaced, apply a primer (ZM S-100 or equivalent) on the molding and stick the butyl tape.
- The figure shows the front corner glass as an example.
- Do not touch the cleaned surfaces of the glass and molding with your hand. If oil, water or other contaminants come into contact with the indicated surfaces, clean again.
- Remove the paper tape from the butyl tape just before installing the glass.
17. Install glass holders, new fasteners and molding on the body.
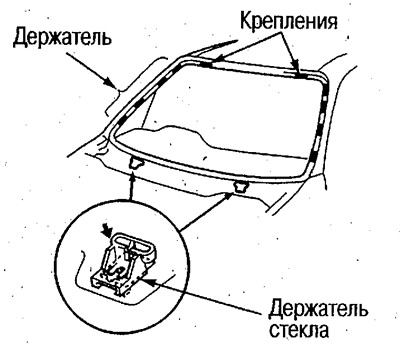
Fix glass holders with screws.
18. If glass is installed on which the clips and moldings are not replaced, remove the clips that were broken during removal, and seal the holes for the clips on the body with a tape of porous material.
19. Using rubber suction cups, install the glass on the body so that the surfaces to be glued along the entire perimeter have the same width.
20. Align glass holders with glass edge and fix with screws.
21. Apply alignment marks to the body and glass.
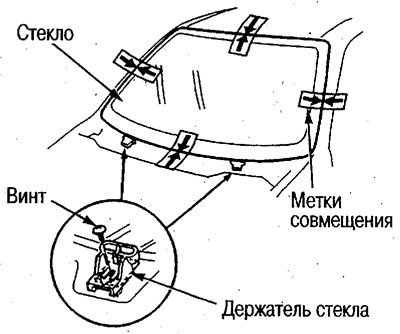
If the glass is being reused, make sure there are alignment marks. Adjust the position of the glass if necessary.
22. Using rubber suction cups, remove the glass.
23. Apply a primer to the glass.

Attention.
- Do not apply body primer to the glass.
- Glue is applied within 30 minutes. after applying primer.
- Apply primer in a thin layer.
- Apply the primer so that there are no gaps.
24. Apply a primer to the body.

Attention.
- Do not apply a glass primer to the bodywork.
- Close trim components.
- Do not apply primer in thick layers.
- After applying the primer, dry naturally for more than 10 minutes.
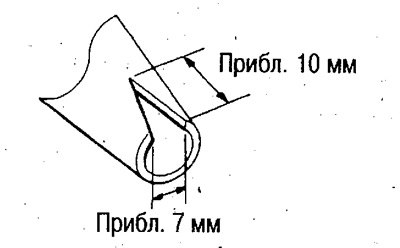
25. Cut off the tip of the cartridge as shown and install the cartridge on the blower.
26. Apply adhesive to the glass surfaces to be bonded.
Attention.
- Install the glass on the body for no more than 5 minutes. after applying the adhesive.
- Apply glue liberally to all corners.
27. Using suction cups, install the glass on the body, aligning the marks and clips with the holes on the body.
If the doors will be opened and closed for the following tasks, fully lower the door windows.
28. Lightly press the glass around the perimeter so that it adheres tightly.
29. Using a spatula, remove the extruded glue, and also add glue where it is missing.
If the body or glass is dirty, clean them with clean gasoline or alcohol.
30. Install the clips on the left and right side moldings and install the moldings on the holders mounted on the body.
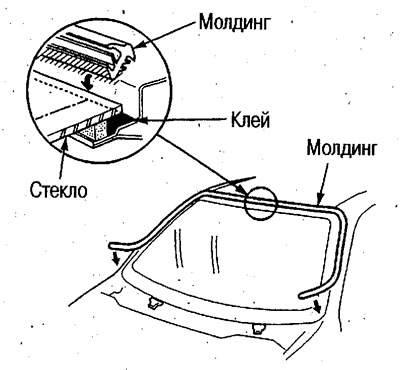
31. If the molding is installed after gluing the glass, install it on the glass.
The center of the molding shown in the picture aligns with the center of the glass and presses lightly against the glass.
32. Keep the minimum time required for the adhesive to cure (see above).
33. Check for water leaks.
- If it is necessary to move the vehicle, do it carefully.
- Pinch the end of the hose and pour water over the glass.
34. If a leak is found, dry the area and fix the leak with the sealant recommended below.
35. Install the removed components.
Attention. When handing over the car to the owner, warn him not to expose the car to strong vibrations for 3 days.