
If your vehicle has a different car radio, please refer to the corresponding Owner's Manual that came with your vehicle.
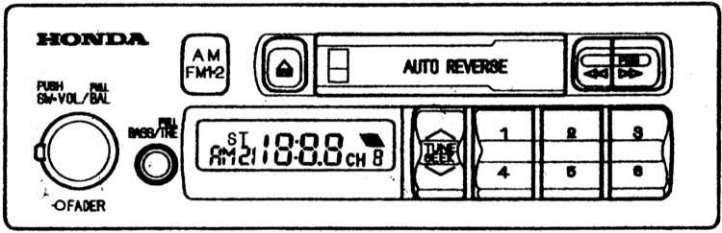
AM/FM Stereo Radio
The car stereo installed in your car is easy to operate and provides high-quality reception of radio broadcasts in the AM and FM ranges. The radio receiver allows you to remember and automatically tune in to 6 radio stations operating in the AM range and 12 radio stations in the FM range.
A cassette deck with an auto-reverse function allows continuous playback of recordings on both tracks of a magnetic tape without changing the audio cassette.
Radio
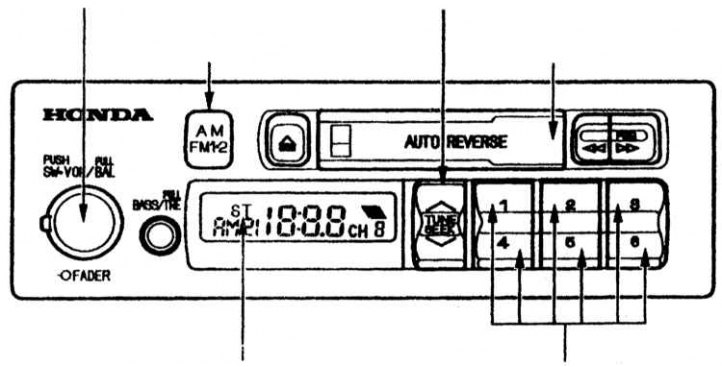
For the radio receiver to function, the ignition key must be turned to position I (ACCESSORY-Auxiliary power consumers) or II (ON-Ignition is on). To turn on the radio, press the SW VOL/BAL button.
The volume level is adjusted by rotating the same SW VOL/BAL button.
The car radio display shows the indicator of the radio range that is on and the frequency value of the current radio setting. The AM/FM 1-2 button is used to switch between the AM, FM 1 and FM 2 ranges. If broadcasting in one of the FM sub-ranges is in stereo mode, the ST indicator appears on the car radio display. There is no stereo mode in the AM radio range.
In any of the three ranges, the radio receiver allows tuning in three ways: manually (TUNE), semi-automatically (SEEK) or to pre-selected radio stations whose frequencies are stored in the radio receiver's memory.
Manual setting (tUNE function). This is done using the TUNE/SEEK key. Press the upper ^ or v lower part of the TUNE/SEEK key to increase or decrease the radio frequency, respectively. When you press and hold the key down, the tuning frequency starts changing continuously. The current radio frequency is shown on the display. Release the TUNE/SEEK key as soon as the receiver is tuned to the desired frequency. To change the tuning frequency by one discrete step, briefly press and release the TUNE/SEEK key.
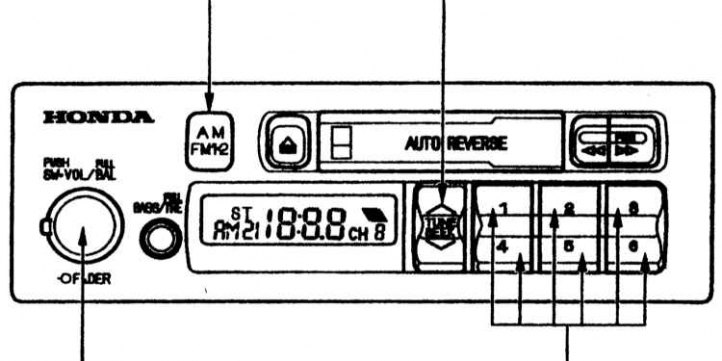
Semi-automatic setup (sEEK function). When this function is enabled, the radio receiver searches for a radio station with a strong signal in the current range and tunes in to it. To switch the radio receiver to the semi-automatic tuning mode, press and hold the TUNE/SEEK key until you hear a short beep. The search for a radio station with a strong signal will occur in the lower or upper sub-range relative to the current radio tuning, depending on which part of the key you pressed - the lower or the upper one. The search stops as soon as the receiver finds the first radio station with a strong signal.
Tuning the radio to pre-selected stations is done using six buttons 1-6. You can enter the frequencies of eighteen of your favorite stations into the radio's memory (six radio stations on each of the AM, FM1 and FM2 ranges).
To store the frequency of a selected station into the radio receiver's memory, do the following.
1. Use the AM/FM1-2 button to switch on the desired radio range. Each of the six automatic tuning buttons allows you to memorize one station in the AM, FM1 and FM2 ranges.
2. Use the TUNE/SEEK key to tune the radio to the desired station using manual or semi-automatic tuning mode.
3. Select one of the six preset buttons for this station, press and hold it until you hear a short beep.
4. Repeat steps 1 through 3 to store the frequencies of six AM stations and twelve FM stations in the radio's memory. Now, simply press any of the six buttons to tune the radio to the station you've pre-selected. The pre-set frequencies are erased when the radio fails (strong discharge) or disconnecting the battery.
Adjusting the balance and tone of sound
Speaker balance controls. The SW VOL/BAL button adjusts the left/right speaker balance, and the FADER knob adjusts the front/rear speaker balance.
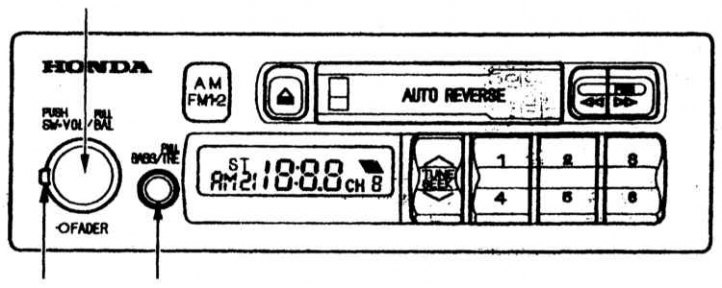
The FADER ring rotary knob is located coaxially with the SW VOL/BAL button. By rotating the FADER knob clockwise or counterclockwise, you can set the desired relative volume of the front and rear speakers. To adjust the left/right speaker balance, first pull the SW VOL/BAL button toward you. The left/right speaker balance is adjusted by rotating the SW VOL/BAL button.
BASS/TRE tone control. Rotate the BASS/TRE knob in one direction or another to adjust the tone of the low frequency range to your taste. To adjust the tone of the high frequency range, pull the BASS/TRE knob toward you and rotate it in the desired direction to achieve the desired tone.
Cassette deck
Turn on the car radio by pressing the SW VOL/BAL button. Turn the audio cassette so that its side with the open section of the magnetic tape is on the right. Then insert the audio cassette into the receiving window of the cassette deck. The audio cassette should enter the receiving window almost completely. After this, the audio cassette is automatically loaded into the working position and the recording begins to play.
Indicators, which are made in the form of arrows and are located on the display of the car radio, show the direction of movement of the magnetic tape and the track being played. When playing a recording on the upper track of the tape (in the position of the audio cassette as you inserted it into the deck) the indicator will light. To change the magnetic track and switch the direction of film movement to the opposite, press both film fast rewind buttons simultaneously.
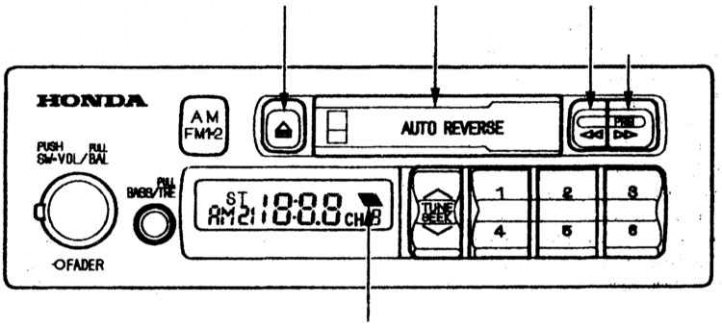
The automatic reverse function allows continuous playback of an audio cassette: when the end of the tape is reached, the cassette deck automatically switches the direction of the tape rewind to reverse.
The recording on the second track of the magnetic tape is played. To remove the audio cassette from the deck, press the button located to the left of the loading window.
Fast film rewind
The two buttons located to the right of the audio cassette loading window are used to activate the fast rewind modes of the magnetic tape forward and backward. The right button activates fast rewind of the tape backward, and the left one – forward. In order to stop fast rewinding of the tape forward or backward, you should briefly press the right or left button, respectively. If the end of the magnetic tape is reached in the fast rewind mode, the direction of the tape movement automatically changes to the opposite direction and playback of the recording is activated.
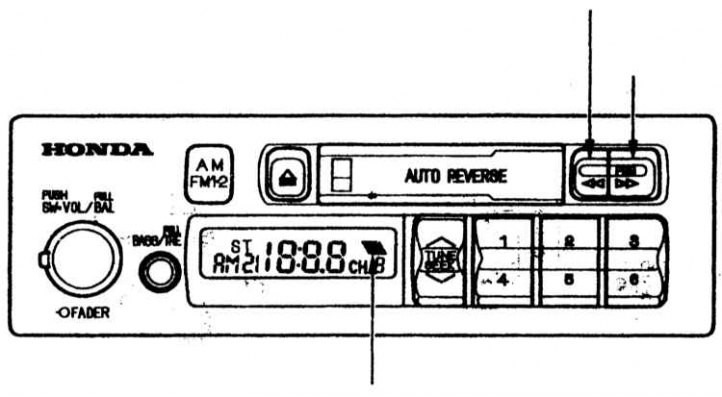
During operation of the car radio, the magnetic head of the cassette deck gradually becomes contaminated with dust deposits and fallen particles of the magnetic layer that fall on it from the film. If the magnetic head is significantly contaminated, the sound quality during playback of recordings deteriorates. To avoid this, it is necessary to periodically, every 30 hours of operation of the cassette deck, clean the magnetic head.
If you do not properly care for your cassette deck and clean the head regularly at the specified intervals, it may turn out that a regular cleaning cassette will not be able to remove the accumulated dirt.
The cassette deck of your car radio is designed to use audio cassettes with a recording time of up to 100 minutes. Using larger-capacity audio cassettes with thin magnetic film may cause the cassette deck to fail or the film to be damaged.
Carefully inspect the audio cassette before inserting it into the deck's slot. If the magnetic tape has partially unwound from the reel, tighten it by rotating the reel hub in the appropriate direction with a pencil or your fingers.
If the paper label on the cassette tape has come off, either glue it back on or remove it completely. Otherwise, the peeling label may cause the tape to get stuck when you try to remove it from the deck.
Do not leave audio cassettes in places where they are exposed to high temperatures or high humidity, such as on the top shelf of the control panel or in the cassette deck itself. If an audio cassette has been extremely hot or cold, do not insert it into the cassette deck until its temperature has returned to normal.
[The article was copied from the website «HONDABOOK»]