HondaBook.ru
Auto companies Volkswagen Auto companies Ford Auto companies Lada Auto companies Skoda Auto companies BMW Auto companies Mazda Auto companies Peugeot
English Русский
Български
Беларускі
Український
Српски
Hrvatski
Română
Polski
Slovenský
Magyar
Bookmark Contacts Sitemap   


Accord Civic Fit / Jazz CR-V HR-V Others Articles
Civic 3 and 4 (1983-1991) Civic 5 and 6 (1991-2000) Civic 6 (1995-2000) Civic 7 (2000-2005) Civic 8 (2005-2011)

Checking the VTEC system (Honda Civic 5)

  • Main
  • Honda Civic
  • 5 (1991-2000)
  • Power unit
  • SOHC engines
  • Checking the VTEC system
0
Contents: VTEC rocker arms ⇊ Inspection using a special tool…⇊
1. Remove the VTEC solenoid valve assembly from the cylinder head, and check the solenoid filter for clogging

If the filter is clogged, replace the engine oil and engine oil filter.
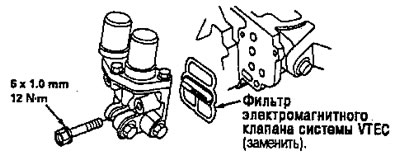
If the filter is clogged, replace the engine oil…


2. If the filter is not clogged, press the VTEC solenoid valve with your finger to check its ability to move.

If the VTEC solenoid is OK, check the engine oil pressure.
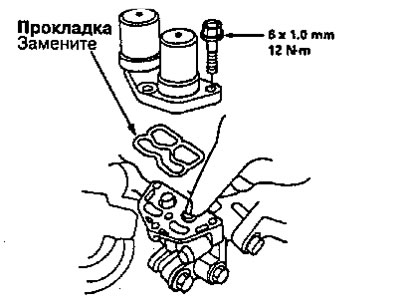
If the VTEC solenoid is OK, check the engine oil…


VTEC rocker arms


External inspection (engines D16Y8, D15Z6, D16Y5, A16I6, D15Z7).

1. Set the piston of the first cylinder to TDC.

2. Remove the cylinder head cover.

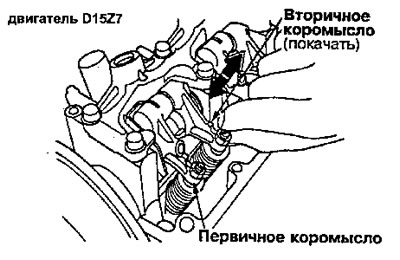
3. Use your hand to press on the middle rocker arm of the intake valve of the first cylinder.

4. Check the independent movement of the intake valve center rocker arm from the primary and secondary rocker arms.
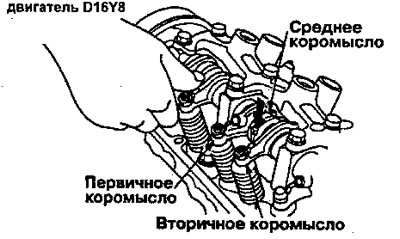
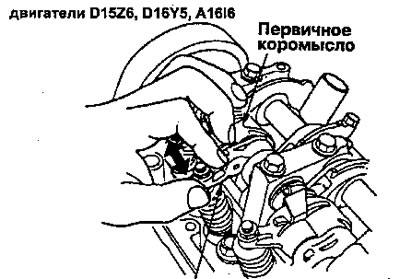

4. Check the independent movement of the intake…


4. Check the independent movement of the intake…


Secondary rocker arm (shake)

Secondary rocker arm (shake)


5. Check the middle rocker arm of the intake valve of each cylinder in the piston position at TDC.

If the intake valve center rocker arm does not move, replace the center, primary and secondary rocker arms as an assembly and check that the pistons in the center and primary rocker arms move smoothly.


Replace the intake valve rocker arms as an assembly if any faults are found.

Inspection using a special tool (engine D16Y8, D15Z6, D16Y5, D16Y6, D15Z7)


Caution: Before using the special tool, make sure the pressure gauge on the air compressor shows a value greater than 400 kPa (4 kgf/cmg). Check the valve clearances before inspecting the operation of the rocker arms.


To protect the timing belt, cover it with a rag.

Check the middle rocker arm of the intake valve in the position of the piston of each cylinder at TDC.

1. Remove the cylinder head cover.

2. Close the discharge hole using a special tool.
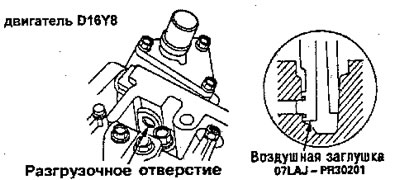
2. Close the discharge hole using a special tool.


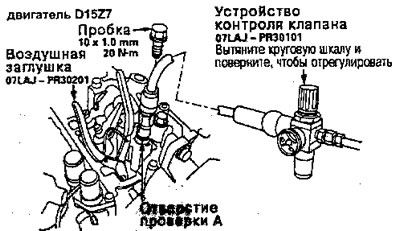
3. Remove the sealing bolt from the inspection hole and attach the special tool to check the valve operation.
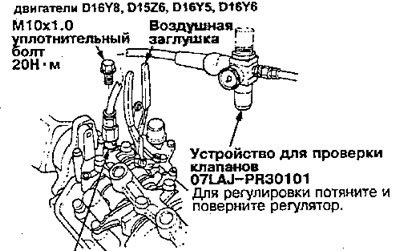
3. Remove the sealing bolt from the inspection…


Inspection hole


Inspection hole


4-1. (engines D16Y8 and D15Z7) Apply nominal pressure to the rocker arm synchronizing piston, then loosen the valve operation tester adjustment valve.
  • Nominal pressure: 250kPa (2.5 kgf/cm²)

4-2. (engines D15Z6, D16Y5, D16Y6) Apply rated pressure to the intake valve rocker arm timing piston, then loosen the valve checker adjustment valve.
  • Nominal pressure: 250 kPa (2.5 kgf/cm²)

5-1. (engine D16Y8) Make sure the primary and secondary rocker arms are mechanically connected by the piston and that the middle rocker arm does not move when pressed.

If the center rocker arms move independently of the primary and secondary rocker arms, replace the rocker arms as a set.
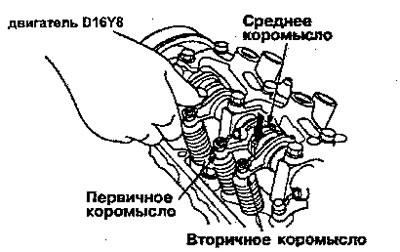
If the center rocker arms move independently of…


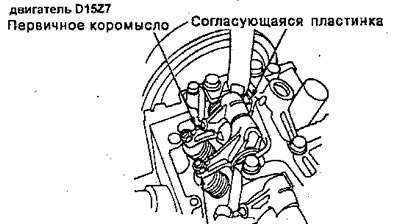
5-2. (engines D15Z6, D16Y5, D16Y6) The supplied nominal air pressure presses on the time adjustment plate; the synchronizing valve operates and connects the secondary rocker arm of the intake valve. Visually check the connection of the synchronizing piston.


Note: The timing piston can be seen in the gap between the secondary and primary rocker arms. When the timing plate engages with notch A on the timing piston, the piston will be locked in the extended position.
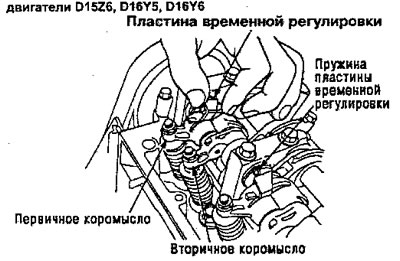

Note: The timing piston can be seen in the gap…

6-1. (engines D15Z6, D16Y5, D16Y6, D15Z7) Stop the air supply and press the timing adjustment plate; the synchronizing piston will return to its initial position with a click. Visually check the disconnection of the synchronizing pistons.

Note: When the timing plate is compressed, it causes the timing piston to disengage, allowing the timing piston to return to its original position under the action of the spring.


Replace the intake valve rocker arms as an assembly if any fault is found.
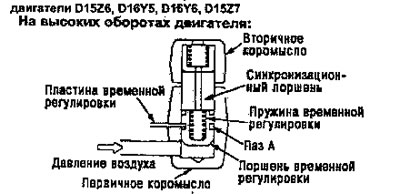
Replace the intake valve rocker arms as an…


7-1. (engines D16Y8, D15Z8, D18Y5, D16Y6) Remove special tools.


7-2. (engine D15Z7) Remove the special tools and tighten the plug.

8. (engine D15Z7) Remove the plug from the B test hole and attach the valve inspection tool.
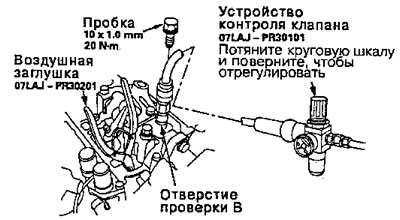
8. (engine D15Z7) Remove the plug from the B test…


9. (engine D15Z7) After loosening the control valve on the valve control device, apply the required air pressure according to technical requirements to the A7B holes of the inlet valve rocker arm synchronizing piston.
  • Air pressure according to technical requirements: 250 kPa (2.5 kgf/cm²)

10. (engine D15Z7) Make sure that the primary and secondary intake rocker arms are mechanically connected by the piston and that the secondary rocker arm does not turn when pressed with your finger.

If the intake valve center rocker arm turns independently of the primary and secondary rocker arms, replace the rocker arms as a set.
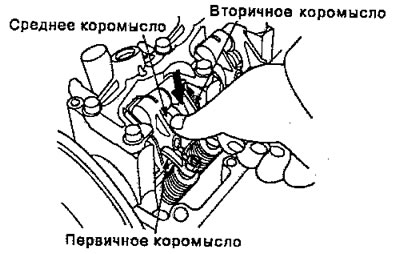
If the intake valve center rocker arm turns…


11. (engine D15Z7) Remove the special tool, then tighten the plug.

12. (engines D16Y8, D15Z7) Using a 10mm rod, push each return device through its full stroke. Replace any return device that does not move smoothly.

13. After inspection, make sure that the malfunction indicator lamp does not light.

[Information obtained from this source: hondabook]
This article is available at: russian, bulgarian, belarusian, ukrainian, serbian, croatian, romanian, polish, slovak, hungarian
This information has been verified: Mikhail Kopasov
Share with friends:
◀ Previous
Civic 5 and 6: SOHC engines
Next ▶

 
Adjusting valve clearance
Crankshaft pulley and pulley mounting bolt
Timing Belt — Checking and Adjusting
Toothed timing belt — device
Removal the timing belt
See also other articles from Honda manuals:
VTEC System — General Information and Component Health Check Honda Accord 6 (1997-2002)
VTEC System Valve (L15A) Honda Fit 1 (2001-2008)
Cooling system — checking and replacing fluid Honda CR-V 1 (1995-2001, petrol)
Checking the charging system with a test lamp Honda HR-V 1 (1998-2006, petrol)
Checking the VTEC solenoid valve Honda Avancier 1 (1999-2003, petrol)
Link in different formats to this article
Comments and feedback from visitors
No comments yet


How much will 26 + 16 ?


Civic 8 (2005-2011) 
  • General information
  • Technical data
  • Governing bodies
  • Driving and maintenance
  • Power unit
  • Gasoline engines (L13A)
  • Gasoline engines (R18A)
  • Diesel engines (N22A)
  • Cooling and lubrication (L13A)
  • Cooling and lubrication (R18A)
  • Cooling and lubrication (N22A)
  • Injection system (gasoline)
  • Injection system (diesel)
  • Toxicity reduction system
  • Troubleshooting
  • Transmission
  • Clutch and drive shafts
  • Mechanical gearbox
  • Chassis and running gear
  • Suspension and wheels
  • Steering
  • Brake system
  • Body and interior
  • Exterior (external elements)
  • Doors, locks and windows
  • Electrical equipment
  • Equipment and devices
  • Headlights and lighting
  • Power devices
  • Electrical circuits
Civic 7 (2000-2005) 
  • General information
  • User manual
  • Maintenance
  • Power unit
  • Engines D15B and D17A
  • K20A Engines
  • Overhaul engine
  • Cooling system
  • Lubrication system
  • Fuel injection system
  • Toxicity reduction system
  • Engine electrical equipment
  • Transmission
  • Clutch
  • Manual gearbox
  • Automatic gearbox
  • Variator (CVT)
  • Drive shafts
  • Chassis and running gear
  • Car suspension
  • Steering
  • Brake system
  • Body and interior
  • Exterior (external elements)
  • Interior (internal elements)
  • Doors, locks and windows
  • Heater and air conditioner
  • Manual air conditioner
  • Automatic air conditioner
  • Security system
  • Electrical equipment
  • Equipment and devices
  • Headlights and lighting
  • Windscreen wipers
  • Audio system
  • Electrical diagrams
Civic 6 (1995-2000) 
  • General information
  • Introduction to guide
  • User manual
  • Maintenance
  • Power unit
  • Engine in car (Civic)
  • Engine in car (Integra)
  • Engine overhaul
  • Cooling and heating
  • Power and exhaust systems
  • Engine electrical equipment
  • Engine management systems
  • Transmission
  • Manual gearbox
  • Automatic transmission (AT/CVT)
  • Clutch and drive shafts
  • Chassis and running gear
  • Brake system
  • Car suspension
  • Steering
  • Body and interior
  • Exterior (external elements)
  • Interior (internal elements)
  • Doors, locks and windows
  • Electrical equipment
  • Equipment and devices
  • Electrical circuits
Civic 5 and 6 (1991-2000) 
  • Power unit
  • SOHC engines
  • DOHC engines
  • Engine overhaul
  • Cooling and lubrication system
  • Intake and exhaust system
  • Fuel injection system (SOHC)
  • Fuel injection system (DOHC)
  • Carburetor
  • Transmission
  • Clutch
  • Manual gearbox S4C
  • Manual gearbox S40
  • Automatic gearbox
  • Drive shafts
  • Chassis and running gear
  • Car suspension
  • Steering
  • Brake system
  • Body and interior
  • Body elements
  • Heater and air conditioner
  • Electrical equipment
  • Power devices
  • Equipment and instruments
  • Electrical circuits
Civic 3 and 4 (1983-1991) 
  • General information
  • Maintenance
  • Power unit
  • Engine in a car
  • Engine overhaul
  • Cooling system
  • Power and exhaust system
  • Engine electrical equipment
  • Emission control system
  • Transmission
  • Mechanical gearbox
  • Automatic gearbox
  • Clutch and drive shafts
  • Four-wheel drive
  • Chassis and running gear
  • Brake system
  • Car suspension
  • Steering
  • Body and interior
  • Body elements
  • Electrical equipment
  • Equipment and devices
  • Electrical circuits
HondaBook.ru © 2018–2026 • Mobile version • Sitemap: EN BG BY UA RS HR RO PL SK HU • Feedback • Driver Information • Search system • Bookmark
Accord 3 (1985-1989) • Accord 6 (1997-2002) • Civic 3 and 4 (1983-1991) • Civic 5 and 6 (1991-2000) • Civic 6 (1995-2000) • Civic 7 (2000-2005) • Civic 8 (2005-2011) • Fit 1 (2001-2008) • CR-V 1 (1995-2001) • CR-V 2 (2002-2006) • HR-V 1 (1998-2006) • Avancier 1 (1999-2003) •
 
This website uses cookies to ensure proper functioning. By clicking "OK," you agree.