Removal/Installation
Attention:
- Be careful not to bend or damage the brake lines when removing the master cylinder.
- Do not allow brake fluid to come into contact with the vehicle; This may damage the paint, if brake fluid gets on the paint, wash off immediately with water.
- To prevent liquid from entering, cover the hose connections with a rag or paper towel.
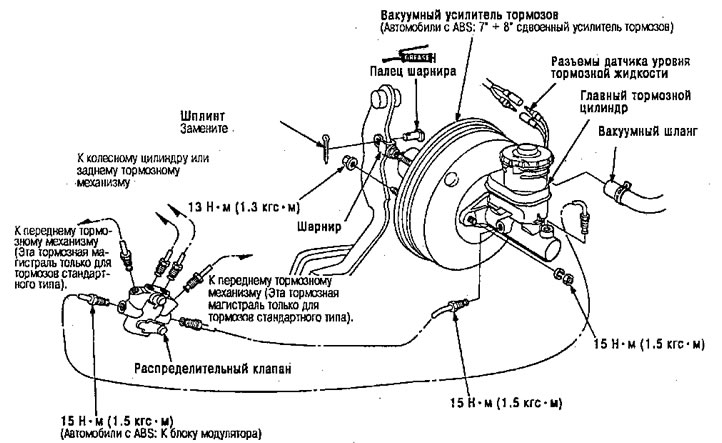
Note: LHD type shown, RHD type symmetrical.
1. Disconnect the fluid level sensor connectors.
2. Remove the filler cap from the brake master cylinder.
3. Brake fluid can be pumped out through the top of the master cylinder filler reservoir using a syringe.
4. Disconnect the brake lines from the master cylinder.
5. Remove the washers and nuts securing the brake cylinder.
6. Remove the brake master cylinder from the brake booster.
7. Disconnect the vacuum hose from the brake booster vacuum.
8. Remove the cotter pin and hinge pin from the hinge.
Caution: Do not disconnect the joint when removing it from the brake booster pushrod. If the pin is loose, adjust the pushrod length before installing the brake booster.
9. Remove the four amplifier mounting nuts.
10. Pull the amplifier forward as far as possible. until the hinge appears from behind the partition.
11. Remove the amplifier from the engine compartment.
12. Install the booster and brake master cylinder in the reverse order of removal.
Attention:
- When connecting the brake lines, make sure that there is no displacement between the brake line and other parts.
- Be careful not to bend or damage the brake lines when installing the master cylinder.
Note: If replacing the master cylinder or brake booster, check and adjust the pushrod clearance before installing the master cylinder.
13. Fill the master cylinder filler barrel and bleed the brake system.
14. After installation, check the height and play of the brake pedal and adjust if necessary.