
Note: if your distributor looks like the one shown in fig. 8.7a is the TOYO DENSO distributor. Otherwise, HITACHI firms.
1. Remove the distributor cap (see chapter 1).
2. Remove the breaker wires (see fig. 8.2).
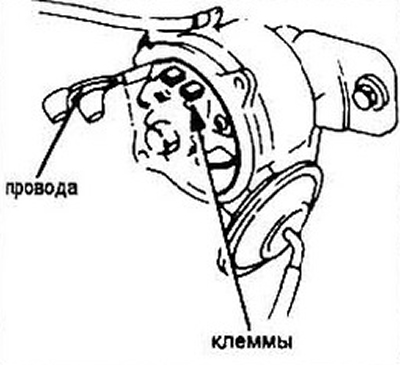
3. Turn the ignition key to the second position Measure the voltage between "weight" and blue wire, then between black and yellow wire and "weight". The voltage must be equal to the battery voltage. If the voltage equality is not observed, there is damage somewhere in the system.
4. Without connecting the wires, check the current flow in both directions at the two terminals of the breaker using an ohmmeter. Passability should be only in one direction. If there is no continuity or there is continuity in both directions, replace the breaker, see below.
5. Remove the two screws securing the breaker to the distributor and remove it.
6. Install in reverse order.
Models from 1984 to 1987 - distributor TOYO DENSO
7. Remove the breaker cover and remove the breaker assembly from the distributor.
8. Turn the ignition key to the second position. Check the voltage between "weight" and terminals blue 1 and black-yellow. In both cases, the battery voltage should be.
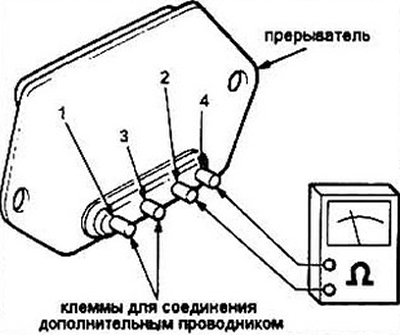
9. Short with an additional conductor terminals blue 2 and green (see fig. 8.8). Use an ohmmeter to check between black and yellow and blue (1) terminals. Passability should be only in one direction.
10. Replace the defective breaker.
Models since 1988
11. With self-diagnosis (see chapter 6) check for faults in the ignition system. On models 1988. 1989 the breaker is checked by diagnostic wires of the electronic control module (EMU), therefore, diagnostics can only be carried out at a service station. Since 1990 diagnostics have been carried out directly at the distributor.
12. Check the presence and suitability of the 50 amp fuse in slot 32 of the fuse box.
13. Tag and disconnect the connectors from the breaker.
14. Turn the ignition key to the second position and measure the voltage between the black and yellow wire and "weight". It must be equal to the battery voltage. If there is no voltage equality, then somewhere between the ignition switch and the black and yellow wire there is a break.
15. With the ignition on, check the voltage between the white-blue wire and "weight". If this voltage is not equal to the battery voltage, check the circuit from the breaker to the lock and the ignition coil.
16. Using an ohmmeter, check the current flow between the white wire and "weight". If there is no patency, there is a break between the breaker and the EMU.
17. Check the continuity of current between blue and "weight", in the absence of patency, there is a break between the breaker! tachometer and automatic transmission control unit.
18. If all of the above tests give a positive result, but the engine does not start, replace the breaker.