
Attention. Install the jack and stands only in the places designated for this purpose.
1. Remove the bottom panel of the front console.
2. Set the selector lever to position R and unscrew the control cable end nut.
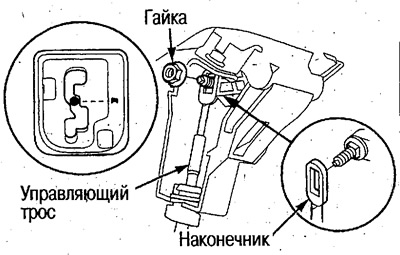
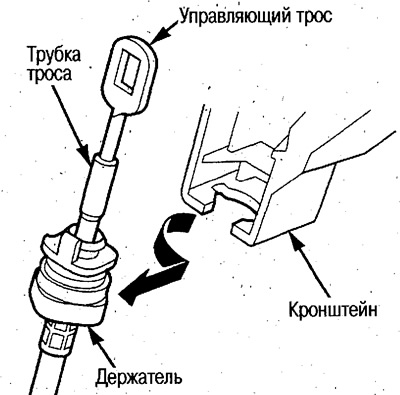
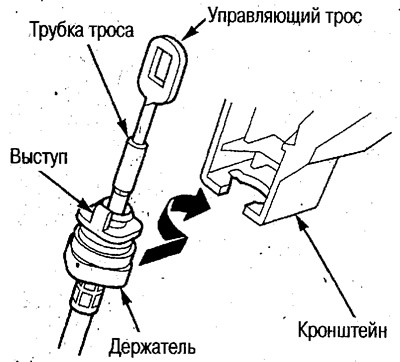
3. Turn the holder 90°counterclockwise, remove the cable from the bracket and disconnect it from the selector lever assembly.
4. Remove floor insulation.
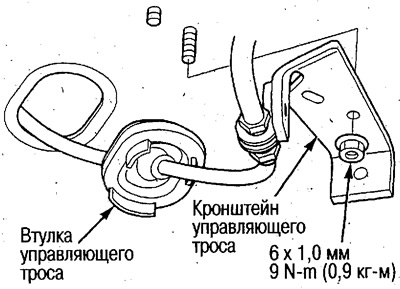
5. Remove the bracket and control cable bushing.
6. Remove the control cable.
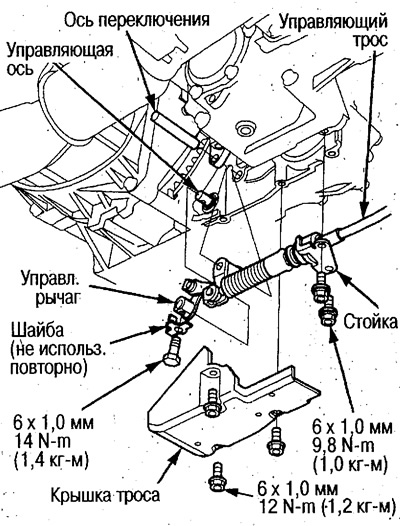
2WD Models:
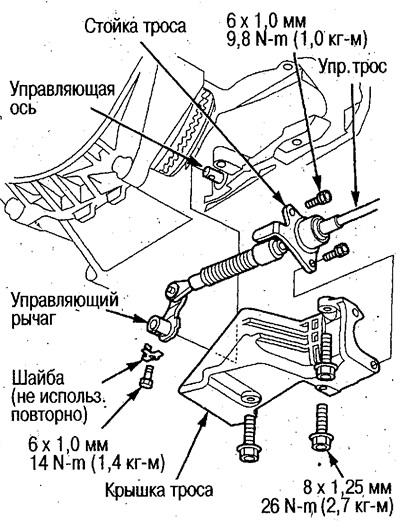
(1) Loosen the rack bolts and remove the cable cover.
(2) Remove the control lever from the shaft, remove the cable.
4WD Models:
(1) Remove the cable cover and unscrew the rack bolts.
(2) Remove the shift shaft, remove the lever from the steering shaft, then remove the cable.
7. Replace cable. Guide the cable with the tip into the passenger compartment. Align the bushing with the hole and install it.
Do not bend the cable too much during installation.
8. Install the control cable bracket.
9. Install the lever on the steering axle.
2WD Models:
(1) Install the lever on the axle.
(2) Install the cable cover, then install the stand.
After installing the cover, fasten the stand firmly to protect the cable and arm attachment point.
4WD Models:
(1) Install the lever on the control shaft and install the shift shaft.
(2) Install the stand, then the cable cover.
10. Install floor insulation.
11. Rotate the holder 90°counterclockwise, insert into the bracket, rotate 90°clockwise and secure the holder.
Install the cable by holding the holder, not the tube.
Before turning the cable clockwise, the protrusion of the holder must be located on the opposite side from the bracket. After installation, the protrusion should point towards the front of the vehicle.
12. Turn the ignition key to the ON position (II) and make sure that the R indicator lights up and the automatic transmission is also in the R position.
If the automatic transmission is not in position R, press the control cable all the way down, then pull it up one position and release.

13. Turn the ignition key to the OFF position.
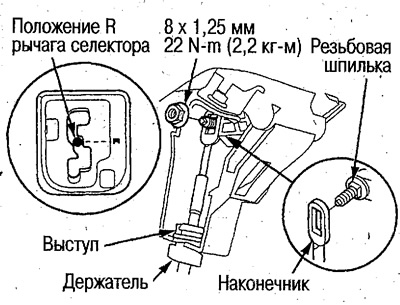
14. Set the selector lever to position R.
15. Secure the selector lever in position R with a 6 mm dowel pin through the holes.

16. Push the end of the cable with a square hole onto the appropriate section of the threaded stud, secure the cable and tighten the nut.
17. Remove the dowel pin.
18. Move the selector lever to all positions and make sure that the indication is correct.
19. Start the engine and re-move the selector lever to all positions and make sure that the control cable is adjusted correctly.
20. Using the ignition key, press the shift lock mechanism and check that the lock is released. Also check that the lock is activated when the key is removed.
21. Install the bottom panel of the front console.