
HondaBook.ru
Auto companies Volkswagen Auto companies Ford Auto companies Lada Auto companies Skoda Auto companies BMW Auto companies Mazda Auto companies Peugeot
English Русский
Български
Беларускі
Український
Српски
Hrvatski
Română
Polski
Slovenský
Magyar
Bookmark Contacts Sitemap   


Accord Civic Fit / Jazz CR-V HR-V Others Articles
Accord 3 (1985-1989) Accord 6 (1997-2002)

Replacement of ignition system parts (Honda Accord 3)

  • Main
  • Honda Accord
  • 3 (1985-1989)
  • Power unit
  • Engine adjustment
  • Replacement of ignition system parts
0
Contents: Replacing the distributor cap and…⇊ Reluctance ⇊ Master winding ⇊ Breaker module ⇊

Replacing the distributor cap and rotor


The distributor cap is secured to the housing with screws. With the ignition off, loosen or remove the screws and remove the cap. Inspect the inside of the cap for cracks (breakages), signs of burning, or wear on the wire terminals. Replace the cap if there is any sign of anything abnormal. Minor wear on the terminals can be considered normal.

Remove the ignition unit rotor by lifting it straight off the shaft. 1989-91 Prelude vehicles with fuel injection use a screw to hold the rotor on the shaft; loosen or remove the screw before removing the rotor. Inspect the rotor for any signs of wear; it is not recommended to align or grind the rotor except in emergency circumstances.

Before installation, align the rotor and shaft; both have flat sides - to ensure correct placement. Press the rotor onto the shaft. Install and tighten the screw if it was removed. Carefully install the distributor insulation or seal and cover; tighten the screws slightly.

Reluctance


1. Disconnect the negative battery terminal.

2. Remove the distributor cap and rotor.

3. Use two small flat tools to gently and evenly remove the magnetic resistance from the shaft. Cover the distributor housing with a rag or cloth. Take care not to damage the stator or other components.
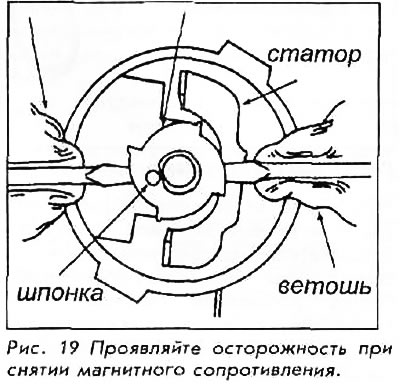
3. Use two small flat tools to gently and evenly…


4. Position the magnetic resistance with the serial number facing up. Install it by pushing it firmly into the distributor shaft.


5. Install the round key with its slot facing away from the distributor shaft.

Master winding


1. Remove the distributor cap, rotor and magnetic resistance.

2. Disconnect the electrical connector from the coil.

3. Remove the screw holding the winding; remove the assembly.

4. Install in reverse order. Adjust the air gap if necessary.

Breaker module
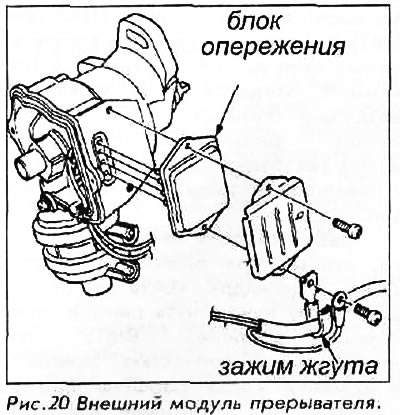


Breaker module


The externally mounted breaker module is removed directly. All work is performed with the ignition off. Removal of the Toyo Denso breaker module mounted on the side of the distributor requires the removal of two bolts and harness clamps. The breaker module is attached directly to the distributor. Before installation, lubricate the contacts of the module with silicone grease.
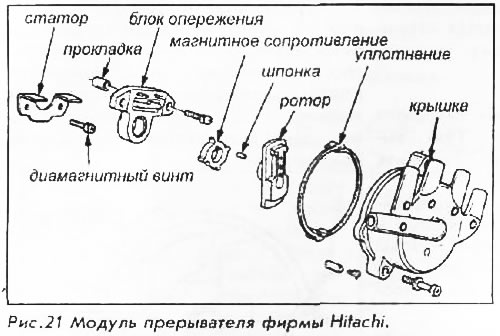
The externally mounted breaker module is removed…


An internally mounted breaker module, as is done for example in Hitachi distributors, requires the removal of the distributor cap, rotor and magnetic resistance. The module can be removed after removing the retaining screws. Note the position of the retaining screws (but it is better to mark them!); they are made of diamagnetic material and must be installed in their original (starting) position.

(Full text available on the portal: HONDABOOK)
This article is available at: russian, bulgarian, belarusian, ukrainian, serbian, croatian, romanian, polish, slovak, hungarian
This information has been verified: Yaroslav Shiryaev
Share with friends:
◀ Previous
Accord 3: Engine adjustment
Next ▶

Ignition Coil Test
Checking the spark
Checking the breaker module input
Checking the breaker module
Checking and adjusting the magnetic resistance gap
Ignition timing — checking and adjustment
Valve clearance — adjustment
Adjusting the air-fuel mixture
Idle speed control
Spark plug diagnostics
See also other articles from Honda manuals:
Ignition system — general information Honda Civic 3 and 4 (1983-1991)
Key-in-ignition and light-on warning system Honda Fit 1 (2001-2008)
Distributor Ignition System — General Information Honda CR-V 1 (1995-2001, petrol)
Ignition system — basic information Honda HR-V 1 (1998-2006, petrol)
Ignition System — Component Locations Honda Avancier 1 (1999-2003, petrol)
Link in different formats to this article
Comments and feedback from visitors
No comments yet


How much will 29 + 19 ?


Accord 6 (1997-2002) 
  • General information
  • Introduction to the guide
  • User manual
  • Maintenance
  • Power unit
  • Four-cylinder engines
  • Six-cylinder engines
  • Engine overhaul
  • Cooling system
  • Heater and air conditioner
  • Power and exhaust systems
  • Engine electrical equipment
  • Engine management
  • Transmission
  • Mechanical gearbox
  • Automatic gearbox
  • Clutch and drive shafts
  • Chassis and running gear
  • Brake system
  • Car suspension
  • Steering
  • Body and interior
  • Exterior (external elements)
  • Interior (internal elements)
  • Electrical equipment
  • Equipment and devices
  • Electrical circuits
Accord 3 (1985-1989) 
  • General information
  • Maintenance
  • Power unit
  • Engine adjustment
  • Engine repair
  • Engine electrics
  • Emission management
  • Engine management (carburetor)
  • Electronic injection
  • Programmable injection
  • Schematic of emission system
  • Fuel system
  • Feedback management
  • Transmission
  • Manual gearbox
  • Automatic gearbox
  • Clutch
  • Chassis and running gear
  • Front suspension
  • Rear suspension
  • Steering
  • Brake system
  • Electrical equipment
  • Ventilation and heating
  • Air conditioner
  • Cruise control system
  • Equipment and devices
HondaBook.ru © 2018–2026 • Mobile version • Sitemap: EN BG BY UA RS HR RO PL SK HU • Feedback • Driver Information • Search system • Bookmark
Accord 3 (1985-1989) • Accord 6 (1997-2002) • Civic 3 and 4 (1983-1991) • Civic 5 and 6 (1991-2000) • Civic 6 (1995-2000) • Civic 7 (2000-2005) • Civic 8 (2005-2011) • Fit 1 (2001-2008) • CR-V 1 (1995-2001) • CR-V 2 (2002-2006) • HR-V 1 (1998-2006) • Avancier 1 (1999-2003) •
 
This website uses cookies to ensure proper functioning. By clicking "OK," you agree.